



Estimated reading time: 15–20 minutes
While working with Acumatica Report Designer, there are several small things that can save significant time during development and troubleshooting. I thought of sharing some practical tips that might be helpful to other Acumatica developers and consultants.
I've compiled some practical tips and lessons learned that may help Acumatica developers, consultants, and report designers save time when building and troubleshooting reports.
1. Passing Parameters to a Subreport
When passing parameters from a main report to a subreport, make sure you verify the parameter mapping carefully.
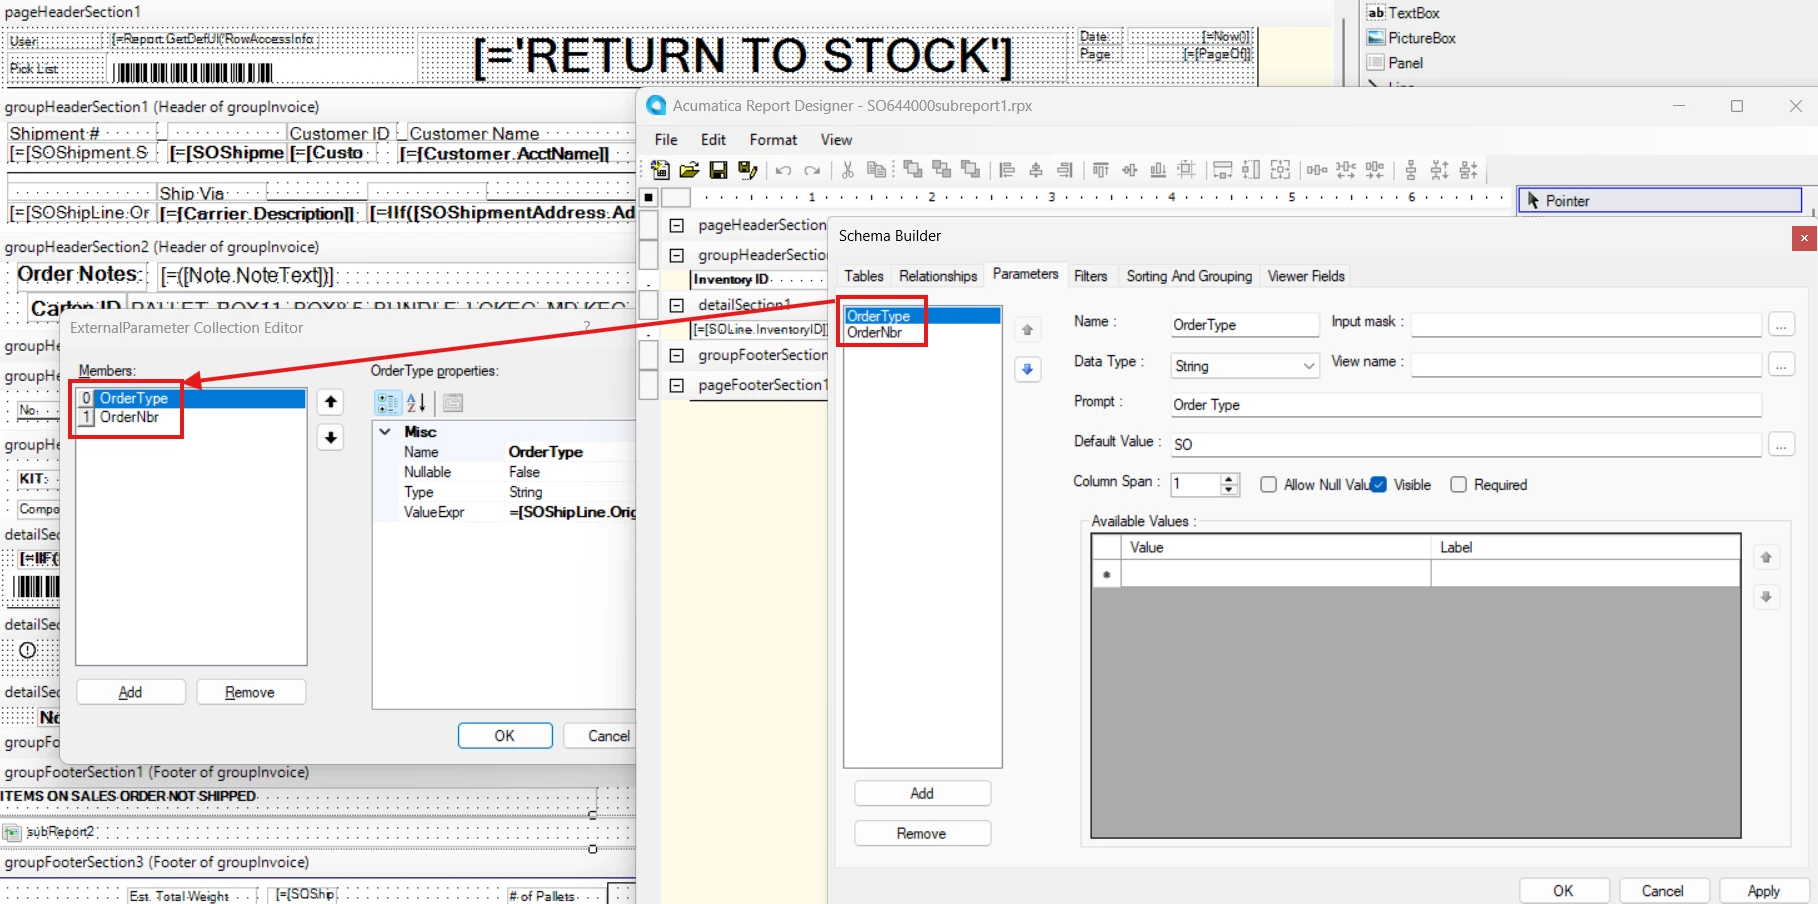
Example: A Sales Order report passes the Order Type and Order Number to a subreport that displays additional order information.
Things to verify:
-
Define the required parameters in the subreport's schema.
-
Ensure the parameter names match the names expected by the subreport.
-
Make sure the parameter data types are compatible.
-
In the main report, configure the subreport control's Collection Parameters to pass the appropriate fields or expressions.
-
Verify the mapping order if your configuration relies on positional parameter mapping.
-
Test the subreport independently before embedding it in the main report.
Tip: A subreport that works independently but returns unexpected results when called from the main report often has a parameter mapping issue.
2. Reading a Variable Value from a Subreport into the Main Report
Passing parameters from a main report to a subreport is different from returning a calculated value from a subreport to the main report.
Example: A subreport calculates a total row count, and the main report needs to display that row count in its summary section.
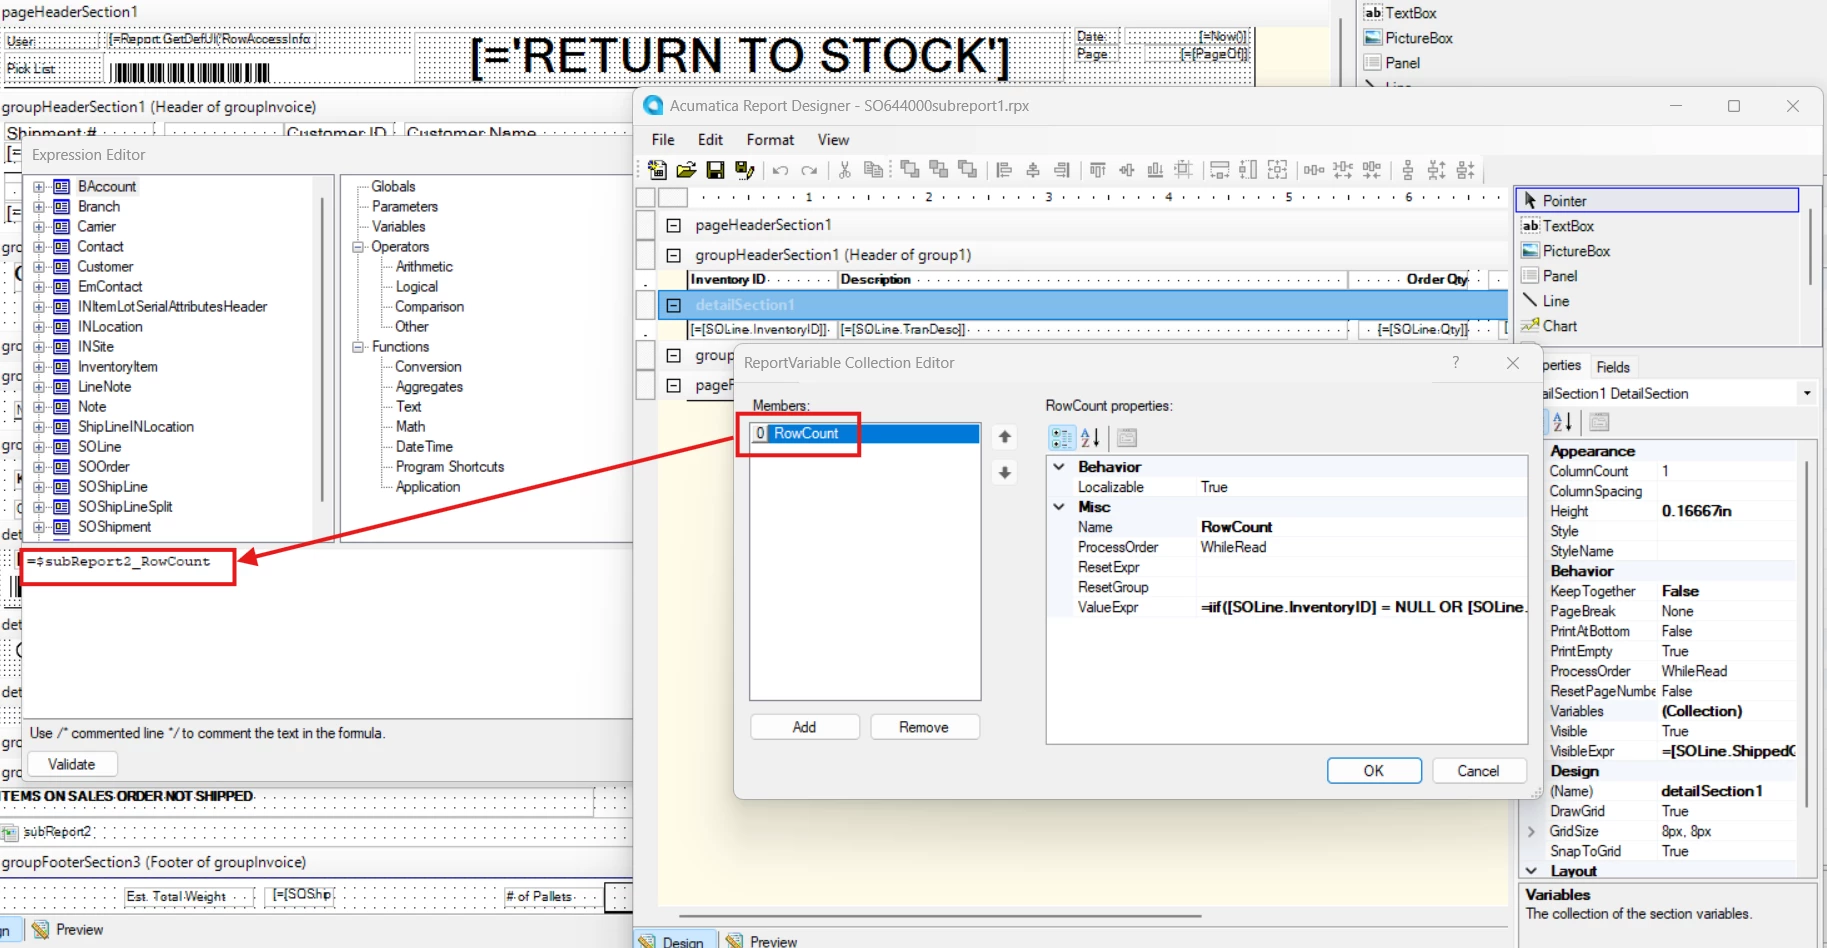
If the variable in the subreport is named $RowCount and the subreport control is named subReport2, you can reference the subreport variable in the main report using:
$subReport2_RowCount
The reference must match the actual subreport control name and variable name.
Things to verify:
-
Define and calculate the variable in the subreport.
-
Reference the variable using the correct subreport control name and variable name.
-
Make sure the subreport has executed before the parent report attempts to use the calculated value.
-
Test with multiple records to check whether the value is recalculated as expected.
-
Confirm that the subreport's layout and execution do not cause the value to be unavailable when needed.
Tip: Before implementing a workaround, determine whether the calculation can be performed directly in the main report or through the report's data source.
3. Control Page Breaks and Subreport Placement
Page breaks can be tricky when a report contains terms and conditions, lengthy detail sections, or embedded subreports.
Example: A Sales Quote or Project Quote should print its terms and conditions on a separate final page.
First, clarify the requirement:
-
Should the terms and conditions always start on page 2?
-
Or should they start on a new page after all quote details, regardless of how many pages the details occupy?
These are different requirements.
A dedicated terms-and-conditions subreport can be placed in an appropriate parent report section, with the section's page-break settings configured accordingly.
Things to check:
-
The section containing the subreport.
-
The
PageBreakproperty and its placement. -
The height of the subreport control and the surrounding section.
-
The behavior of the parent report when the detail section spans multiple pages.
-
The final PDF output, not just the standalone subreport preview.
Tip: Test with both a short quote and a quote containing enough detail lines to span several pages.
4. Test Subreports
A subreport may work perfectly when tested with one document but behave differently when the main report processes multiple documents or groups.
For example, a report may list several Sales Orders, each with its own subreport containing additional information.
Check the following:
-
Each parent record passes the correct parameter values.
-
Variables are recalculated for the appropriate record.
-
A subreport that returns no records does not cause unexpected output.
-
Repeated subreport execution does not duplicate totals.
-
The subreport control is correctly positioned within the parent report.
-
The subreport's dimensions and margins are appropriate for the parent report layout.
Tip: Test one record, multiple records, empty results, and multiple groups before considering the report complete.
5. What to Check When the Run Report Button Does Not Appear
If you cannot find the Run Report button, check the following:
Things to investigate:
-
Confirm that the report is registered and accessible through the Site Map.
-
Check the screen configuration and how the report is launched.
-
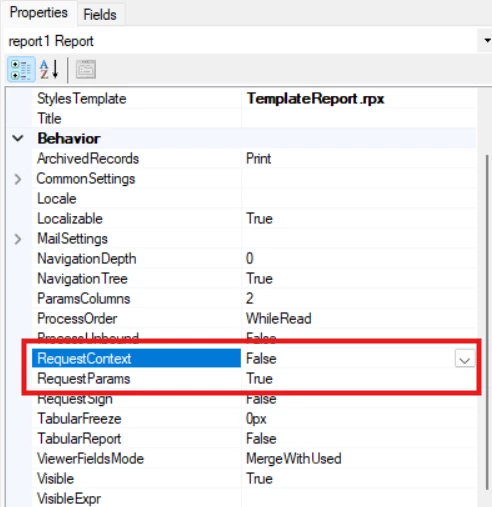
In configurations where the report needs to be launched with request parameters, verify whether
RequestContext = FalseandRequestParams = Trueare appropriate for the intended behavior. These settings should not be changed blindly because their effect depends on how the report is launched. -
Verify the user's access rights.
-
Compare the behavior with a standard report that works correctly.
-
Check the report properties, including
RequestContextandRequestParams, where relevant to the launch scenario.
Tip: Identify whether the issue affects only one report or multiple reports. This helps narrow down whether the problem is specific to the report configuration or related to the environment and permissions.
6. What to Check When the Edit Report Button Does Not Appear
The Edit Report option is useful when customizing an existing report, but it may not be available to every user or in every context.
Check the following:
-
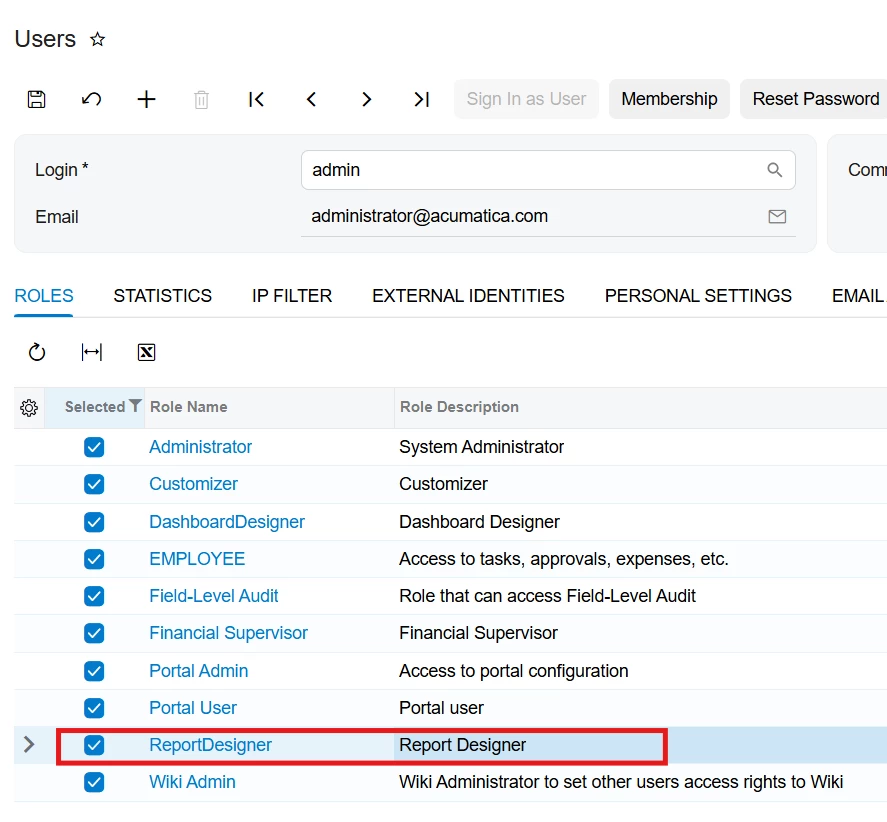
Make sure the user has the ReportDesigner role assigned.
-
Confirm that Report Designer is installed and available on the workstation.
-
Open the report from the appropriate Acumatica screen.
-
Verify the report's registration and customization configuration.
-
Confirm that you are working in the intended tenant and environment.
Tip: If the Edit Report button is missing, do not assume the report definition is missing. Check the user's role and the way the report is opened first.
7. Always Save Changes as a New Report Version
One of the most important habits when customizing reports is preserving the original report and maintaining a clear version history.
Recommended workflow:
-
Open the report in Report Designer.
-
Make your changes in a development or test environment.
-
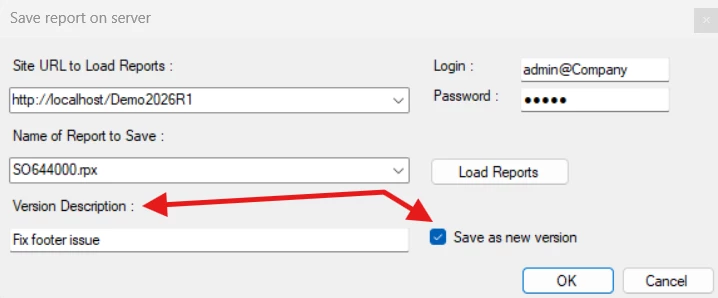
Select File → Save to Server.
-
Provide a meaningful version description.
-
Select the Save as new version checkbox.
-
Confirm that the new version is available and active when appropriate.
-
Test the report through the normal Acumatica screen before deploying it.
Also keep a local copy of the report definition (in .rpx format) so that you can restore or compare it if necessary.
Tip: Never make untracked changes directly in production. A backup of the original report can save considerable time when a customization causes unexpected output.
8. Follow a Consistent Deployment and Troubleshooting Process
Before deploying a modified report to production:
-
Preserve the original report definition.
-
Test representative documents and parameter combinations.
-
Validate totals, grouping, page breaks, and subreports.
-
Include the report in your customization deployment and source-control process, where applicable.
-
Verify that the intended report version is active in the target environment.
-
Document dependencies on subreports, custom fields, DACs, SQL views, and other customizations.
If the report works in development but not in production, compare the report version, tenant, report ID, data, permissions, and deployment state.
Tip: When a report works in a development environment but not in production, compare the deployed report definition, data, access rights, and customization state before assuming it is a Report Designer defect.
9. Validate the Report's Data Source Before Formatting
If a report displays incorrect totals or missing records, start by checking the underlying data rather than immediately changing the layout.
Example: An invoice report shows a total higher than the amount displayed on the invoice screen. Before modifying the total expression, check whether the report's joins are duplicating invoice amounts across multiple detail rows.
-
Review the tables, relationships, joins, and relations used by the report.
-
Check whether joins are unintentionally excluding records or producing duplicates.
-
Validate the selection conditions and parameters.
-
Compare the report's output against the relevant Acumatica inquiry or database records.
-
Check whether the report is using the correct document status or date fields.
Tip: If the data is incorrect in the report's data source, formatting changes will not fix the underlying problem.
10. Be Careful with Grouping and Aggregation
Incorrect grouping is a common reason for reports displaying unexpected totals and records.
-
Group records using the appropriate business keys.
-
Place group totals and report totals in the correct sections.
-
Verify whether a field is being summed more than once because of one-to-many joins.
-
Test subtotals and grand totals against known sample data.
-
Make sure calculated expressions use the intended scope.
Tip: If a report total is higher than expected, check for duplicate detail rows before changing the aggregation formula.
11. Use Expressions Carefully
Report Designer expressions can become difficult to maintain when they are overly complex.
Example: When calculating unit price from an amount and quantity, verify that the calculation handles zero quantities appropriately.
-
Keep expressions readable and use intermediate calculated fields when appropriate.
-
Check for null or empty values before performing calculations.
-
Verify date calculations, numeric conversions, and string comparisons.
-
Test expressions with boundary cases, such as zero quantities, missing values, and negative amounts.
-
Confirm that the expression uses the correct field and data type.
Tip: Test complex expressions with a small, predictable dataset before applying them to the complete report.
12. Understand Report Section Processing
Report sections, grouping, and visibility conditions can affect what gets printed.
-
Check the section in which a field or expression is placed.
-
Review visibility conditions for detail, group header, and footer sections. Review
VisibleExprconditions. -
Verify that page headers and footers behave correctly across multiple pages.
-
Test reports with one record, multiple records, and multiple groups.
-
Check whether a blank section is caused by a visibility condition or by missing data.
Tip: When a value appears on the first page but not on subsequent pages, review the section placement and report pagination settings.
13. Check Page Layout and Printing
A report that looks correct in preview may not print as expected.
Verify:
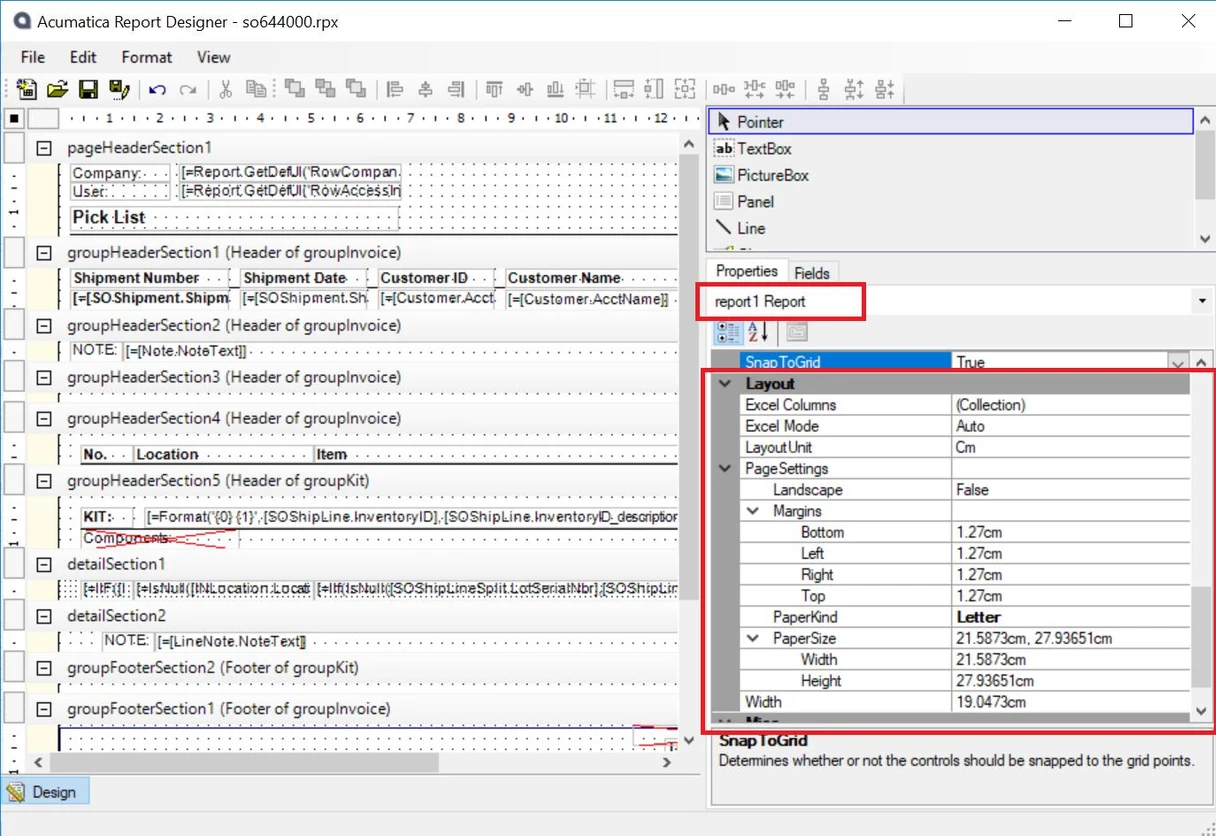
-
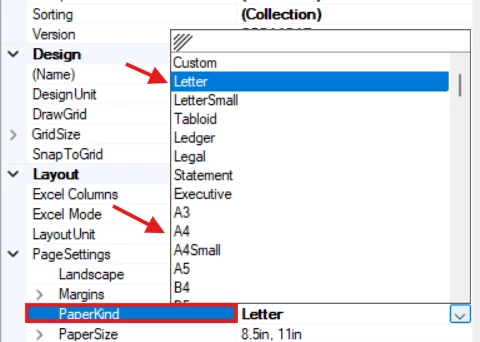
Set the correct paper size and orientation.
-
Check margins, column widths, and page-break settings.
-
Verify that long descriptions and memo fields do not overlap other fields.
-
Test headers and footers on subsequent pages.
-
Preview reports with realistic data volumes and longer field values.
Tip: Test the final report using both the preview and the actual output format required by the customer.
14. Compare the Designer Preview with the Final Output
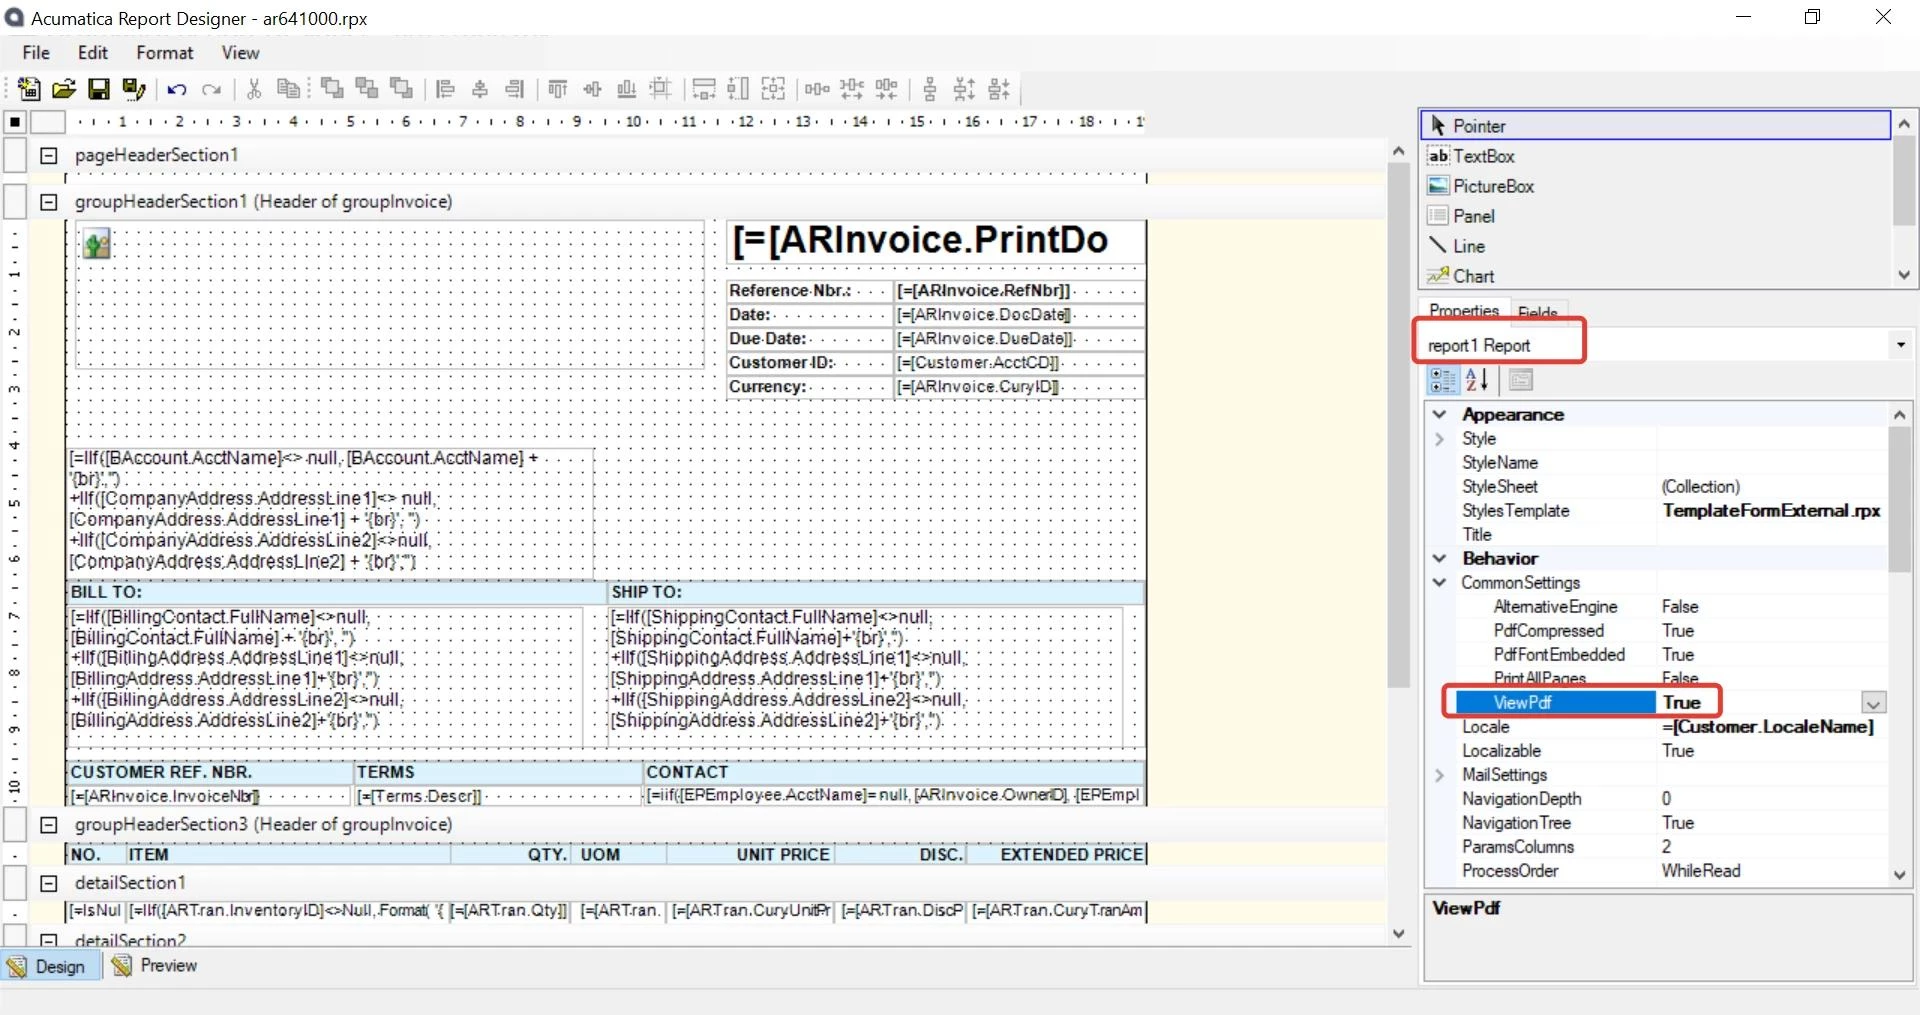
Always test the output format that the customer will actually use.
For example, a report may look correct in PDF but export poorly to Excel, or a label may look correct in PDF preview but print with unexpected margins on a thermal printer.
Test the following:
-
PDF output.
-
Excel output, when applicable.
-
Actual printing through the customer's normal printing workflow.
-
Multiple-page reports and documents with long descriptions.
-
Reports containing subreports, images, or barcodes.
Tip: When troubleshooting, isolate whether the problem occurs in the report layout, the generated output, or the printing process.
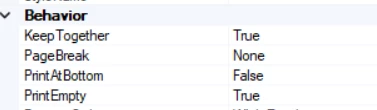
15. Understand PageBreak, KeepTogether, PrintAtBottom, and PrintEmpty
These properties can help control how report sections are printed.
-
PageBreak: Controls page breaks before or after a section, depending on the selected setting.
-
KeepTogether: Helps keep a section or group together rather than allowing it to split across pages. It can also create large blank areas when a section does not fit in the remaining page space.
-
PrintAtBottom: Positions a section at the bottom of the page when the report's layout and processing allow it.
-
PrintEmpty: Controls whether an otherwise empty section or group is printed, depending on the report configuration.
Tip: If a report has unexpected blank space, investigate KeepTogether, section heights, and page-break settings before reducing font sizes or changing margins.
A useful troubleshooting technique is to temporarily apply different background colors to report sections. This can help identify which section is creating unexpected spacing.
16. Working with PictureBox control
The PictureBox control is useful for logos, images, and other visual elements in reports.
Properties worth understanding include:
- Scale property (AutoSize, Center, Normal, Fit, & Scale)
- Source (External, Embedded, Barcode, & Database)
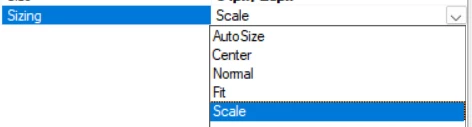
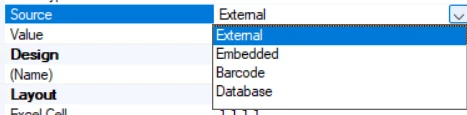
The available options and their behavior depend on the control configuration and report requirements.
Tip: For logos and embedded images, test the image in the actual output format. If an image is missing from a PDF or HTML preview, check the source, image name, and sizing configuration.
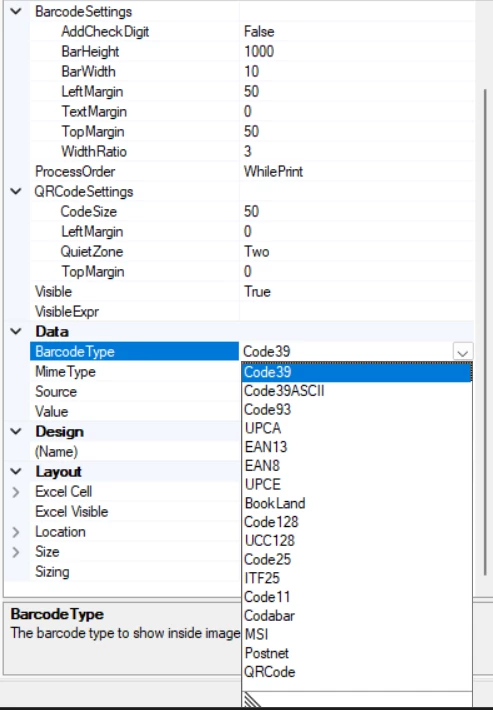
17. Printing Barcode
Barcode printing requires attention to both report configuration and the target output device.
Example: For inventory labels, test a representative Inventory ID and confirm that the printed barcode scans correctly.
Before deploying a barcode report:
-
Confirm that the barcode control is configured with the correct source value.
-
Verify the barcode type and expected data.
-
Ensure the barcode is large enough for the intended use.
-
Test the generated output with the actual printer.
-
Scan a printed sample to verify that the barcode is readable.
Tip: A barcode that looks correct on screen is not necessarily readable after printing. Validate it using the customer's printer and scanner.
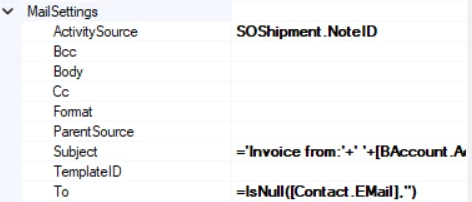
18. Configure MailSettings and Email Notifications
When a report is used with email notifications, verify the email configuration as well as the report layout.
-
Check the report's
MailSettingsconfiguration. -
Verify whether the appropriate email template is configured through
TemplateID, where applicable. -
Confirm that the email recipient and subject are correct.
-
Test the generated attachment.
-
Validate the email workflow in a test environment before enabling it for business-critical notifications.
Tip: Troubleshoot report generation and email delivery separately. A report that generates correctly may still encounter an issue in the email configuration or delivery process.
- Use TemplateID
19. Customize AP Check Reports Carefully
AP check reports require additional care because even small layout changes can affect printing and alignment.
Before making changes:
-
Obtain a sample voided check or check stock from the customer, as appropriate.
-
Get the MICR configuration from the customer for the bank they are using
-
Confirm the printer model and paper or check stock dimensions.
-
Adjust margins and field positions to match the physical check.
-
Test multiple checks, not just the first page.
-
Verify the check number, date, payee, amount, and remittance details.
Tip: Always validate alignment using the customer's actual printing workflow. A PDF preview alone is not sufficient to confirm that a check will print correctly.
20. Adjusting Excel Columns and Rows for better export output
Acumatica Report Designer's Excel export can require additional configuration when the output is intended for data analysis rather than visual reproduction of a printed document.
The default Excel mode is generally Auto.
Things to consider:
-
In Auto mode, Excel output may contain merged cells and formatting that are suitable for reproducing the report layout but less convenient for data manipulation.
-
If you need predictable cell placement, investigate Manual Excel Mode.
-
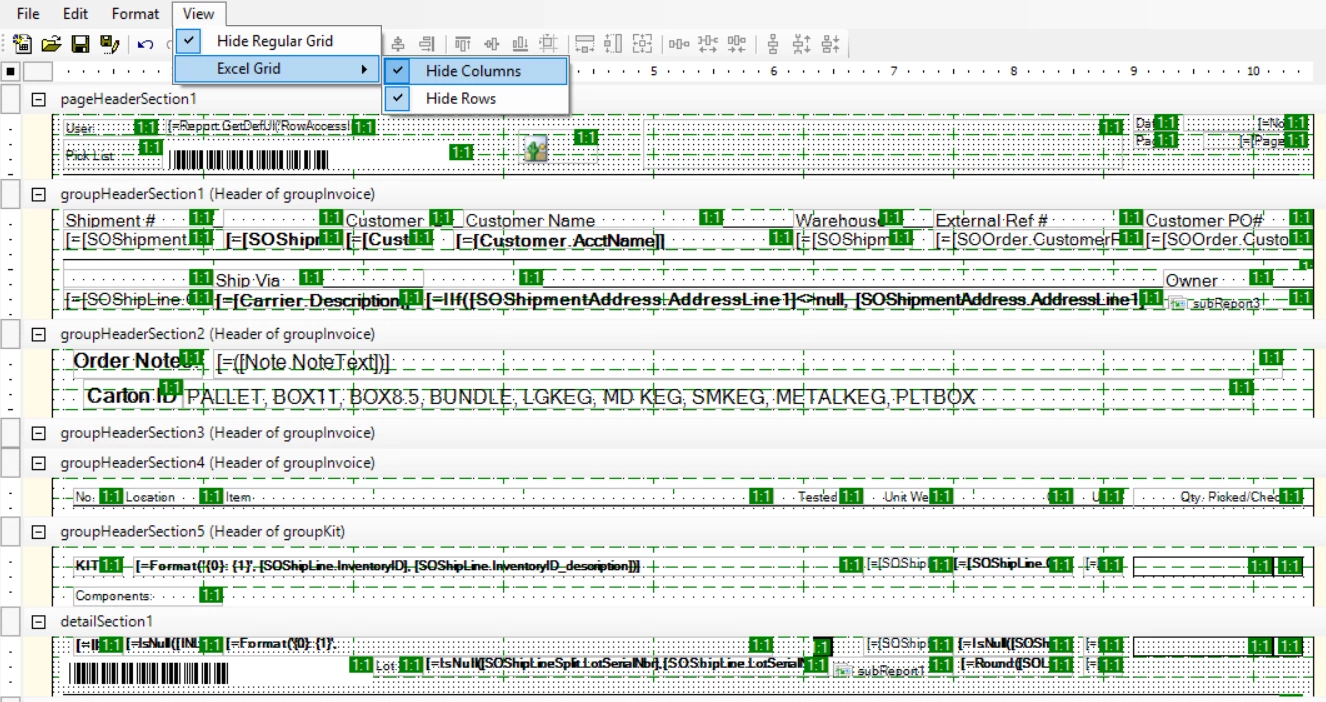
In Manual mode, configure the Excel row and column positions for the relevant controls.
-
Check the
Export Visibleproperty when a field is missing from the export. -
Test the exported file and verify that the expected columns and rows are present.
Tip: Decide whether Excel is meant to reproduce the printed report or provide clean, tabular data. The best configuration may differ depending on that requirement.
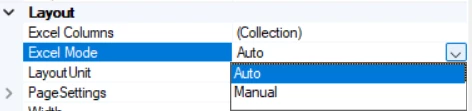
- Once you set the ExcelMode property to Manual, you will be able show columns and row for each value for excel. These you can adjust based on the output you need. This is tricky though.
21. Use TemplateReport.rpx and Consistent Formatting
When working with common formatting across reports, understand how the report's style template is configured.
-
Check the
StyleTemplateproperty. -
The default may be set to
TemplateReport.rpx. -
Use
StyleNameto apply the appropriate style where needed. -
Keep fonts, colors, borders, and other formatting consistent across related reports.
Tip: Before changing formatting on multiple reports, confirm whether the style comes from the report itself or from its configured style template.
22. Design Labels for the Actual Printer
Inventory labels, shipping labels, and other small-format reports need to be designed around the physical output.
Before building a label report, confirm:
-
The exact label width and height.
-
The printer model and driver.
-
The required margins and printable area.
-
The expected content and barcode size.
-
Whether one label or multiple labels should print for each record.
Example: A label report may look correct in PDF preview but print too high or too low on a Zebra printer.
Tip: Compare the physical label dimensions with the report's page size and printer settings. If the alignment is wrong, verify the printer driver and printable area before making repeated layout adjustments.
23. Working with Custom Fields, SQL View & Attribute
Inventory labels, shipping labels, and other small-format reports need to be designed around the physical output.
Before building a label report, confirm:
-
The exact label width and height.
-
The printer model and driver.
-
The required margins and printable area.
-
The expected content and barcode size.
-
Whether one label or multiple labels should print for each record.
Example: A label report may look correct in PDF preview but print too high or too low on a Zebra printer.
Tip: Compare the physical label dimensions with the report's page size and printer settings. If the alignment is wrong, verify the printer driver and printable area before making repeated layout adjustments.
Screenshot: Show the report's page settings, the label layout, and the actual printed result when troubleshooting alignment.
Further reading: How to remove unnecessary margins.
24. Work with Custom Fields, SQL Views, and Attributes
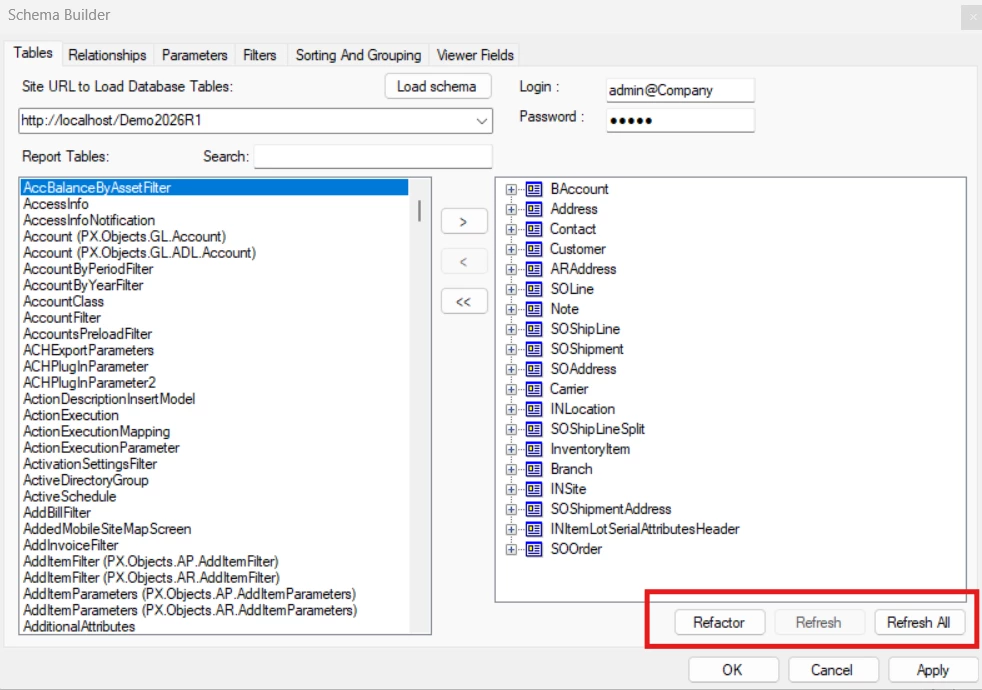
Custom fields and attributes may not be immediately available in the Report Designer schema.
Example: If an Inventory Item attribute is available in a Generic Inquiry but not in Report Designer, refresh the schema and check the required relationships before assuming the attribute cannot be used.
When working with custom DACs, custom fields, SQL views, or attributes:
-
Confirm that the required customization is published.
-
Refresh or reload the schema in Report Designer when the available fields do not reflect recent customization changes.
-
Verify that the required tables and relationships are included.
-
For SQL-based reporting requirements, a supported approach may be to create a SQL view and a DAC that exposes the view to Report Designer.
-
Make sure you have CompanyID and Key fields defined for any custom DAC you intended to use in your report.
-
For attributes, verify that the necessary attribute data and relationships are available to the report.
Tip: When adding a custom field or changing a DAC, reconnect to or refresh the report data source as appropriate, then verify that the field is available and returns the expected values.
What other tips would you add?
These are some of the practices I have found useful when working with Acumatica Report Designer.
I would love to hear from other Acumatica developers and consultants.
-
What Report Designer issues have taken you the longest to troubleshoot?
-
Do you have any useful tricks for subreports, variables, or pagination?
-
What are your best practices for check printing, labels, and Excel exports?
-
Are there any lesser-known properties that have saved you hours of debugging?
What are your favorite Report Designer tips, common pitfalls, or troubleshooting techniques?
Please share your experiences and examples in the comments. Let's build a useful reference for the Acumatica Community!