

Solved

Need to add a button to the address on Leads (CR301000) in MUI

  • September 9, 2026
  • 14 replies
  • 110 views

Joe Schmucker
Captain II
Forum|alt.badge.img+3

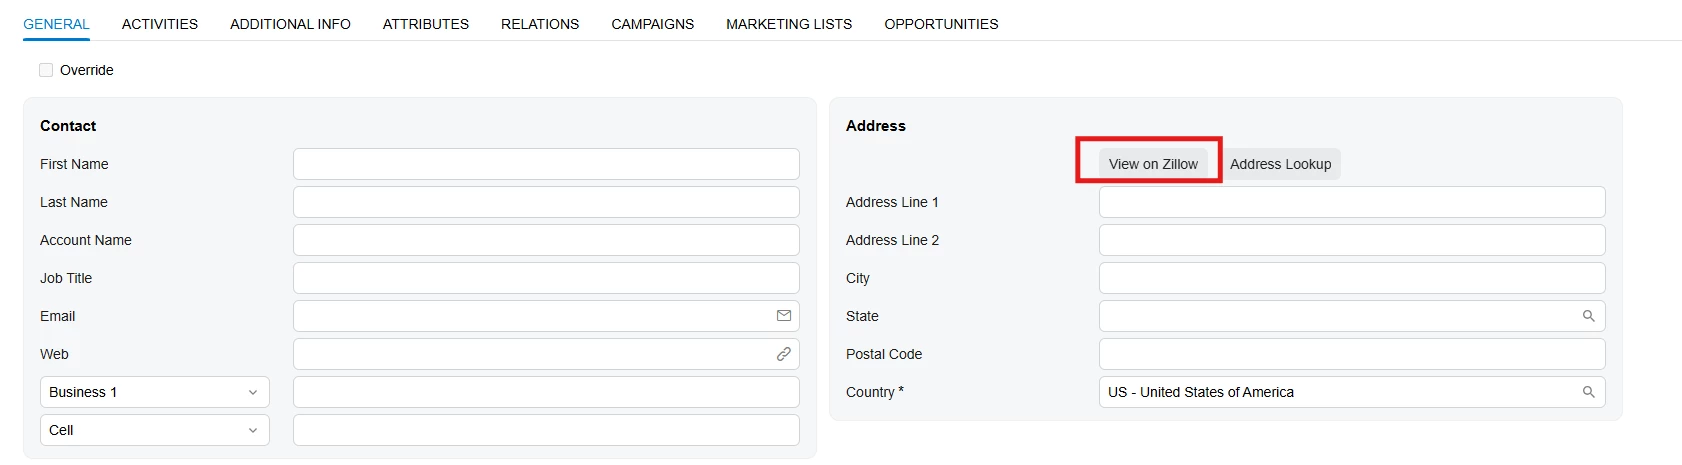
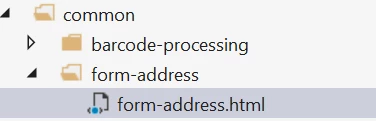
Hello!  I need to add a custom button to the Address on the Leads screen.  The address section is a common screen
 

This is my goal (shown in classic UI)
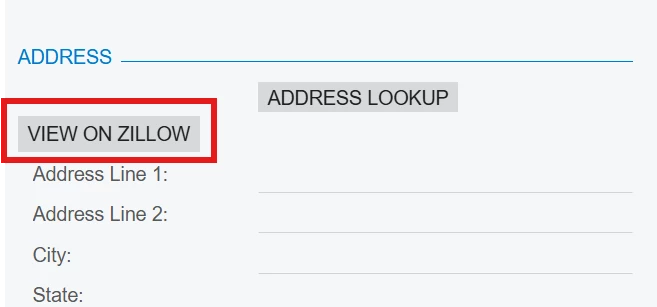
 

Even if I could extend/modify the “common” files, I don’t want to add this button to every place that this address is used.  The other issue is that the Address section is part of tabGeneral which includes the Contact section.

<qp-tabbar id="LeadCurrent_tab" class="label-size-m" wg-container="">
    <qp-tab id="tabGeneral" caption="General" ref="tabGeneral_Content"></qp-tab>

I am lost as to how I can accomplish this.

Would I have to completely replace the tabGeneral with a custom tab and put all the fields and related business logic?  

Thanks in advance for any tips.

Best answer by Abhishek Niikam

@Joe Schmucker 
This is html :

<template>
<qp-button
before="#formA #formA_btn"
id="btnViewOnZillow"
caption="View on Zillow"
state.bind="ViewOnZillow"
class="col-auto">
</qp-button>
<qp-address-lookup modify="#formA #formA_btn" class="col-auto"></qp-address-lookup>
</template>


TS File:

import { PXActionState } from "client-controls";
import { CR301000 } from "src/screens/CR/CR301000/CR301000";

export interface CR301000_Zillow extends CR301000 {}
export class CR301000_Zillow {
ViewOnZillow: PXActionState;
}

Adjust the action and view names according to your requirements.

14 replies

Forum|alt.badge.img+5

@Joe Schmucker Did you mean it like this?


Joe Schmucker
Captain II
Forum|alt.badge.img+3
  • Author
  • Captain II
  • September 9, 2026

Yes!  Exactly!  How did you do it?


Forum|alt.badge.img+3
  • Captain II
  • September 10, 2026

@Joe Schmucker 

In the HTML, you can try adding the <qp-button> element. I have included the sample code below for reference. I tried this on one of the screens, and it worked.

Hope this helps!

<field name="Prompt" config-rows.bind="3"></field>
<qp-button id="btnGenerateContent" state.bind="GenerateContent" class="col-auto" wg-name="GenerateContent"></qp-button>
<field name="TopicSummary" config-rows.bind="6"></field>

Forum|alt.badge.img+5
  • Jr Varsity III
  • Answer
  • September 10, 2026

@Joe Schmucker 
This is html :

<template>
<qp-button
before="#formA #formA_btn"
id="btnViewOnZillow"
caption="View on Zillow"
state.bind="ViewOnZillow"
class="col-auto">
</qp-button>
<qp-address-lookup modify="#formA #formA_btn" class="col-auto"></qp-address-lookup>
</template>


TS File:

import { PXActionState } from "client-controls";
import { CR301000 } from "src/screens/CR/CR301000/CR301000";

export interface CR301000_Zillow extends CR301000 {}
export class CR301000_Zillow {
ViewOnZillow: PXActionState;
}

Adjust the action and view names according to your requirements.


Joe Schmucker
Captain II
Forum|alt.badge.img+3
  • Author
  • Captain II
  • September 10, 2026

Hi ​@Abhishek Niikam 

When I compile the extensions, I get an error: 

In HTML extension 'C:\inetpub\BigL26\BigL26\FrontendSources\screen\src\development\screens\CR\CR301000\extensions\CR301000_BigL_generated.html' for screen 'CR301000' child node 'QP-BUTTON' has BEFORE attribute with '#formA #formA_btn', but screen HTML doesn't contain any elements that satisfies such querySelector

Since you got it to work, I was hoping I could copy/paste!  :-)  Strange that it worked for you but not for me.  Dang.


Where did you find the values for the before attribute?  I looked at the acumatica common form-address.html, but the id’s all look like are generated on the fly.    


Joe Schmucker
Captain II
Forum|alt.badge.img+3
  • Author
  • Captain II
  • September 10, 2026

Using this code, I got the button to show on the form and it does work.  But it shows at the bottom of the screen.

I removed the before attributes.

    <qp-button 
               id="btnViewOnZillow"
               caption="View on Zillow"
               state.bind="ViewOnZillow"
               class="col-auto">
    </qp-button>
Not sure how to get the before attributes that will make this show correctly.

Super thanks for your help!


Forum|alt.badge.img+5

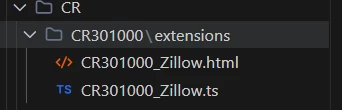
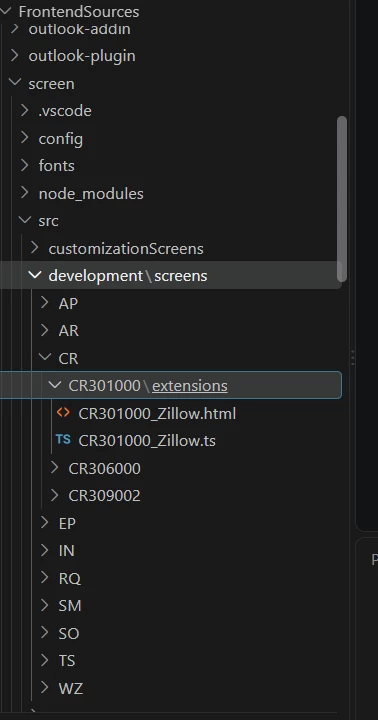
@Joe Schmucker My file names are these, so please check against these file names. Anyway, if your snippet is working as well, that's great.

and the #formA and #formA_btn values come from the fs-id="formA" parameter passed when form-address.html is included. In the common template, {{fs-id}} is replaced with the value provided in fs-id, so {{fs-id}} becomes formA and {{fs-id}}_btn becomes formA_btn. We can also see Acumatica's core code targeting #formA directly, which confirms that these IDs are generated from the fs-id parameter and are not arbitrary hardcoded values.


Joe Schmucker
Captain II
Forum|alt.badge.img+3
  • Author
  • Captain II
  • September 10, 2026

@Abhishek Niikam , did you put the files in the Acumatica screen\src\screens\CR\CR301000\extensions folder?   I am putting them in the src\development\screens\CR\CR301000\extensions folder. 


Forum|alt.badge.img+5

my files are also in same folder/:


Joe Schmucker
Captain II
Forum|alt.badge.img+3
  • Author
  • Captain II
  • September 10, 2026

I think I found a bit of a bug.  If I use the build from the command line in terminal (PS C:\inetpub\BigL26\BigL26\FrontendSources\screen> npm run build-dev --- --env "customFolder=development") I get the error.  If I publish from the project, no errors.

The button now shows correctly.

What a pain.  It takes forever to publish the project.  It is super quick to build from the command line.  I now know to try the publish approach if I get this error.  

THANK YOU.


EDIT...I still cannot follow how to find the id attributes, but hopefully I won’t need to modify this html file again!  I’m a real noob with MUI.


Forum|alt.badge.img+5

Usually, I build it from the FrontEndSource folder using the same command:

npm run build-dev -- --env customFolder=development


Joe Schmucker
Captain II
Forum|alt.badge.img+3
  • Author
  • Captain II
  • September 10, 2026

I’ll try that.  The last time I ran that command from fes folder, I ended up having to reinstall (update) the website.  It seems like it corrupted the base files.  I’ll give that a try!  I can always update the site to get it back to a useable state.


my command uses three dashes.  npm run build-dev --- --env "customFolder=development" after build-dev.  I’ll try it using your command with two dashes


Forum|alt.badge.img+8
  • Captain II
  • September 10, 2026

When you start to work on a screen that has been previously published you’ll want to remove the compiled screen files so that you can do the quick command line compile to see your changes.

I have a batch file that I pass a screen ID as a parameter to delete the files.

@echo off
setlocal enabledelayedexpansion

if "%~1"=="" (
echo Usage: %~nx0 ^<ScreenID^>
echo Example: %~nx0 NLSO2200
exit /b 1
)

set "PARAM=%~1"
set "DIR1=C:\ACMSites\TP26MUISite\Scripts\Screens\Company"
set "DIR2=C:\ACMSites\TP26MUISite\App_Data\TSScreenInfo\Company"

echo Deleting files starting with "%PARAM%" in:
echo %DIR1%
echo %DIR2%
echo.

if exist "%DIR1%\%PARAM%*" (
del /f /q "%DIR1%\%PARAM%*"
echo Deleted matching files from %DIR1%
) else (
echo No matching files found in %DIR1%
)

if exist "%DIR2%\%PARAM%*" (
del /f /q "%DIR2%\%PARAM%*"
echo Deleted matching files from %DIR2%
) else (
echo No matching files found in %DIR2%
)

echo.
echo Done.
endlocal

Then, from the FrontendSources\screen folder you can run this:

npm run build-dev --- --env customFolder=development --env screenIds=IN405000

And set in the screenIds value to the screen that you’re customizing. e.g. CR301000

You can compile changes and then just press F5 to see update. Rinse and repeat.

When you’re happy, pull the files into the customization project.

(with thanks to ​@MichaelShirk for posting previously about removing the compiled screen files)


Joe Schmucker
Captain II
Forum|alt.badge.img+3
  • Author
  • Captain II
  • September 10, 2026

@Django Without using the batch file, I deleted the files from the respective folders and tried the command you provided editing the screenid CR301000.  It killed the page.  I got the same error that the before formA not found.

I ran npm run build-dev from the FrontEndSources folder and got the page back.

I found that if you don’t publish any custom MUI files in Project Editor, I can do the rinse and repeat without deleting any files.  This has always worked for me on lots of screens with the exception of CR301000.  

I’m just going to use the command and put in the screen I want to update NOT doing it on CR301000.  Those mui files work when publishing from the project.  I’ll just leave that one alone when using the command line.