Solved

How to create approval flow in Expenses Claim

  • 6 November 2020
  • 7 replies
  • 749 views

Forum|alt.badge.img
  • Jr Varsity II
  • 103 replies

Hi Sir

Not sure if anyone know how to create the approval flow in the Expenses Claim?It would be good if you can give me a guide/step to create the approval flow.

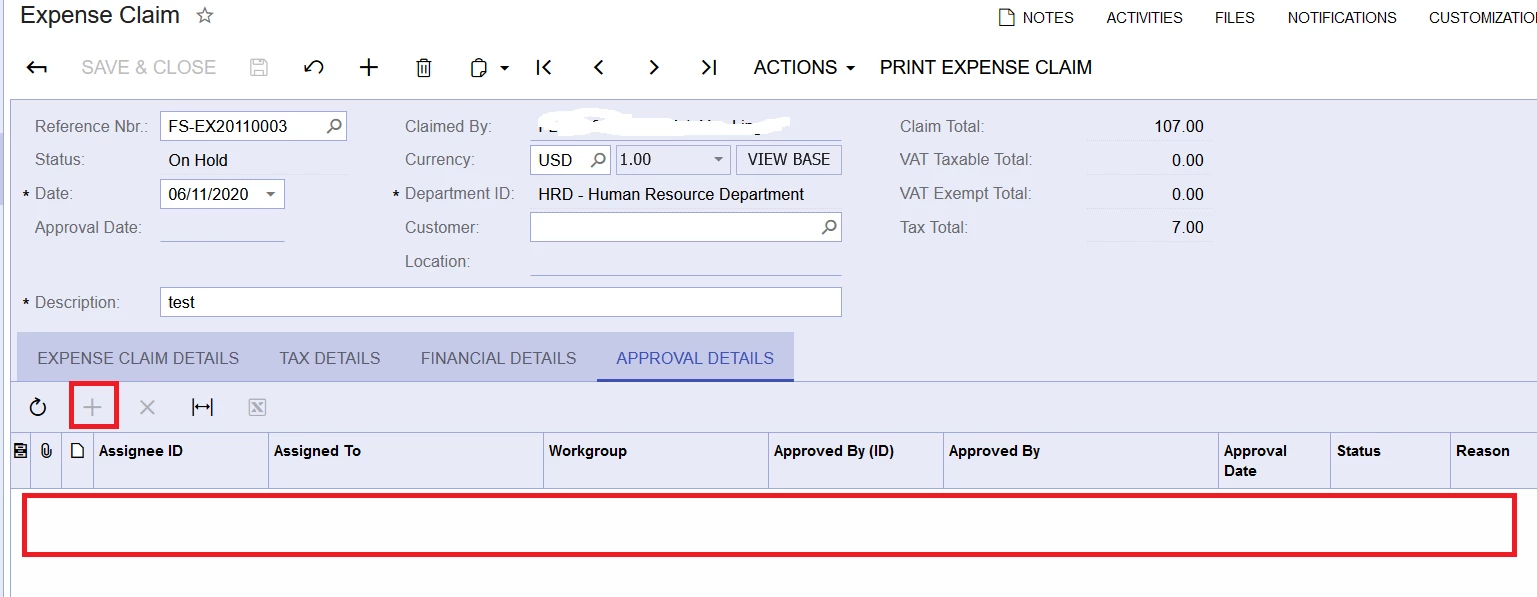
Reefe to below, there is not able to “ add” in the approval details.
 

Best answer by vkumar

Hi @erin 

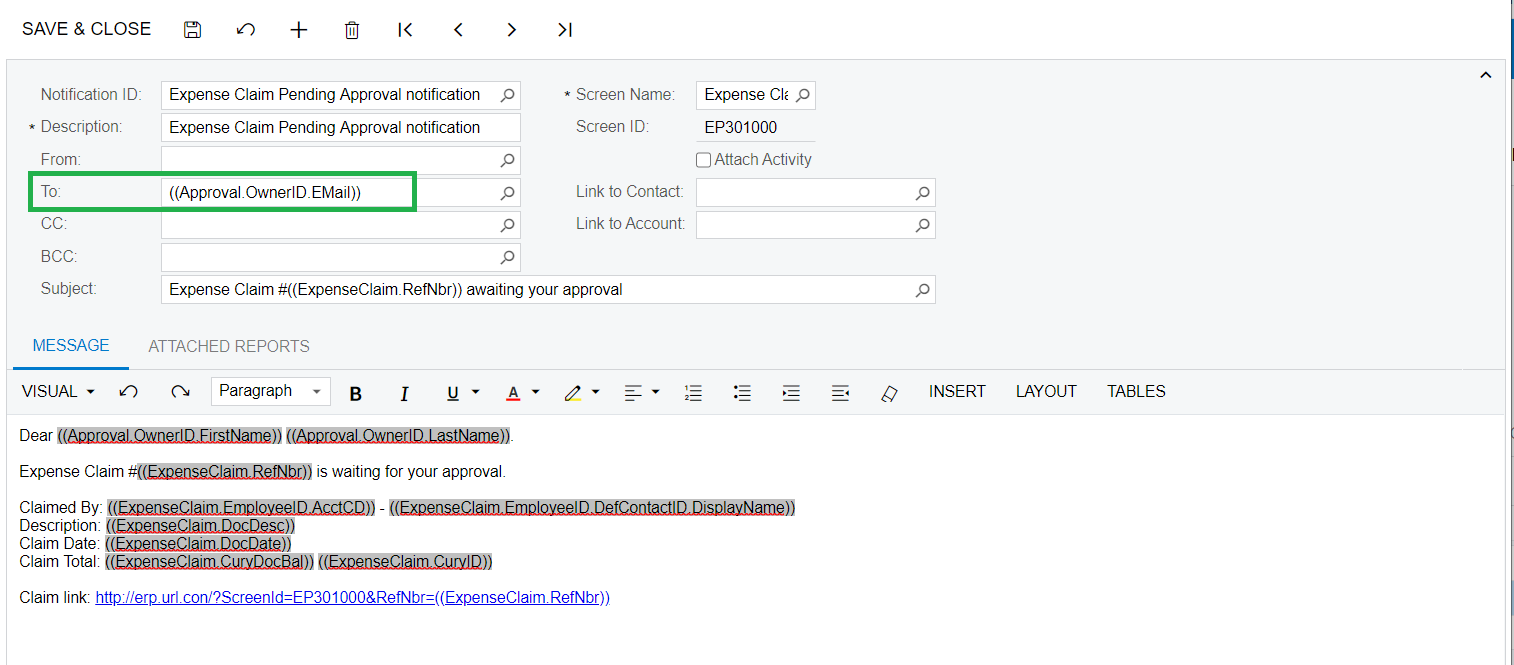
((Approval.OwnerID.EMail)) should work. Let us know the result.  We have following sample notification on our Sales demo data. You can test that as well. 
Hope this helps,

Regards,

View original
Did this topic help you find an answer to your question?

7 replies

BenjaminCrisman
Acumatica Employee
Forum|alt.badge.img+4
  • Acumatica Support Team
  • 631 replies
  • November 6, 2020

Hi @erin ! To see approvals for Expense Claims you’ll want to make sure one is selected in the Time & Expense Preferences:

If there is not an existing approval map to choose, you can click the pencil to make a new one.


Once you’ve made the expense claim, you should see the details on the claim once it is submitted:

Here is a link to the help documentation on Expense Claim Approvals:

https://help-2020r2.acumatica.com/(W(8))/Help?ScreenId=ShowWiki&pageid=ace4d71a-cfd2-4634-8e92-edad9c2a0f4b


Forum|alt.badge.img
  • Author
  • Jr Varsity II
  • 103 replies
  • November 7, 2020

Hi Benjamin

Thanks for your prompt reply. In my system , not able to find the Time and expenses preferences 

Is it because user authority issue ?

Thank you


Forum|alt.badge.img
  • Author
  • Jr Varsity II
  • 103 replies
  • November 8, 2020
BenjaminCrisman wrote:

Hi @erin ! To see approvals for Expense Claims you’ll want to make sure one is selected in the Time & Expense Preferences:

If there is not an existing approval map to choose, you can click the pencil to make a new one.


Once you’ve made the expense claim, you should see the details on the claim once it is submitted:

Here is a link to the help documentation on Expense Claim Approvals:

https://help-2020r2.acumatica.com/(W(8))/Help?ScreenId=ShowWiki&pageid=ace4d71a-cfd2-4634-8e92-edad9c2a0f4b


Hi Benjamin

Thanks for your very clear step to guide me. i manage to do that :)

Currently , I would like to send the Expense Claim Pending Approval notification to the approver to inform them to approve the claim . I go to the notification template as below.

In Approval Map (Blue box): I set the approver is employee and and employee : FLSSG05 . I want trigger the notification email to her once the claim submitted.

In Notification Template (Green box) : May i know what formula command that i need to enter in the green box in order to send the notification email to appover?  as i based on the below formula command is not sucessfuly send to notification email to the approver. 

Not sure if you could help this?


Forum|alt.badge.img+11
  • Acumatica Support Team
  • 785 replies
  • Answer
  • November 9, 2020

Hi @erin 

((Approval.OwnerID.EMail)) should work. Let us know the result.  We have following sample notification on our Sales demo data. You can test that as well. 

Hope this helps,

Regards,


  • 5 replies
  • June 16, 2023

Hi, how do a restrict user to release expense claim using the approval map? Thanks


Forum|alt.badge.img
  • Varsity I
  • 98 replies
  • October 4, 2024
vkumar wrote:

Hi @erin 

((Approval.OwnerID.EMail)) should work. Let us know the result.  We have following sample notification on our Sales demo data. You can test that as well. 

Hope this helps,

Regards,

Hi, I have my email template set up like this as well but all the email are stuck in the Email Pending Process screen would not go through. Do you have any thoughts on that? 


  • Freshman I
  • 2 replies
  • January 1, 2025

@jzhu 

[1/2] If you are getting error “Unable to process approval notification. Create message failed. Email account should be defined” (pictured below): Go to the email template and add an email to the “From:” box.


[2/2] If emails are stuck all together

  1. Send and Receive Email
  2. Clock looking icon
    1. View
  3. Activate
  4. Schedule
  5. Update Execution Time (I have it set at every 1 minute)
  6. SAVE


Reply


Cookie policy

We use cookies to enhance and personalize your experience. If you accept you agree to our full cookie policy. Learn more about our cookies.

 
Cookie settings