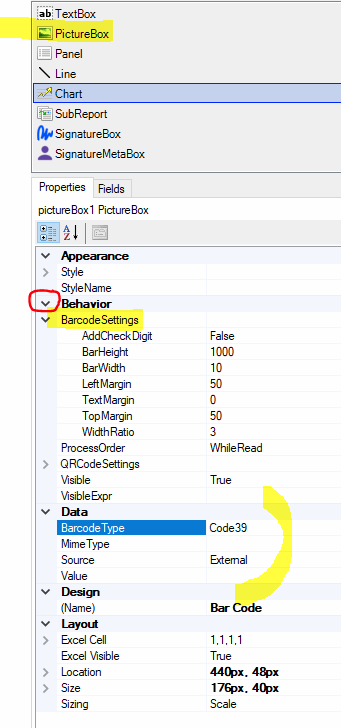
How do you create barcode labels for stock items using the report designer?
I have configured the report to print barcodes for each item, however, the printed bar codes for each item are all exactly the same.
Am I missing something here?
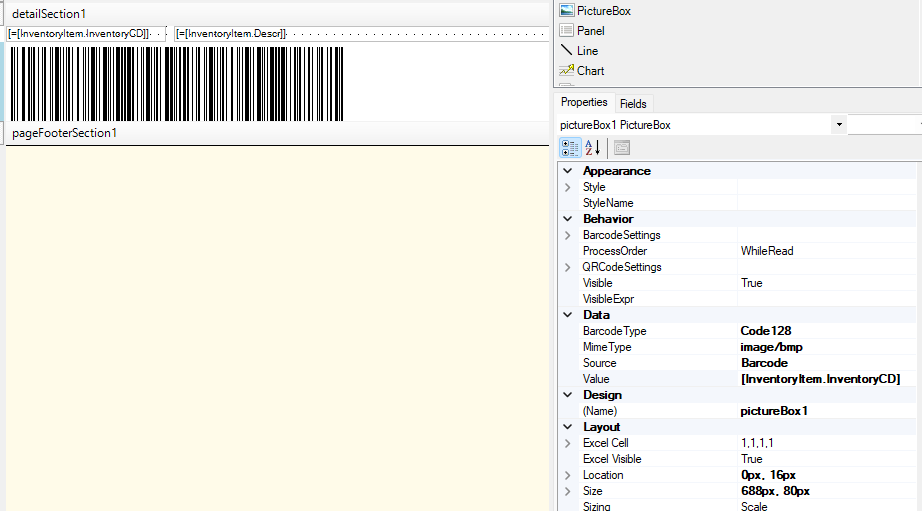
How do you create barcode labels for stock items using the report designer?
I have configured the report to print barcodes for each item, however, the printed bar codes for each item are all exactly the same.
Am I missing something here?
Hello,
First barcodes are added to Stock items on the Cross-Reference page. Then the Alternate ID field (where alternate type = Barcode) is added to the report as a Picture Box.
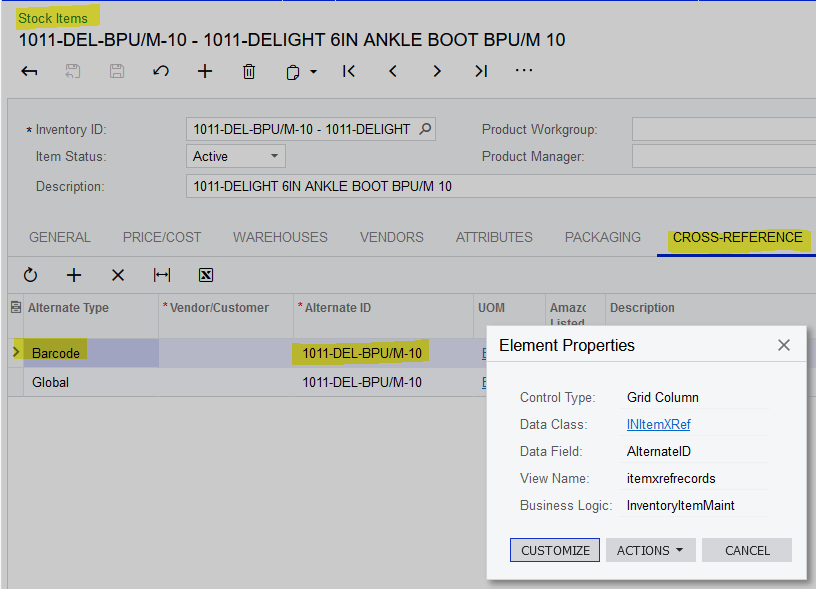
I can’t remember the exact settings for the Behavior and Data section; tell the report writer the Field name to print is INItemXRef.AlternateId and choose proper type of Barcode. I hope I’ve given enough information to help you.
Also, an example of the output of your report may help the next person, in case I have not given enough information; please consider posting the printed results. Thanks!
Thank you Chris. That worked!
Following your instructions, my report settings are as follows:
I didn’t do any changes to the barcode settings on the report designer.
Are there any other fields one can use for the barcodes? What I need now are bar code labels for the warehouses and also for lot/serial numbers.
What I have done for the warehouses, is created a ‘dummy’ inventory and added all warehouse ID’s to the AlternateID of the ‘dummy’ inventory. It seems to work too, but I wondered if there is a more straight forward way to do this.
Any ideas how to create the barcodes for the lot/serial no’s?
Thanks again for you help.
Hello,
Yes, I believe you can create a barcode out of any set of numbers/letters you want. If you want a barcode representing the Warehouses, you can turn Warehouse ID into a bar code, and/or Warehouse-location ID, using the above steps.
I wanted to show adding an Attribute/ User Defined Field to the warehouses to hold the text field that represents barcode for the warehouse, but I don’t see ability to connect an Attribute. Could be a new Idea for this website to allow addition of UDF/Attribute in every screen or could be, I need more coffee.
Thank you Laura. Yes an attribute would be helpful.
I found the solution, where the INSite table can be used for the barcode of the warehouse, so no alternative ID required. The same for the lot/serial number.
Thank you
It’s baffling that Acumatica does not have an out of the box report to print item barcodes...
Baffling and straight up torture for end user experience. am i really supposed to go write this myself!!! or pay a consultant to do it for me?
Under the Additional Sort and Filters tab you can add Additional Filter Conditions such as description, inventory ID and Default BIN Location. This will allow printing a small selection by ID or larger selections by description or default BIN.
It will need to be saved to your server and added to the site map. I hope that helps!
You are a rock star I can modify the CRAP out of an example. but starting from scratch is difficult! Acumatica tries to make everything so configurable but they err on the side of not giving us enough to learn with!
I think I might have figured it out. I changed the property for the details section “visibleexpr” in the “behavioral” section to have the value: =($IndexRow%2=1)
Now it appears to be working for our data.
I hate to veer off topic, but now I need to change the height of the labels to 1 inch. When I change the detail section to 0.75 inches high it reacts, but the border of each row is still over 1.25 inches high. I’ve tried making the page footer and header “not visible” and even deleting the footer, but the height of each label is still too high for my 1 x 3 inch labels. Does anybody have tips for where this setting resides?
I think I figured it this out too. I went through every object on the report and found a “dotted line” that had a position too low on my report. Once I moved that up all seems good.
Enter your E-mail address. We'll send you an e-mail with instructions to reset your password.