Solved

Modern UI: Adding custom fields to Line Splitting Grid (SO302000) using Shared Templates

  • January 20, 2026
  • 7 replies
  • 127 views

anahizentella94
Jr Varsity III
Forum|alt.badge.img

Hello,

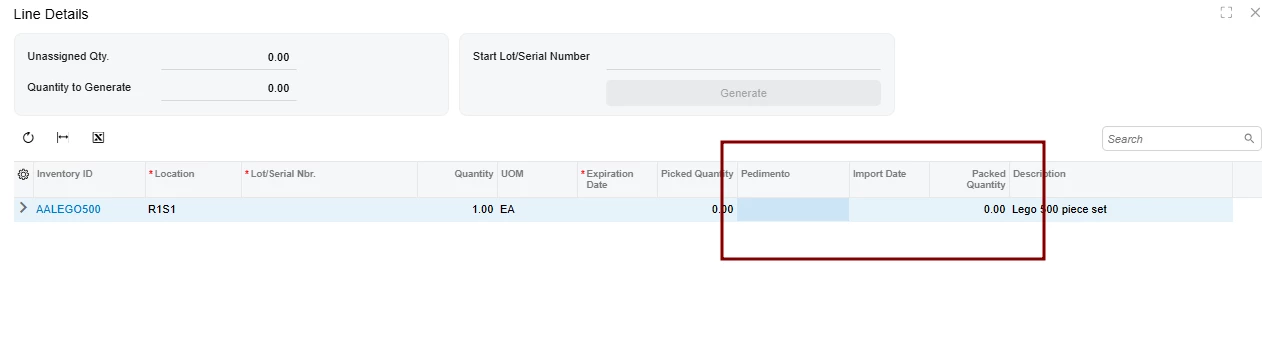
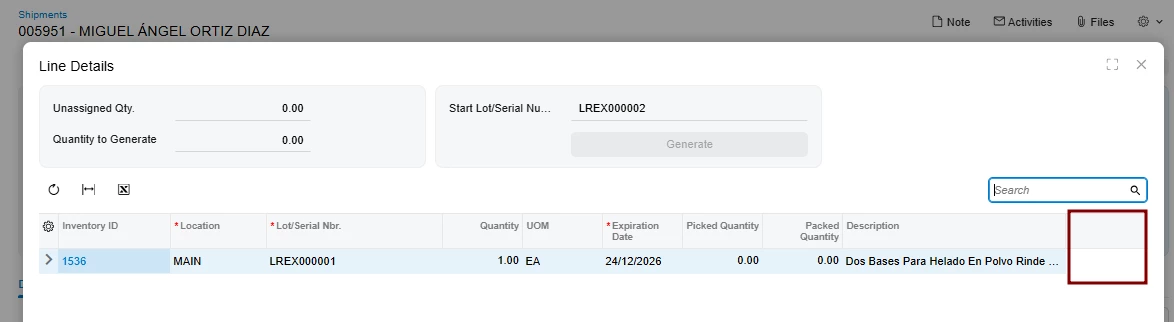
I am trying to add two custom fields (UsrMXFEPedimentoNbr and UsrMXFEImportDate) to the Line Details (Line Splitting) grid in the Shipments screen.

Acumatica Version: 2025 R2

SO302000 - Line Details panel

Following the standard extension pattern, I created the .ts and .html files. However, when running npm build, I get an error stating that #grid-LineSplitting does not exist.

After investigating, I noticed that SO302000_LineSplitting.html references a shared component: ../../../IN/common/line-splitting/panel-line-splitting/panel-line-splitting.html. Since the grid is defined in that shared template and not directly in the SO302000 main files, the compiler cannot resolve the after="#grid-LineSplitting" instruction.


This is my code: SO302000_MyExtension.ts

import { placeAfterProperty, PXFieldOptions, PXFieldState } from "client-controls";
import { SOShipLineSplit } from "src/screens/SO/SO302000/extensions/SO302000_LineSplitting";
import { SO302000, SOShipment,Transactions, Packages } from "src/screens/SO/SO302000/SO302000";

export interface SOShipLineSplit_MyExtension extends SOShipLineSplit{}
export class SOShipLineSplit_MyExtension {
@placeAfterProperty("PickedQty")
UsrMXFEPedimentoNbr: PXFieldState<PXFieldOptions.CommitChanges>;

@placeAfterProperty("UsrMXFEPedimentoNbr")
UsrMXFEImportDate: PXFieldState;
}

HTML:

<template>
<field name="UsrMXFEPedimentoNbr" after="#grid-LineSplitting"></field>
<field name="UsrMXFEImportDate" after="#grid-LineSplitting"></field>
</template>

This is panel-line-splitting.html code

<template>
<qp-include-parameters
extension-name="LineSplittingExtension"
splits-view="splits">
</qp-include-parameters>

<qp-panel id="{{extension-name}}_lsselect" caption="Line Details" auto-repaint="true" width="lg" height="85vh">
<qp-template id="form-LineSplitting" name="17-17-14" class="equal-height" wg-container="{{extension-name}}_LotSerOptions_optform">
<qp-fieldset id="fsColumnA-LineSplitting" slot="A" view.bind="{{extension-name}}_LotSerOptions">
<field name="UnassignedQty"></field>
<field name="Qty"></field>
</qp-fieldset>
<qp-fieldset id="fsColumnB-LineSplitting" slot="B" view.bind="{{extension-name}}_LotSerOptions">
<field name="StartNumVal">
<qp-button id="buttonGenerate-LineSplitting" state.bind="{{extension-name}}_GenerateNumbers" class="col-12" wg-name="Generate"></qp-button>
</field>
</qp-fieldset>
</qp-template>

<qp-grid id="grid-LineSplitting" view.bind="{{splits-view}}" wg-container="{{splits-view}}_grid2"></qp-grid>

<footer id="footer-LineSplitting">
<qp-button id="buttonOK-LineSplitting" dialog-result="OK"></qp-button>
</footer>
</qp-panel>
</template>

What is the correct way to target a grid that is part of a shared template (panel-line-splitting.html) from a screen extension?

How can I ensure these columns appear specifically in the Shipments screen Line Details without affecting other screens that share the same template (if possible)?

Best answer by anahizentella94

Thank you very much for your suggestions! I wanted to share the specific solution that worked for me when extending a native, reusable component in the Modern UI.

In this case, I needed to modify the Line Splitting grid, but specifically for the Shipments (SO302000) screen. Since this grid is a shared element located at IN/common/line-splitting, a direct modification was not an option as it would affect every screen that references it.

By using an Inclusion Extension approach, I was able to isolate the changes to a single screen. Here are the steps I followed:

1. TypeScript View Extension

First, I created a view extension in SO302000_MyExtension.ts. I used the @placeAfterProperty decorator to inject my custom fields into the existing SOShipLineSplit view structure.


export interface SO302000_SOShipLineSplit_MyExtension extends SOShipLineSplit {}

export class SO302000_SOShipLineSplit_MyExtension {
@placeAfterProperty("PickedQty")
UsrMXFEPedimentoNbr: PXFieldState<PXFieldOptions.CommitChanges>;

@placeAfterProperty("UsrMXFEPedimentoNbr")
UsrMXFEImportDate: PXFieldState;
}

2. Main Screen Inclusion (HTML)

In the main extension file SO302000_MyExtension.html, I added the qp-include tag to access the panel. The key is using the extension-name attribute to allow the engine to map my custom view extensions correctly to this specific inclusion.


<template>
<qp-include
url="../../IN/common/line-splitting/panel-line-splitting/panel-line-splitting.html"
extension-name="SOShipmentLineSplittingExtension">
</qp-include>
...
</template>

3. Targeted Grid Modification

Finally, I created an additional file named SO302000_LineSplitting_MyExtension.html. Using the <template modify="..."> tag, I targeted the specific ID of the native grid (#grid-LineSplitting) to append the new fields as columns.

<template>
<template modify="#grid-LineSplitting">
<field name="UsrMXFEPedimentoNbr"></field>
<field name="UsrMXFEImportDate"></field>
</template>
</template>

With this configuration, the custom columns (Pedimento Info) are now visible in the Line Splitting grid only within the Shipments screen, keeping the common component clean and intact for other modules.

Custom Columns in grid


7 replies

Forum|alt.badge.img
  • Jr Varsity II
  • January 21, 2026

<template>
    <qp-grid id="grid-LineSplitting" view.bind="{{splits-view}}" wg-container="{{splits-view}}_grid2">
        <columns>
            <field name="UsrMXFEPedimentoNbr" after="PickedQty"></field>
            <field name="UsrMXFEImportDate" after="UsrMXFEPedimentoNbr"></field>
        </columns>
    </qp-grid>
</template>

Update your HTML Like This

*************************


Instead of using the HTML Please Update like above

<field name="UsrMXFEPedimentoNbr" after="#grid-LineSplitting"></field>


for TS File
 

import { placeAfterProperty, PXFieldOptions, PXFieldState } from "client-controls";
import { SOShipLineSplit } from "src/screens/SO/SO302000/extensions/SO302000_LineSplitting";

export interface SOShipLineSplit_MyExtension extends SOShipLineSplit {}

export class SOShipLineSplit_MyExtension {
    @placeAfterProperty("PickedQty")
    UsrMXFEPedimentoNbr: PXFieldState<PXFieldOptions.CommitChanges>;

    @placeAfterProperty("UsrMXFEPedimentoNbr")
    UsrMXFEImportDate: PXFieldState;
}


anahizentella94
Jr Varsity III
Forum|alt.badge.img
  • Author
  • Jr Varsity III
  • January 21, 2026

I have tried to change html but, during build the terminal shows the next message 

ERROR in ./src/screens/SO/SO302000/SO302000.html
Module build failed (from ./node_modules/build-tools/html-merge-loader.js):
Error: Element ids are not unique: id=grid-LineSplitting tags=QP-GRID,QP-GRID


darylbowman
Captain II
Forum|alt.badge.img+16

import { placeAfterProperty, PXFieldOptions, PXFieldState } from "client-controls";
import { SOShipLineSplit } from "src/screens/SO/SO302000/extensions/SO302000_LineSplitting";

export interface SOShipLineSplit_MyExtension extends SOShipLineSplit {}

export class SOShipLineSplit_MyExtension {
    @placeAfterProperty("PickedQty")
    UsrMXFEPedimentoNbr: PXFieldState<PXFieldOptions.CommitChanges>;

    @placeAfterProperty("UsrMXFEPedimentoNbr")
    UsrMXFEImportDate: PXFieldState;
}

If you’re doing this, you shouldn’t need an HTML file


Forum|alt.badge.img
  • Jr Varsity III
  • January 30, 2026

@anahizentella94  please use modify in your HTML file to avoid the error. 

Ex: <qp-grid modify id=” ”>


Jhon Reeve Penuela
Freshman I
Forum|alt.badge.img


This is my code: SO302000_MyExtension.ts

<template>
<field name="UsrMXFEPedimentoNbr" after="#grid-LineSplitting"></field>
<field name="UsrMXFEImportDate" after="#grid-LineSplitting"></field>
</template>


You don't need this if you created on the grid.


darylbowman
Captain II
Forum|alt.badge.img+16

@anahizentella94 Could you provide an update or pick (or provide) an answer if you’ve figured it out so we can hopefully close this?


anahizentella94
Jr Varsity III
Forum|alt.badge.img
  • Author
  • Jr Varsity III
  • Answer
  • February 6, 2026

Thank you very much for your suggestions! I wanted to share the specific solution that worked for me when extending a native, reusable component in the Modern UI.

In this case, I needed to modify the Line Splitting grid, but specifically for the Shipments (SO302000) screen. Since this grid is a shared element located at IN/common/line-splitting, a direct modification was not an option as it would affect every screen that references it.

By using an Inclusion Extension approach, I was able to isolate the changes to a single screen. Here are the steps I followed:

1. TypeScript View Extension

First, I created a view extension in SO302000_MyExtension.ts. I used the @placeAfterProperty decorator to inject my custom fields into the existing SOShipLineSplit view structure.


export interface SO302000_SOShipLineSplit_MyExtension extends SOShipLineSplit {}

export class SO302000_SOShipLineSplit_MyExtension {
@placeAfterProperty("PickedQty")
UsrMXFEPedimentoNbr: PXFieldState<PXFieldOptions.CommitChanges>;

@placeAfterProperty("UsrMXFEPedimentoNbr")
UsrMXFEImportDate: PXFieldState;
}

2. Main Screen Inclusion (HTML)

In the main extension file SO302000_MyExtension.html, I added the qp-include tag to access the panel. The key is using the extension-name attribute to allow the engine to map my custom view extensions correctly to this specific inclusion.


<template>
<qp-include
url="../../IN/common/line-splitting/panel-line-splitting/panel-line-splitting.html"
extension-name="SOShipmentLineSplittingExtension">
</qp-include>
...
</template>

3. Targeted Grid Modification

Finally, I created an additional file named SO302000_LineSplitting_MyExtension.html. Using the <template modify="..."> tag, I targeted the specific ID of the native grid (#grid-LineSplitting) to append the new fields as columns.

<template>
<template modify="#grid-LineSplitting">
<field name="UsrMXFEPedimentoNbr"></field>
<field name="UsrMXFEImportDate"></field>
</template>
</template>

With this configuration, the custom columns (Pedimento Info) are now visible in the Line Splitting grid only within the Shipments screen, keeping the common component clean and intact for other modules.

Custom Columns in grid