Solved

Account Class Column in Journal Transaction (per line)

  • December 9, 2022
  • 9 replies
  • 119 views

Forum|alt.badge.img

Hello Everyone,


In standard journal transaction window we can’t see the column of account class.

Is there a way to make it visible upon creation of journal transactions?
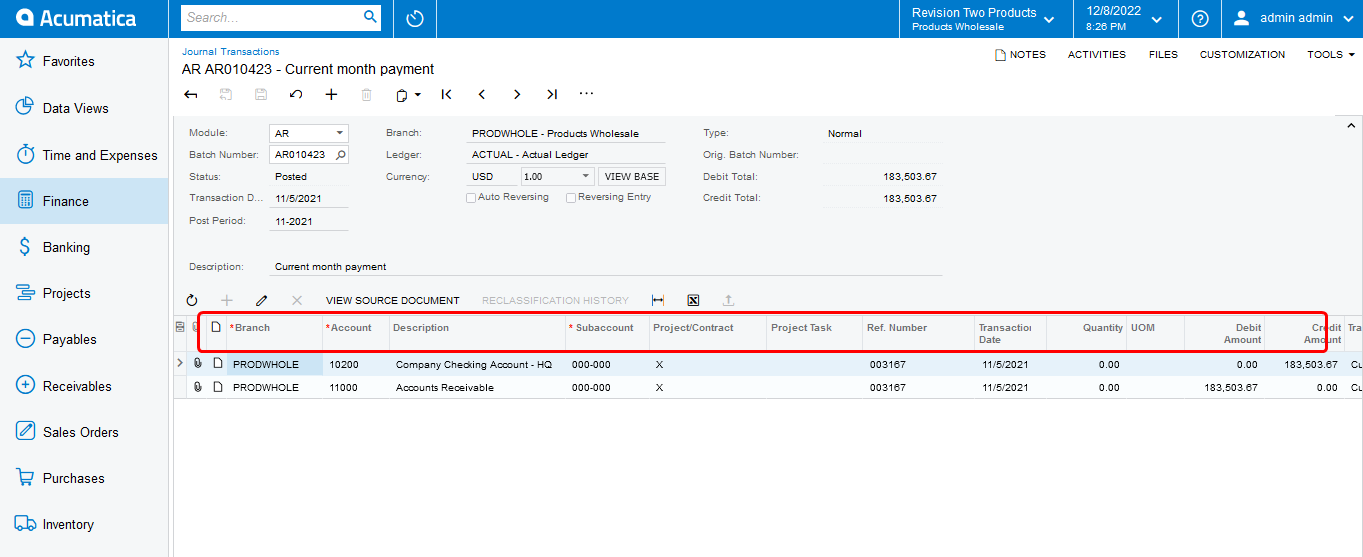
 

Thank you !


Best answer by aaghaei

@Fie 

Below I have provided all you need. You can make it work either using VS or Acumatica’s built-in Customization Project Editor assuming you know the basics.

namespace PX.Objects.GL
{
    // DAC Ext
    [PXNonInstantiatedExtension]
    public sealed class GLTranExt : PXCacheExtension<PX.Objects.GL.GLTran>
    {
        public static bool IsActive() => true;

        #region UsrClassName
        public abstract class usrClassName : PX.Data.BQL.BqlString.Field<usrClassName> { }
        [PXString(60, IsUnicode = true)]
        [PXUIField(DisplayName = "Account Class", Enabled = false, Visible = true)]
        public string UsrClassName { get; set; }
        #endregion
    }

    // Graph Ext
    public class JournalEntryExt : PXGraphExtension<PX.Objects.GL.JournalEntry>
    {
        public static bool IsActive() => true;

        protected void _(Events.FieldSelecting<GLTran, GLTranExt.usrClassName> e)
        {
            if (e.Row == null) return;

            e.ReturnValue = "";

            if (e.Row.AccountID != null)
            {
                Account account = PXSelect<Account,
                    Where<Account.accountID, Equal<Required<Account.accountID>>>>.Select(Base, e.Row.AccountID);

                if (account != null && account.AccountClassID != null)
                {
                    AccountClass accountClass = PXSelect<AccountClass,
                        Where<AccountClass.accountClassID, Equal<Required<AccountClass.accountClassID>>>>.Select(Base, account.AccountClassID);

                    if (accountClass != null)
                    {
                        e.ReturnValue = accountClass.Descr;
                    }
                }
            }
        }
    }
}

    //Add the "UsrClassName" to the Transaction Grid (GLTranModuleBatNbr) in GL301000 and set the CommitChanges = True as follows:
    <px:PXGridColumn DataField = "UsrClassName" Width="220" CommitChanges="True" />


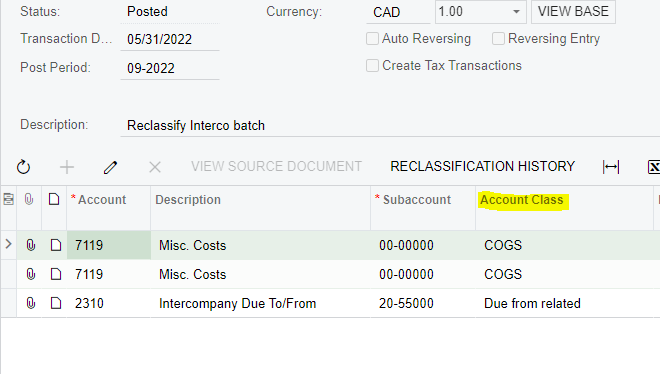
I have also tested it and this will be your GL Tran Grid layout:


View original
Did this topic help you find an answer to your question?

9 replies

Laura02
Captain II
Forum|alt.badge.img+19
  • Captain II
  • 3132 replies
  • December 9, 2022

Hello,

A customization will be needed, to display the Account Class field for each account in the Journal Transactions screen.


aaghaei
Captain II
Forum|alt.badge.img+10
  • Captain II
  • 1204 replies
  • December 17, 2022

@Fie how are you developing you customizations? Are you doing through VS?


aaghaei
Captain II
Forum|alt.badge.img+10
  • Captain II
  • 1204 replies
  • Answer
  • December 17, 2022

@Fie 

Below I have provided all you need. You can make it work either using VS or Acumatica’s built-in Customization Project Editor assuming you know the basics.

namespace PX.Objects.GL
{
    // DAC Ext
    [PXNonInstantiatedExtension]
    public sealed class GLTranExt : PXCacheExtension<PX.Objects.GL.GLTran>
    {
        public static bool IsActive() => true;

        #region UsrClassName
        public abstract class usrClassName : PX.Data.BQL.BqlString.Field<usrClassName> { }
        [PXString(60, IsUnicode = true)]
        [PXUIField(DisplayName = "Account Class", Enabled = false, Visible = true)]
        public string UsrClassName { get; set; }
        #endregion
    }

    // Graph Ext
    public class JournalEntryExt : PXGraphExtension<PX.Objects.GL.JournalEntry>
    {
        public static bool IsActive() => true;

        protected void _(Events.FieldSelecting<GLTran, GLTranExt.usrClassName> e)
        {
            if (e.Row == null) return;

            e.ReturnValue = "";

            if (e.Row.AccountID != null)
            {
                Account account = PXSelect<Account,
                    Where<Account.accountID, Equal<Required<Account.accountID>>>>.Select(Base, e.Row.AccountID);

                if (account != null && account.AccountClassID != null)
                {
                    AccountClass accountClass = PXSelect<AccountClass,
                        Where<AccountClass.accountClassID, Equal<Required<AccountClass.accountClassID>>>>.Select(Base, account.AccountClassID);

                    if (accountClass != null)
                    {
                        e.ReturnValue = accountClass.Descr;
                    }
                }
            }
        }
    }
}

    //Add the "UsrClassName" to the Transaction Grid (GLTranModuleBatNbr) in GL301000 and set the CommitChanges = True as follows:
    <px:PXGridColumn DataField = "UsrClassName" Width="220" CommitChanges="True" />


I have also tested it and this will be your GL Tran Grid layout:


aaghaei
Captain II
Forum|alt.badge.img+10
  • Captain II
  • 1204 replies
  • December 20, 2022

@Fie 

Can you please advise if the above solution worked for you and if yes kindly flag the correct answer to close the case and reference for others in case they come across the same issue.


Forum|alt.badge.img
  • Author
  • 17 replies
  • December 26, 2022

Hi @aaghaei,

Where should i put your code in the customization project?

Would you give me a reference for this?

Thank you!


aaghaei
Captain II
Forum|alt.badge.img+10
  • Captain II
  • 1204 replies
  • December 26, 2022

@Fie

please see below resource on Acumatica University 

https://openuni.acumatica.com/courses/reporting/w140-customization-projects/

if you read through and couldn’t make it work, considering I have provided all the codes, I can help you with wrapping the code as a Customization Project and give it to you

i suggest you learn the basics at least as you will need it if you come across similar requirements.


aaghaei
Captain II
Forum|alt.badge.img+10
  • Captain II
  • 1204 replies
  • December 27, 2022

@Fie

I got sometime to wrap this package for you as attached here. Import using SM204505 as shown below and select it and publish. if successful the “published” column will be ticked and you should see the expected result in JE screen. As suggested earlier I strongly recommend reading the Customization Project document.


Forum|alt.badge.img
  • Author
  • 17 replies
  • December 27, 2022

Got It Sir @aaghaei . Its working on my local host.

Thank you so much!


aaghaei
Captain II
Forum|alt.badge.img+10
  • Captain II
  • 1204 replies
  • December 27, 2022

Glad to see it is working 


Cookie policy

We use cookies to enhance and personalize your experience. If you accept you agree to our full cookie policy. Learn more about our cookies.

 
Cookie settings