Solved

Create Customer on Mobile App

  • 28 March 2023
  • 3 replies
  • 141 views

Userlevel 7
Badge +10

Hi Experts,

One of our customers looking for creating customers from the mobile App.

I would appreciate your response in this case. 

Thank you.

icon

Best answer by Cesar Betances 28 March 2023, 23:43

View original

3 replies

Userlevel 7
Badge +15

HI @sweta68 

That would require a customization to achieve this.

There is an idea currently that you could vote for so that Acumatica may provide that in a future release. You could vote for this. 

https://community.acumatica.com/ideas/create-customer-on-mobile-app-5657

Userlevel 5
Badge +1

HI @sweta68 

To add an existing customer screen to the mobile app menu in Acumatica, you can use the following code:

  1. Open the mobile app project in Visual Studio and navigate to the "Menu" folder.

  2. Add a new XML file to the "Menu" folder and name it something like "CustomerScreen.xml".

  3. In the new XML file, add the following code to define the new menu item:

xml

<?xml version="1.0" encoding="utf-8"?> <MenuPackage xmlns="http://schemas.acumatica.com/menu/package/2017/"> <Package name="CustomerScreen"> <Folder name="Screens"> <Screen name="AR303000"> <Title>Customers</Title> <IconUrl>~/App_Themes/Default/Images/menu_customer.png</IconUrl> <Visibility>PX.Data.Update</Visibility> </Screen> </Folder> </Package> </MenuPackage>

In this code, the "AR303000" screen represents the existing Acumatica screen that displays customer information. You can replace this with the screen ID of any existing customer screen in Acumatica.

  1. Save the file and rebuild the mobile app project.

  2. Test the app to ensure that the new menu item appears and that it opens the correct customer screen when selected.

Note that the "IconUrl" parameter in the code above refers to the icon image that should be used for the new menu item. You should replace this with the URL of the icon image that you want to use. Also, the "Visibility" parameter determines who can access the new menu item, and you can adjust this as needed.

Userlevel 4
Badge +2

Hi @sweta68 ,


If you are trying to map the Customer screen(functionality) on the Acumatica mobile app, another approach I suggest is the following.

Instead of trying to add AR303000 screen to main menu, try:

  1. Map theAR3030PL screen, including action with behavior=Open

add screen AR3030PL {
  add container "Result" {
    fieldsToShow = 6
    listActionsToExpand = 1
    containerActionsToExpand = 1
    add field "DisplayName"
    add field "CustomerID"
    add field "CustomerName"
    add field "CustomerClass"
    add field "Country"
    add field "City"
    add containerAction "editDetail" {
      behavior = Open
      redirect = True
    }
    add containerAction "insert" {
      icon = "system://Plus"
      behavior = Create
      redirect = True
    }
  }
}


  1. Add AR3030PL to main menu

update sitemap {
  add folder "Customers" {
    type = HubFolder
    isDefaultFavorite = True
    displayName = "Customers"
    icon = "system://Pen"
    add item "AR3030PL" {
      displayName = "Customers"
    }
  }
}
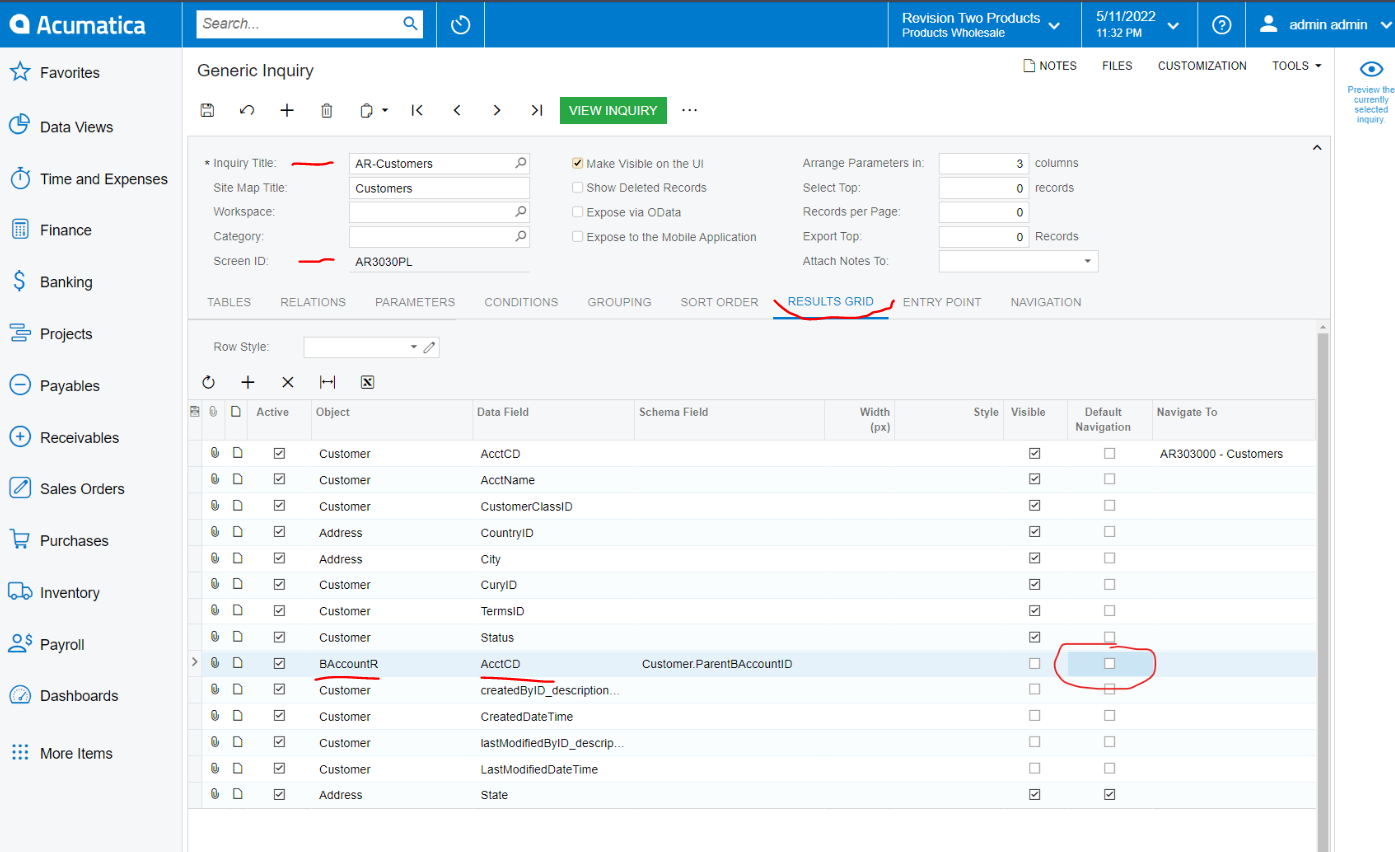
 

  1. Then GO to the AR3030PL generic inquiry click on Results Grid, and uncheck the Default Navigation checkbox for the BAccountR -> AcctCD field, see below:
  1. Then proceed to map the AR303000 screen to the mobile app and include it in the mobile Menu(sitemap).

Reply


About Acumatica ERP system
Acumatica Cloud ERP provides the best business management solution for transforming your company to thrive in the new digital economy. Built on a future-proof platform with open architecture for rapid integrations, scalability, and ease of use, Acumatica delivers unparalleled value to small and midmarket organizations. Connected Business. Delivered.
© 2008 — 2024  Acumatica, Inc. All rights reserved