

Acumatica ERP allows you to define attributes for various entities. In this article, I will explain how to extend attribute functionality to entities where it is not natively implemented.
Before we start let’s look at how existing attributes work.

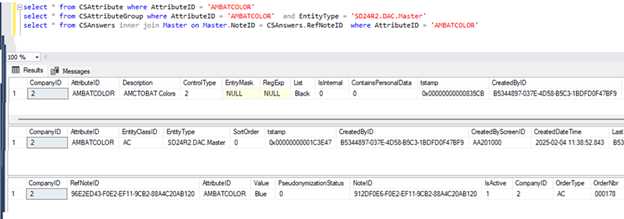
CSAttribute – contains the definition of an attribute;
CSAttributeGroup – contains attribute setup for a particular Class. EntityType – entity for which attribute is used, EntityClassID – type of the entity.
CSAnswers – contains values of attributes. RefNoteID – NoteID of the entity.
In our case entity is PX.Objects.CR.Contact could have different types and you can set up different attributes on each of them.
1. Custom Form
Story
You have:
- Custom Entry screen with master-detail relations. (ex. Sales Order (SO301000)).
- Custom Order Type screen where your entry screen settings are specified (ex. Order Type (SO201000))
You need:
- Attributes tab on the Entry screen which is configured on the Order Type screen.
Implementation
Step 1. Order Type Screen.
1. In Order Type Graph add CSAttributeGroupList view. This view will store CSAttributeGroup. Here you need specify your EntityType and EntityClassID.
public class MasterTypeMaint : PXGraph<MasterTypeMaint, MasterType>
{
	public PXSelect<MasterType> MasterTypes;

	public PXSelect<MasterType, Where<MasterType.orderType, Equal<Current<MasterType.orderType>>>> CurrentMasterType;

	public CSAttributeGroupList<MasterType.orderType, Master> Mapping;
}
Where Master – master table in entry screen (EntityType);
MasterType.orderType – master type (EntityClassID).
2. Add a tab to aspx code.
<px:PXTabItem Text="Attributes">
    <Template>
        <px:PXLayoutRule runat="server" StartRow="true" StartGroup="true" LabelsWidth="S" ControlSize="XM" />
        <px:PXGrid ID="AttributesGrid" runat="server" SkinID="Details" ActionsPosition="Top" DataSourceID="ds" Width="100%" BorderWidth="0px"
            Style="left: 0px; top: 0px; height: 13px">
            <Levels>
                <px:PXGridLevel DataMember="Mapping">
                    <RowTemplate>
                        <px:PXLayoutRule runat="server" StartColumn="True" LabelsWidth="M" ControlSize="XM" />
                        <px:PXSelector ID="edCRAttributeID" runat="server" DataField="AttributeID" AutoRefresh="true" FilterByAllFields="True" />
                        <px:PXTextEdit ID="edDescription2" runat="server" AllowNull="False" DataField="Description" />
                        <px:PXCheckBox ID="chkRequired" runat="server" DataField="Required" />
                        <px:PXNumberEdit ID="edSortOrder" runat="server" DataField="SortOrder" />
                    </RowTemplate>
                    <Columns>
                        <px:PXGridColumn DataField="IsActive" AllowNull="False" TextAlign="Center" Type="CheckBox" />
                        <px:PXGridColumn DataField="AttributeID" DisplayFormat=">aaaaaaaaaa" Width="81px" AutoCallBack="True" LinkCommand="CRAttribute_ViewDetails" />
                        <px:PXGridColumn AllowNull="False" DataField="Description" Width="351px" />
                        <px:PXGridColumn DataField="SortOrder" TextAlign="Right" Width="54px" />
                        <px:PXGridColumn AllowNull="False" DataField="Required" TextAlign="Center" Type="CheckBox" CommitChanges="true" />
                        <px:PXGridColumn AllowNull="False" DataField="ControlType" Type="DropDownList" Width="63px" />
                        <px:PXGridColumn AllowNull="False" DataField="AttributeCategory" Type="DropDownList" CommitChanges="true" />
                    </Columns>
                </px:PXGridLevel>
            </Levels>
            <AutoSize Enabled="True" MinHeight="150" />
        </px:PXGrid>
    </Template>
</px:PXTabItem>
3. Insert records into the tab.
After the data is added to the tab, the UI screen will look similar to :
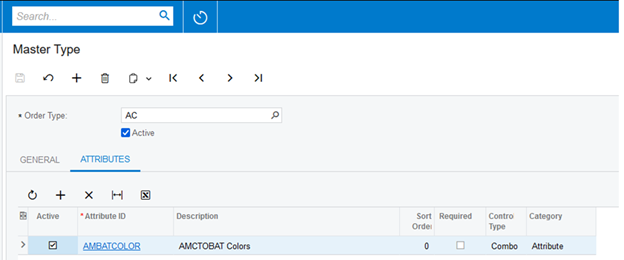
The corresponding DAC will looks as follows:

Step 2. Entry Screen.
1. In the Entry Screen graph add CRAttributeList view. This view will store CSAnswer. Here you need to specify your EntityType.
public class MasterEntry : PXGraph<MasterEntry, Master>
{
	public PXSelect<Master> Document;

	public PXSelect<Master, Where<Master.orderType, Equal<Current<Master.orderType>>,
        	And<Master.orderNbr, Equal<Current<Master.orderNbr>>>>>
    	CurrentDocument;

	public CRAttributeList<Master> Answers;
}
Where Master – master table in entry screen (EntityType);
2. In Master DAC add the following fields:
        #region Attributes

        [CRAttributesField(typeof(Master.orderType))]
        public virtual string[] Attributes { get; set; }
        public abstract class attributes : BqlAttributes.Field<attributes> { }

        public virtual string ClassID => OrderType;
        #endregion
Where typeof(Master.orderType) - master type (EntityClassID).
As these fields are unbound, you do not need to add db scripts.
Note: check if your DAC contains the NoteID field. This is required condition
3. Add Attributes tab to aspx form.
<px:PXTabItem Text="Attributes">
	<Template>
    	<px:PXLayoutRule runat="server" StartColumn="True" LabelsWidth="S" ControlSize="XM" />
    	<px:PXGrid ID="PXGridAnswers" runat="server" Caption="Attributes" DataSourceID="ds" Height="150px" MatrixMode="True" Width="420px" SkinID="Attributes">
        	<Levels>
            	<px:PXGridLevel DataKeyNames="AttributeID,EntityType,EntityID" DataMember="Answers">
                	<RowTemplate>
                    	<px:PXLayoutRule runat="server" ControlSize="XM" LabelsWidth="M" StartColumn="True" />
                    	<px:PXTextEdit ID="edParameterID" runat="server" DataField="AttributeID" Enabled="False" />
                    	<px:PXTextEdit ID="edAnswerValue" runat="server" DataField="Value" />
                	</RowTemplate>
                	<Columns>
                    	<px:PXGridColumn AllowShowHide="False" DataField="AttributeID" TextField="AttributeID_description" TextAlign="Left" Width="135px" />
                    	<px:PXGridColumn DataField="isRequired" TextAlign="Center" Type="CheckBox" Width="80px" />
                    	<px:PXGridColumn DataField="AttributeCategory" Type="DropDownList" />
                    	<px:PXGridColumn DataField="Value" Width="185px" />
                	</Columns>
            	</px:PXGridLevel>
        	</Levels>
    	</px:PXGrid>

	</Template>
</px:PXTabItem>
4. Insert records into the tab.
After the data is added to the tab, the UI screen will look similar to :
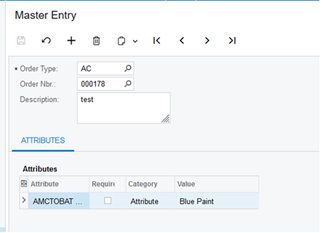
The above steps result into the following DACs data:
2. Existing Form
Story
You have:
- Existing screen where attributes are not implemented.
You need:
- Attributes tab on the screen.
Implementation
For example, we consider adding attributes to the Customer Location screen (AR303020). The primary DAC to be used is PX.Objects.CR.Location.
In this case, the attribute setup will not depend on the type (class), as it will be the same across all Locations.
Step 1. Location DAC.
1. Add the following fields:
public sealed class LocationExt : PXCacheExtension<Location>
 {
 	#region Attributes

 	[CRAttributesField(typeof(classID), typeof(Location.noteID))]
 	public string[] Attributes { get; set; }
 	public abstract class attributes : BqlAttributes.Field<attributes> { }

 	[PXString(20)]
 	public string ClassID => "CUSTLOC";
 	public abstract class classID : BqlString.Field<classID> { }
 	#endregion
 }
Note: it is required to explicitly specify typeof(Location.noteID
Step 2. Project Attributes Screen.
1. Since the attribute setup should be the same for all locations, it can be managed from any setup screen. I chose the Project Attributes screen as it already includes similar functionality.
Modify dropdown list to contain information for our DAC.
public class ProjectAttributeGroupMaintExt : PXGraphExtension<ProjectAttributeGroupMaint>
{
    [PXOverride]
    public string getEntityName(string classid)
    {
        switch (classid)
        {
            case Common.Constants.CustomerLocation:
                return typeof(LocationExt).FullName;
            default:
                return getEntityNameStatic(classid);
        }
    }

    public override void Initialize()
    {
        AddCustomerLocationClass();
        base.Initialize();
    }

    public virtual void AddCustomerLocationClass()
    {
        PXStringListAttribute.AppendList<GroupTypeFilter.classID>(Base.Filter.Cache, null,
            new string[] { "CUSTLOC" },
            new string[] { "Customer Location" });
    }
}
2. Insert records.

Step 3. Customer Location Screen.
1. Add CRAttributeList view to CustomerLocationMaint graph.
public class CustomerLocationMaintExt : PXGraphExtension<CustomerLocationMaint>
{
	public CRAttributeList<Location> Answers;
}
2. Add a tab to aspx form.
<px:PXTabItem Text="Attributes">
	<Template>
    	<px:PXGrid runat="server" ID="PXGridAnswers" Height="200px" SkinID="Inquire" Width="100%" MatrixMode="True" DataSourceID="ds">
        	<AutoSize Enabled="True" MinHeight="200" />
        	<ActionBar>
            	<Actions>
                	<Search Enabled="False" />
            	</Actions>
        	</ActionBar>
        	<Mode AllowAddNew="False" AllowDelete="False" AllowColMoving="False" />
        	<Levels>
            	<px:PXGridLevel DataMember="Answers">
                	<Columns>
                    	<px:PXGridColumn DataField="AttributeID" TextAlign="Left" TextField="AttributeID_description" Width="250px" AllowShowHide="False" />
                    	<px:PXGridColumn DataField="isRequired" Type="CheckBox" TextAlign="Center" />
                    	<px:PXGridColumn DataField="Value" AllowSort="False" AllowShowHide="False" />
                	</Columns>
            	</px:PXGridLevel>
        	</Levels>
    	</px:PXGrid>
	</Template>
</px:PXTabItem>
3. Insert records into the tab
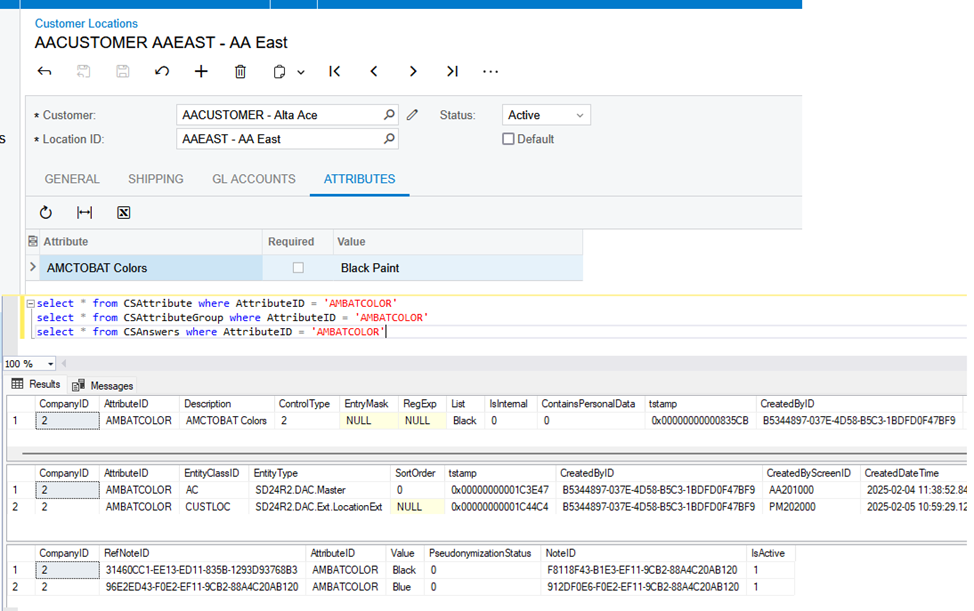
Important: note the difference when we added attributes to a custom form and an existing one.
CSAttributeGroup.EntityType field - contains full name class (typeof(LocationExt).FullName) where the EntityClassID is defined.
The solution source is attached below. Your feedback is appreciated.

