Solved

Error: 'NavigationScreenLineNbr' cannot be empty


Forum|alt.badge.img

I am going through the S130 Data Retrieval and Analysis, second lesson. We are going through setting up the Navigation Targets and Parameters. There are three Navigation Targets, AP303000 - Vendors,

AR303000 - Customers, and CR303000 - Business Accounts. The Window Mode is Side Panel for all three. Selecting any of the Navigation Targets, such as the AP303000 - Vendors, Navigation Parameters is set for AcctCD, Parameter BAccount.AcctCD has been set, Icon is the directions car (all set up in accordance with the video). When I attempt to save my work, an error pops up stating:

Error: ‘NavigationScreenLineNbr’ cannot be empty.

Best answer by jamesh

Here’s the step by step instructions. 
 

First, make sure you’re using the U100 dataset or you may be missing key features for this exercise. 
 

Specifying the Navigation Settings for the Side Panel
To specify the needed navigation settings for the side panel of the generic inquiry, do the following:


1. Open the Generic Inquiry (SM208000) form.
2. In the Inquiry Title box of the Summary area, select DB1-CRBAccounts.
This generic inquiry is a copy of the generic inquiry with the CR-BusinessAccounts2018R1 inquiry title and the Business Accounts site map title, which is associated with the predefined Business Accounts (CR3030PL) generic inquiry form. Notice that the S130 Business Accounts site map title is specified for it.
3. On the Navigation tab, in the Navigation Targets pane, add a row, and in the Link column, select AP303000 - Vendors.
   The Business Accounts (CR3030PL) generic inquiry form, which is the list of the business accounts that have been created on the Business Accounts (CR303000) form, is the substitute form that is opened when you click the Business Accounts link in a workspace or a list of search results.
          When you add a row on the Navigation Targets pane and select Side Panel in the Window Mode column, the check box in the Active column is selected, which means that the side panel is enabled.
4. Add one more row, and select AR303000 - Customers in the Link column.
5. Add one more row, and select CR303000 - Business Accounts in the Link column.
6. In the Window Mode column for all the added rows, select Side Panel.
7. On the form toolbar, click Save.
8. In the Navigation Targets pane, click the row with the AP303000 - Vendors link, and in the Icon box of the right pane, select directions car.
The Icon box appears when you select a row for which Side Panel is selected in the Window Mode column.
9. In the Navigation Targets pane, click the row with the AR303000 - Customers link, and in the Icon box of the right pane, select shopping cart.
10. In the Navigation Targets pane, click the row with the CR303000 - Business Accounts link, and in the Icon box of the right pane, select badge.
11. On the form toolbar, click Save.
12. In the Navigation Targets pane, click AP303000 - Vendors, and in the Navigation Parameters
table (in the right pane), add a row, and specify the following settings in the added row:
• Field: AccCD
• Parameter: BAccount.AcctCD
13. On the form toolbar, click Save.
14. In the Navigation Targets pane, click AR303000 - Customers, and in the Navigation
Parameters table, add a row, and specify the following settings in the added row:
• Field: AccCD
• Parameter: BAccount.AcctCD
15. On the form toolbar, click Save.
16. In the Navigation Targets pane, click CR303000 - Business Accounts, and in the Navigation
Parameters table, add a row, and specify the following settings in the added row:
• Field: AccCD
• Parameter: BAccount.AcctCD
17. On the form toolbar, click Save.

View original
Did this topic help you find an answer to your question?

3 replies

jamesh
Semi-Pro I
Forum|alt.badge.img+7
  • Semi-Pro I
  • 172 replies
  • Answer
  • June 9, 2023

Here’s the step by step instructions. 
 

First, make sure you’re using the U100 dataset or you may be missing key features for this exercise. 
 

Specifying the Navigation Settings for the Side Panel
To specify the needed navigation settings for the side panel of the generic inquiry, do the following:


1. Open the Generic Inquiry (SM208000) form.
2. In the Inquiry Title box of the Summary area, select DB1-CRBAccounts.
This generic inquiry is a copy of the generic inquiry with the CR-BusinessAccounts2018R1 inquiry title and the Business Accounts site map title, which is associated with the predefined Business Accounts (CR3030PL) generic inquiry form. Notice that the S130 Business Accounts site map title is specified for it.
3. On the Navigation tab, in the Navigation Targets pane, add a row, and in the Link column, select AP303000 - Vendors.
   The Business Accounts (CR3030PL) generic inquiry form, which is the list of the business accounts that have been created on the Business Accounts (CR303000) form, is the substitute form that is opened when you click the Business Accounts link in a workspace or a list of search results.
          When you add a row on the Navigation Targets pane and select Side Panel in the Window Mode column, the check box in the Active column is selected, which means that the side panel is enabled.
4. Add one more row, and select AR303000 - Customers in the Link column.
5. Add one more row, and select CR303000 - Business Accounts in the Link column.
6. In the Window Mode column for all the added rows, select Side Panel.
7. On the form toolbar, click Save.
8. In the Navigation Targets pane, click the row with the AP303000 - Vendors link, and in the Icon box of the right pane, select directions car.
The Icon box appears when you select a row for which Side Panel is selected in the Window Mode column.
9. In the Navigation Targets pane, click the row with the AR303000 - Customers link, and in the Icon box of the right pane, select shopping cart.
10. In the Navigation Targets pane, click the row with the CR303000 - Business Accounts link, and in the Icon box of the right pane, select badge.
11. On the form toolbar, click Save.
12. In the Navigation Targets pane, click AP303000 - Vendors, and in the Navigation Parameters
table (in the right pane), add a row, and specify the following settings in the added row:
• Field: AccCD
• Parameter: BAccount.AcctCD
13. On the form toolbar, click Save.
14. In the Navigation Targets pane, click AR303000 - Customers, and in the Navigation
Parameters table, add a row, and specify the following settings in the added row:
• Field: AccCD
• Parameter: BAccount.AcctCD
15. On the form toolbar, click Save.
16. In the Navigation Targets pane, click CR303000 - Business Accounts, and in the Navigation
Parameters table, add a row, and specify the following settings in the added row:
• Field: AccCD
• Parameter: BAccount.AcctCD
17. On the form toolbar, click Save.


Forum|alt.badge.img
  • Author
  • Jr Varsity II
  • 16 replies
  • June 14, 2023

Thank you for your answer. I kind of figured that I was using the incorrect training db (SalesDemo)  instead of the U100. Once I installed that, everything else worked like a champ. Just finished the U100 S130 Data Retrieval and Analysis yesterday,. 


jamesh
Semi-Pro I
Forum|alt.badge.img+7
  • Semi-Pro I
  • 172 replies
  • June 14, 2023

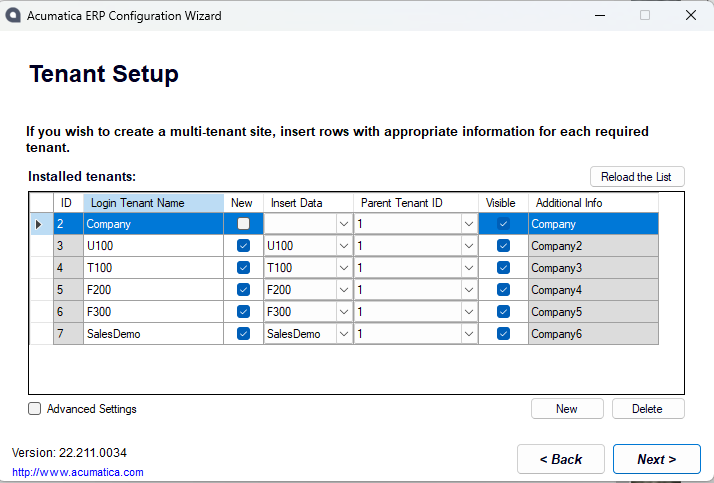
I can’t count how many times that’s happened to me when going through various trainings.  One thing I’ve done to help prevent this, was load the data sets into separate tenants and rename the companies.  You can have one data set loaded into each tenant company and switch between tenants based upon the training you’re doing.   


This has helped me in the past to help keep things organized and saved a ton of headache when running into similar issues.  Also helped me keep my progress when advancing through lessons. I could restore snapshots to a tenant and start over from scratch. 


Hope this helps.  And if it did, maybe mark my response as the solution? :) 


Cookie policy

We use cookies to enhance and personalize your experience. If you accept you agree to our full cookie policy. Learn more about our cookies.

 
Cookie settings