Solved

Ability to Default Report Version by Customer

  • 7 September 2022
  • 7 replies
  • 244 views

Forum|alt.badge.img+1

Hello,

Is there functionality to default a sales order (or any other report for that matter) version based on the customer? The base requirement is to be able to dynamically change the format of the report and versioning makes the most amount of sense without creating multiple overlays within the same report.

The idea would be that “Print Sales Order” would dynamically spit out the correct version without the user having to go in the report itself and select the version and then run it. Even if this needs to be a customization I would be curious if it’s possible.

Thanks in advance,

Best answer by Manikanta Dhulipudi

Hi @rhooper91

How to Add a Report in Acumatica

Step 1: Report Designer

On the Report Designer, open the report to which you want to add the form and make sure that it contains parameters required to run the report (for example, OrderType and OrderNbr for a sales order).

Step 2: New Customization Project

On the Customization Projects form, create a new customization project, and open it in the Customization Project Editor.

Step 3: Customize Existing Screen

Click Screens in the navigation pane to open the Customized Screens page. On the page toolbar, click Add Screen > Customize Existing Screen and select the correct form (in this case, Sales Orders).

Step 4: Action Properties

In the navigation pane, for whatever screen you’re using, click Actions. In the right panel, click Add New Record > Create New:

  • The Action Properties dialog box will open; then enter the values for the Action Name and Display Name boxes.
  • Select the report needed (SO641000, in our example) in the Destination Screen lookup box.
  • In the Toolbar Folder drop-down list, select Reports.
  • On the Navigation Parameters tab, add parameters required to run the report.
  • Click OK to close the Action Properties dialog box and save changes.
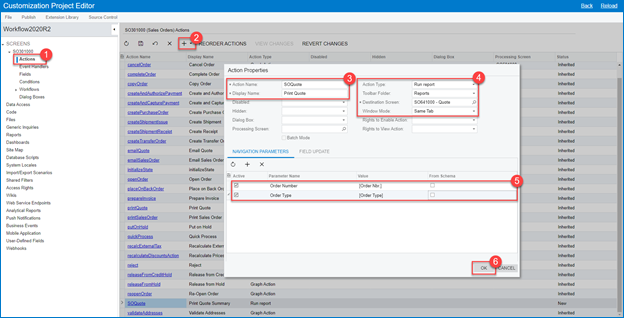
Adding Reports to any Screen in Acumatica

Step 5: Add the Action to Workflow

Add the newly created action to the desired workflow screen states. In this example, we will add it to the On Hold state as follows:

In the navigation pane of the Customization Project Editor, click Workflows under the screen node you want to customize. The Workflows page will open. You can customize a predefined workflow using the changes you have made in the previous versions or you can copy the system workflow instead of extending it or create a simple workflow.

In the Actions tab of the workflow, create a new action by clicking Create Action.

Select the action created in Step 1.
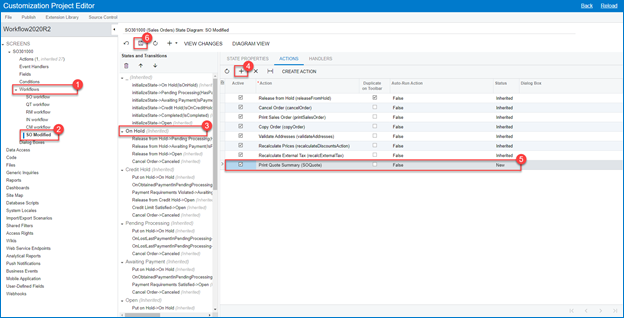
Adding Reports to any Screen in Acumatica

Step 6: Publish the Customization Project

Publish the customization project by clicking Publish > Publish Current Project in the Customization Project Editor.

Adding Reports to any Screen in Acumatica

Results

And just like that: a new report has been added to the Reports drop-down list.

Adding Reports to any Screen in Acumatica

OK, so maybe it wasn’t easy but it is certainly something that anyone can do by following those simple steps.

View original
Did this topic help you find an answer to your question?

7 replies

Kandy Beatty
Captain II
Forum|alt.badge.img+16
  • Captain II
  • 2183 replies
  • September 7, 2022

Hi @rhooper91 

There is currently no out of the box functionality to assign a customer to a Sales Order Type. 


Manikanta Dhulipudi
Captain II
Forum|alt.badge.img+13

Hi @rhooper91 

Just want to understand how many report versions you want to handle separately based on the customer.

If your report is version 3 or 4 then try to create a report in multiple ways as needed and link the report under sales order >Reports

Based on the customer user can run the sales order report as needed from Actions> Reports

Reports can be added under Actions using workflow ( Automation steps called earlier) without any customizations,

Thanks


Manikanta Dhulipudi
Captain II
Forum|alt.badge.img+13

Hi @rhooper91

How to Add a Report in Acumatica

Step 1: Report Designer

On the Report Designer, open the report to which you want to add the form and make sure that it contains parameters required to run the report (for example, OrderType and OrderNbr for a sales order).

Step 2: New Customization Project

On the Customization Projects form, create a new customization project, and open it in the Customization Project Editor.

Step 3: Customize Existing Screen

Click Screens in the navigation pane to open the Customized Screens page. On the page toolbar, click Add Screen > Customize Existing Screen and select the correct form (in this case, Sales Orders).

Step 4: Action Properties

In the navigation pane, for whatever screen you’re using, click Actions. In the right panel, click Add New Record > Create New:

  • The Action Properties dialog box will open; then enter the values for the Action Name and Display Name boxes.
  • Select the report needed (SO641000, in our example) in the Destination Screen lookup box.
  • In the Toolbar Folder drop-down list, select Reports.
  • On the Navigation Parameters tab, add parameters required to run the report.
  • Click OK to close the Action Properties dialog box and save changes.

Adding Reports to any Screen in Acumatica

Step 5: Add the Action to Workflow

Add the newly created action to the desired workflow screen states. In this example, we will add it to the On Hold state as follows:

In the navigation pane of the Customization Project Editor, click Workflows under the screen node you want to customize. The Workflows page will open. You can customize a predefined workflow using the changes you have made in the previous versions or you can copy the system workflow instead of extending it or create a simple workflow.

In the Actions tab of the workflow, create a new action by clicking Create Action.

Select the action created in Step 1.

Adding Reports to any Screen in Acumatica

Step 6: Publish the Customization Project

Publish the customization project by clicking Publish > Publish Current Project in the Customization Project Editor.

Adding Reports to any Screen in Acumatica

Results

And just like that: a new report has been added to the Reports drop-down list.

Adding Reports to any Screen in Acumatica

OK, so maybe it wasn’t easy but it is certainly something that anyone can do by following those simple steps.


Forum|alt.badge.img+1
  • Author
  • Varsity III
  • 64 replies
  • September 7, 2022

@manikantad18,

Thanks for this. I can see how this can work. Essentially create the report or even a graph action to print and send the report and make it visible based on the client type. So there might be duplicates but you would only ever see one based on the customer you are working in. I like it.

Will give this a shot.


Laura02
Captain II
Forum|alt.badge.img+19
  • Captain II
  • 3135 replies
  • September 7, 2022

Hi,

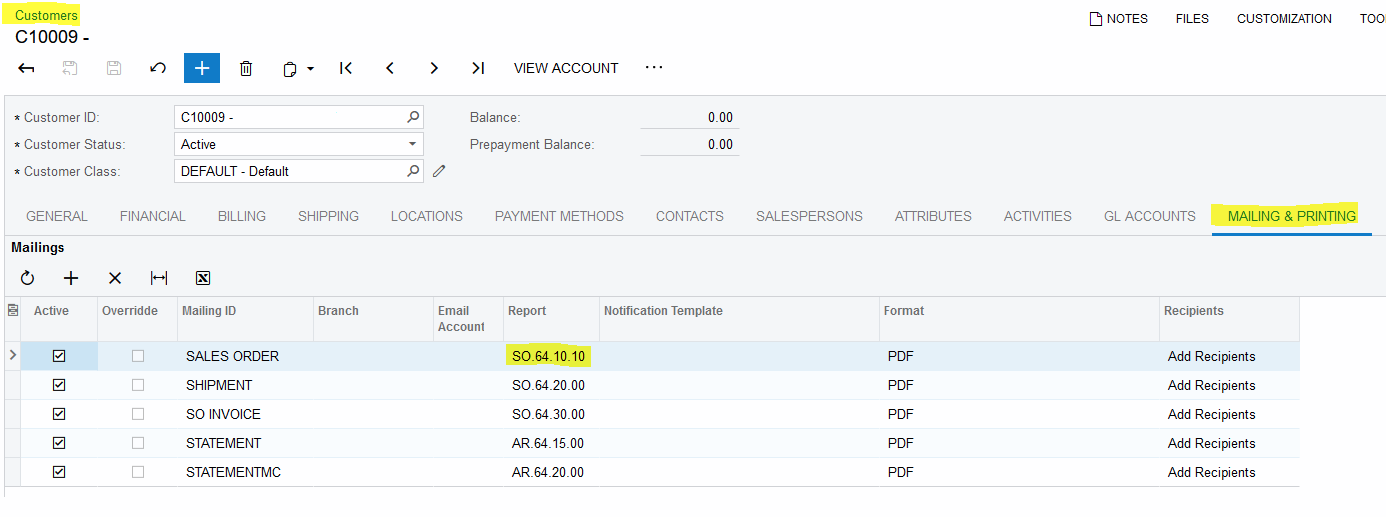
You can also modify the Sales Order using Report Designer, and save the new report as a different version name. Then attach your new sales order to customer class (to default the new SO version to new customers of the class) and to individual customers on the Mailings tab of customer profile. When Sales Orders are printed, this customer will print with a different report format using the new report version you added to their Mailing tab.


Forum|alt.badge.img+1
  • Author
  • Varsity III
  • 64 replies
  • September 7, 2022

Hi @laura01,

I actually think this is exactly what I’m looking for. I think a mix between both solutions would be a good way of approaching this. 

Thanks again!


Manikanta Dhulipudi
Captain II
Forum|alt.badge.img+13

Hi @rhooper91 

Thanks for marking Best Answer

Glad to know that, you got the required assistance to proceed with your work.


Reply


Cookie policy

We use cookies to enhance and personalize your experience. If you accept you agree to our full cookie policy. Learn more about our cookies.

 
Cookie settings