Solved

Negative Values


Forum|alt.badge.img+3

Hello community,
I would like to make a field of Int Data Type to not accept negative values. I would like to know if I can define the logics using the Customization project Editor? If not then using VS how shall I load up the file in which i am willing to apply the condition for the particular field?

Thanks in Advance.

Best answer by harutyungevorgyan

Harshita wrote:
davidnavasardyan09 wrote:

Hello @Harshita 

Using the Customization Project Editor:

  1. Open your Customization Project.
  2. Navigate to the DAC that contains the field you want to modify.
  3. Select the field, and in the field properties, add a PXInt attribute with a MinValue parameter.
  4. In the MinValue parameter, set the minimum value to 0.
  5. Publish the customization.

Here's an example:


[PXInt(MinValue = 0)]
[PXUIField(DisplayName = "Custom Field")]
public virtual int? UsrCustomField { get; set; }
public abstract class usrCustomField : PX.Data.BQL.BqlInt.Field<usrCustomField> { }

Using Visual Studio:

  1. Open your customization project in Visual Studio.
  2. Navigate to the DAC that contains the field you want to modify.
  3. Add or modify the attribute for the field, setting the MinValue parameter of the PXInt attribute to 0.
  4. Save the file and publish the customization from the Customization Project Editor in Acumatica.

After applying the customization, the field should no longer accept negative values. When a user tries to input a negative value, they should receive a validation error.

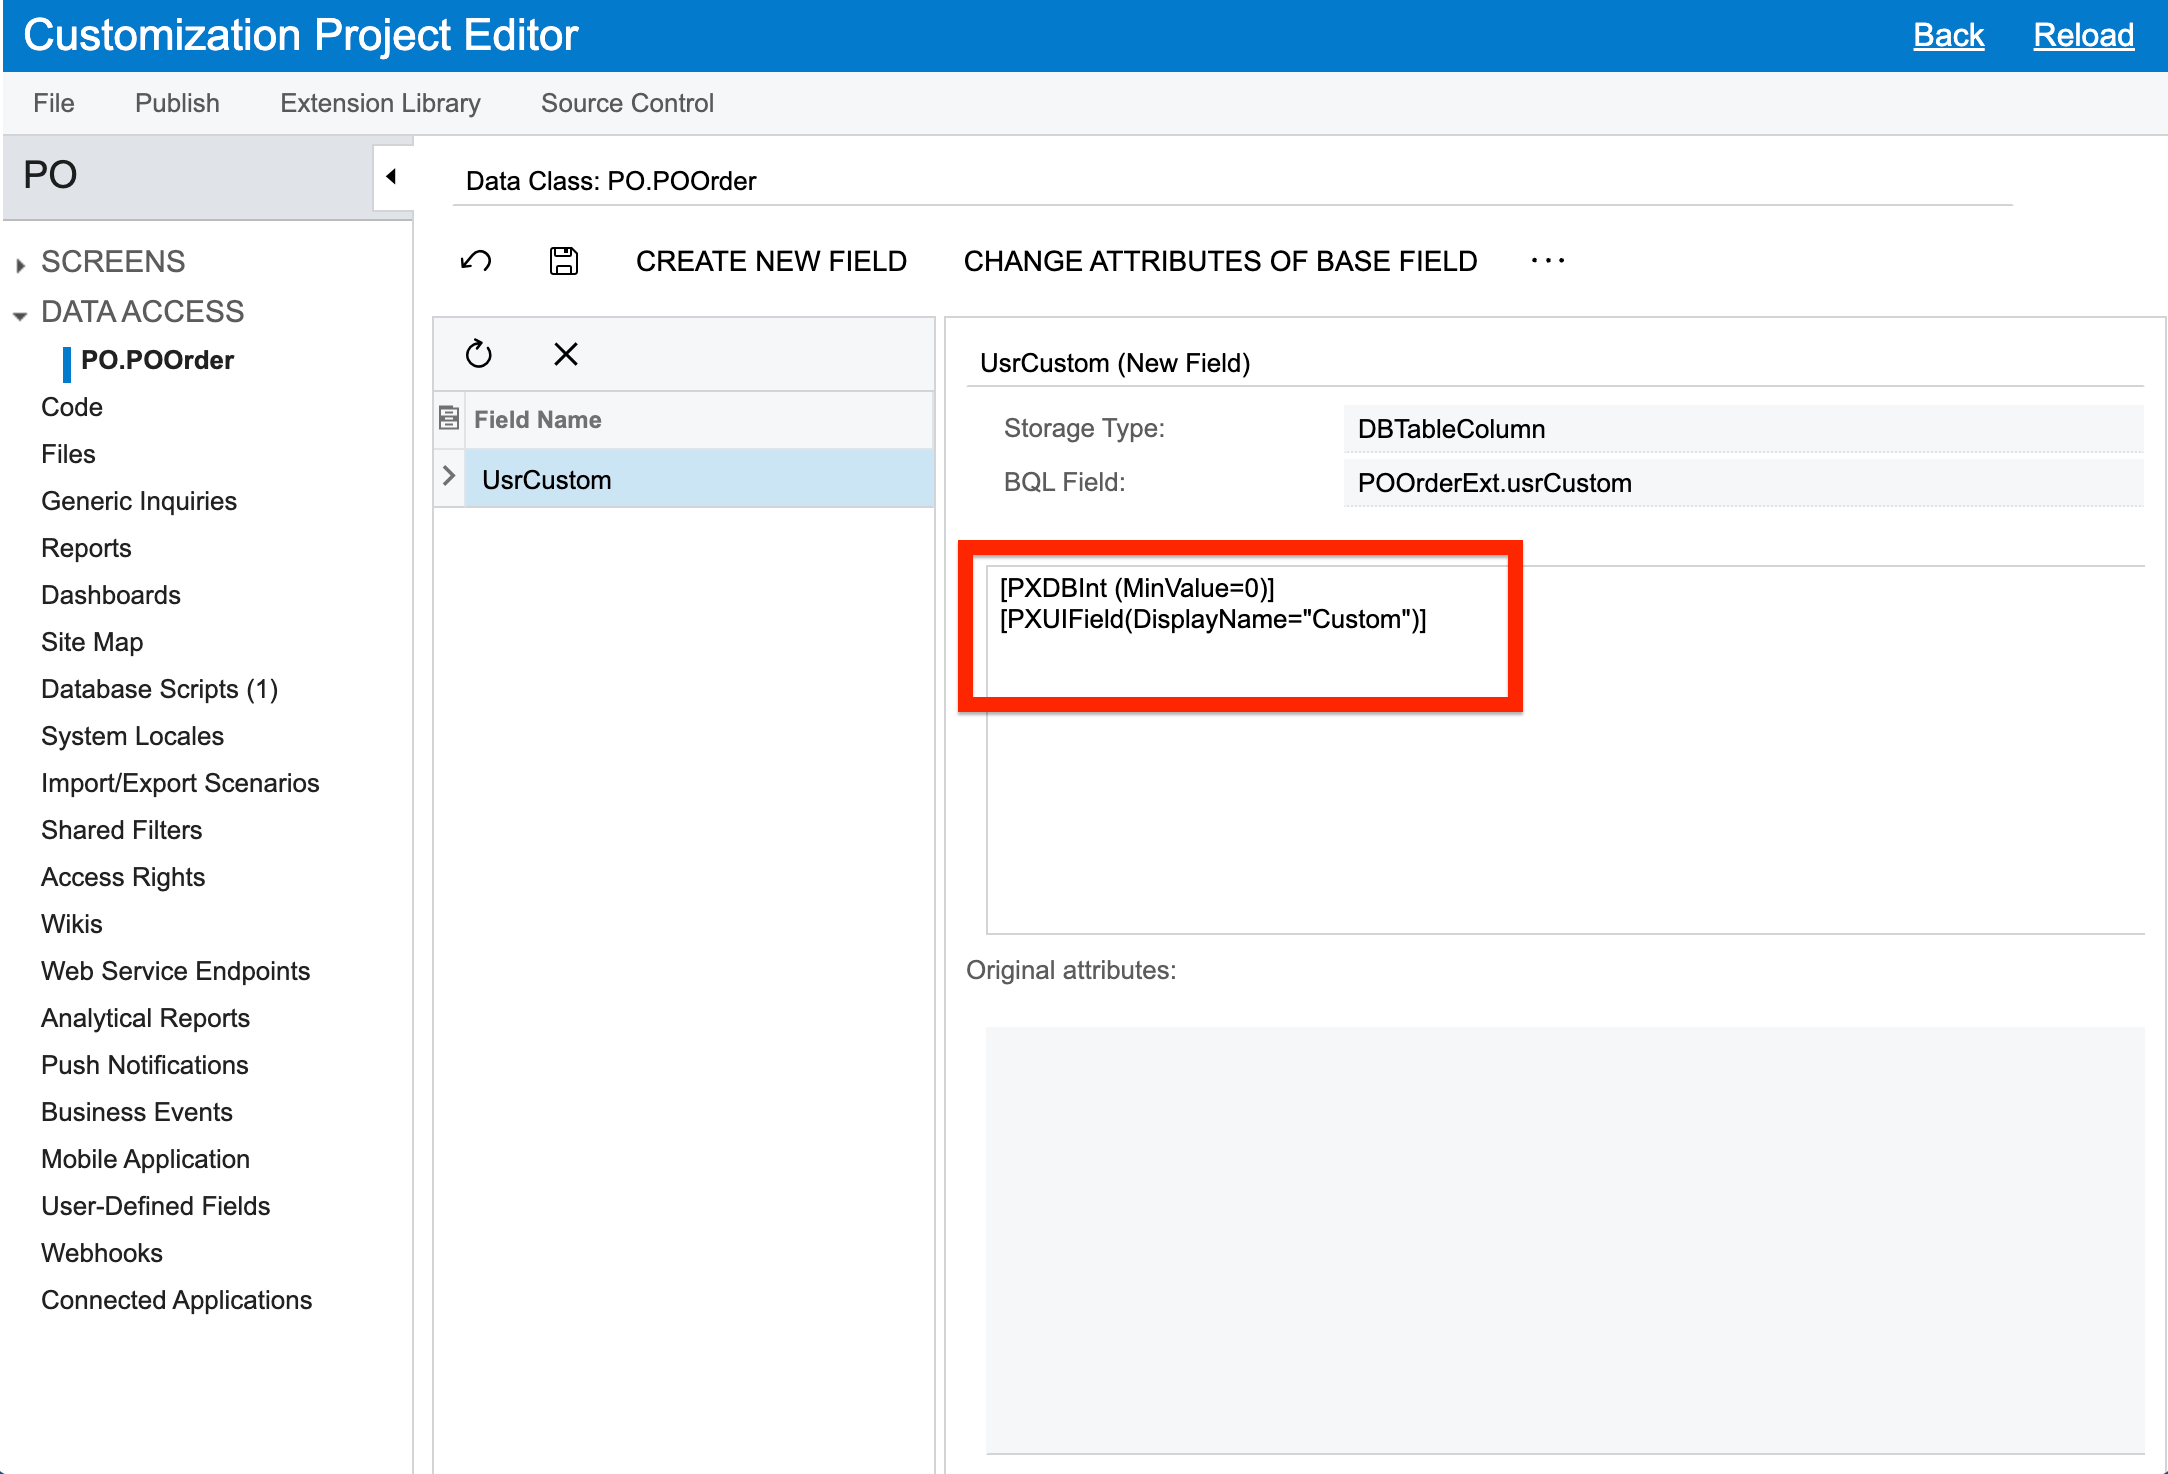
Thank you so much @davidnavasardyan09 , for your solution. What I did first is, I just entered the first line as a condition, published the pkg. So now Acumatica doesn’t allow me to even type the negative ‘-’ sign in the field.


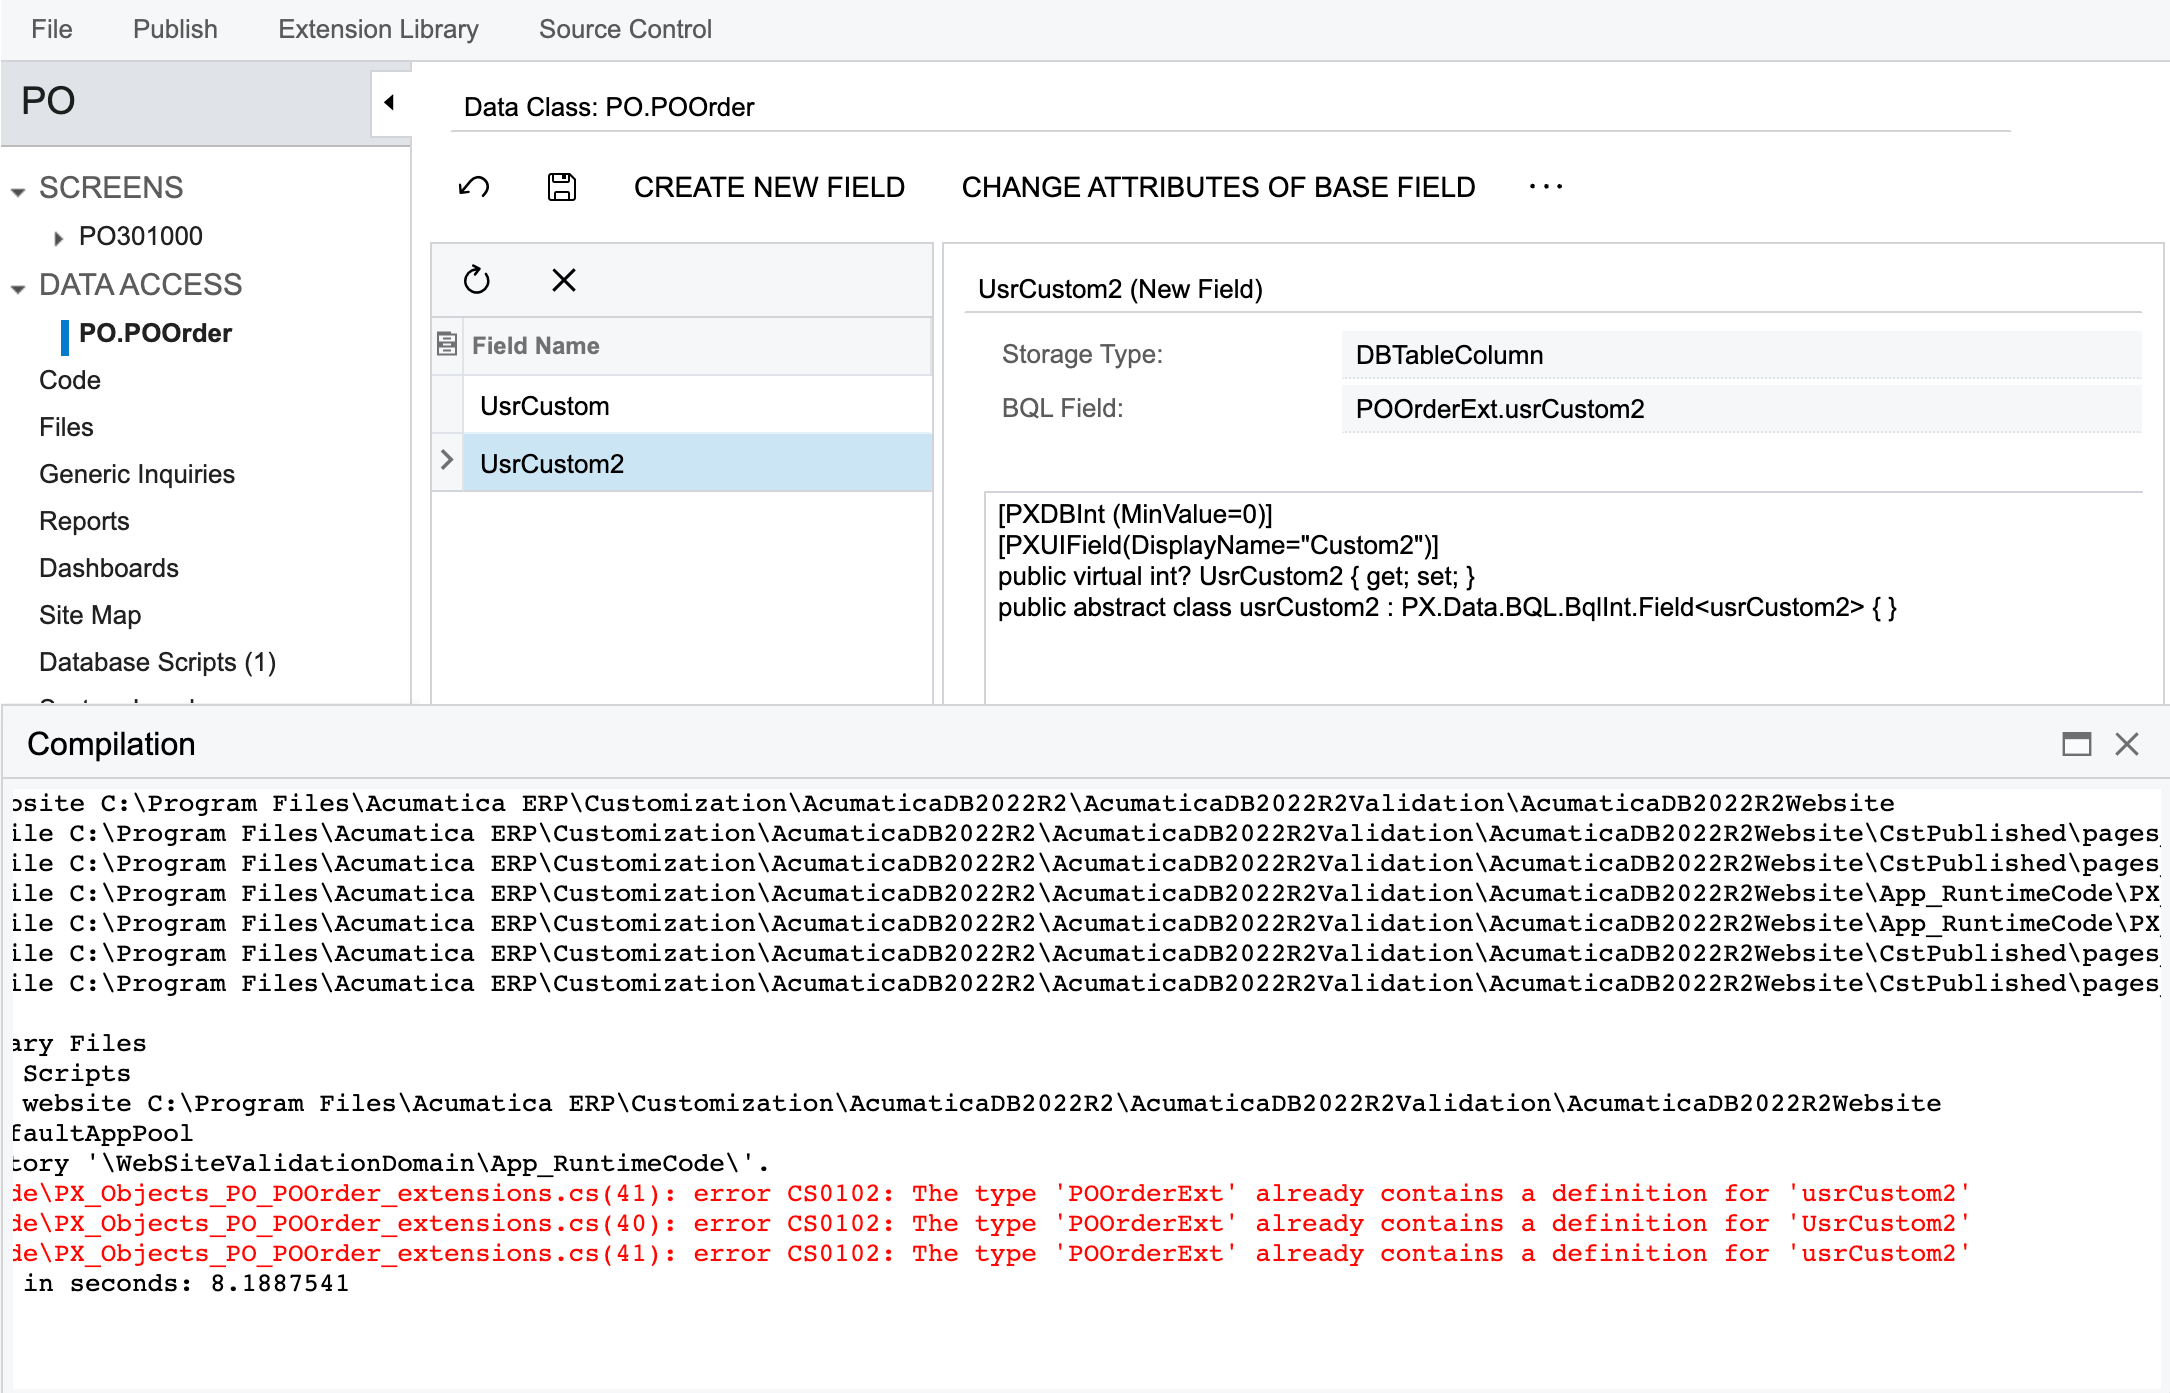
And upon creating a new field and adding the lines as you suggested, the system displays the following message when trying to publish as shown below. Please let me know what I am missing here. I haven’t created any field with name as Custom2 before.


Thanks in advance.

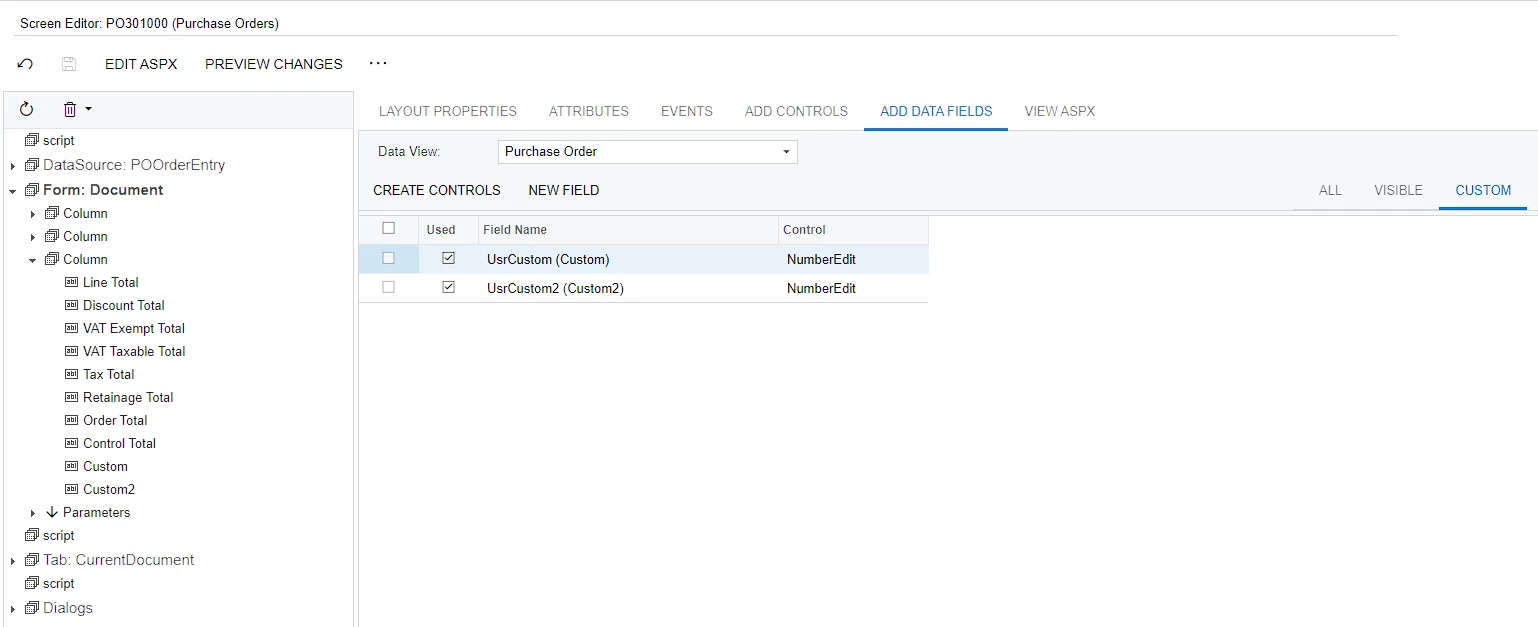
Hi @Harshita , just use these attributes to add your fields, you don’t need to define a property or abstract class for these fields. Apparently the reason of this error is that Acumatica has created this property and abstract class for your fields automatically and if you type it manually it seems like duplication. So keep all as shown on your first screenshot and after that if you want to add these fields to screen just go to screens page in your customization editor,find the form Document and place your fields where you want, for searching the fields quickly you can look for only Custom fields.


View original
Did this topic help you find an answer to your question?

6 replies

darylbowman
Captain II
Forum|alt.badge.img+13

Is this a custom field or an existing field?


Forum|alt.badge.img+3
  • Author
  • Captain II
  • 317 replies
  • August 21, 2023
darylbowman wrote:

Is this a custom field or an existing field?

Its a custom field. But I would also like to know about the existing field.


davidnavasardyan
Jr Varsity I
Forum|alt.badge.img+2

Hello @Harshita 

Using the Customization Project Editor:

  1. Open your Customization Project.
  2. Navigate to the DAC that contains the field you want to modify.
  3. Select the field, and in the field properties, add a PXInt attribute with a MinValue parameter.
  4. In the MinValue parameter, set the minimum value to 0.
  5. Publish the customization.

Here's an example:


[PXInt(MinValue = 0)]
[PXUIField(DisplayName = "Custom Field")]
public virtual int? UsrCustomField { get; set; }
public abstract class usrCustomField : PX.Data.BQL.BqlInt.Field<usrCustomField> { }

Using Visual Studio:

  1. Open your customization project in Visual Studio.
  2. Navigate to the DAC that contains the field you want to modify.
  3. Add or modify the attribute for the field, setting the MinValue parameter of the PXInt attribute to 0.
  4. Save the file and publish the customization from the Customization Project Editor in Acumatica.

After applying the customization, the field should no longer accept negative values. When a user tries to input a negative value, they should receive a validation error.


Forum|alt.badge.img+3
  • Author
  • Captain II
  • 317 replies
  • August 21, 2023
davidnavasardyan09 wrote:

Hello @Harshita 

Using the Customization Project Editor:

  1. Open your Customization Project.
  2. Navigate to the DAC that contains the field you want to modify.
  3. Select the field, and in the field properties, add a PXInt attribute with a MinValue parameter.
  4. In the MinValue parameter, set the minimum value to 0.
  5. Publish the customization.

Here's an example:


[PXInt(MinValue = 0)]
[PXUIField(DisplayName = "Custom Field")]
public virtual int? UsrCustomField { get; set; }
public abstract class usrCustomField : PX.Data.BQL.BqlInt.Field<usrCustomField> { }

Using Visual Studio:

  1. Open your customization project in Visual Studio.
  2. Navigate to the DAC that contains the field you want to modify.
  3. Add or modify the attribute for the field, setting the MinValue parameter of the PXInt attribute to 0.
  4. Save the file and publish the customization from the Customization Project Editor in Acumatica.

After applying the customization, the field should no longer accept negative values. When a user tries to input a negative value, they should receive a validation error.

Thank you so much @davidnavasardyan09 , for your solution. What I did first is, I just entered the first line as a condition, published the pkg. So now Acumatica doesn’t allow me to even type the negative ‘-’ sign in the field.


And upon creating a new field and adding the lines as you suggested, the system displays the following message when trying to publish as shown below. Please let me know what I am missing here. I haven’t created any field with name as Custom2 before.


Thanks in advance.


Forum|alt.badge.img+3
  • Author
  • Captain II
  • 317 replies
  • August 21, 2023

I am also looking to add these 2 new fields and display the result in a third custom field.


harutyungevorgyan
Jr Varsity I
Forum|alt.badge.img
Harshita wrote:
davidnavasardyan09 wrote:

Hello @Harshita 

Using the Customization Project Editor:

  1. Open your Customization Project.
  2. Navigate to the DAC that contains the field you want to modify.
  3. Select the field, and in the field properties, add a PXInt attribute with a MinValue parameter.
  4. In the MinValue parameter, set the minimum value to 0.
  5. Publish the customization.

Here's an example:


[PXInt(MinValue = 0)]
[PXUIField(DisplayName = "Custom Field")]
public virtual int? UsrCustomField { get; set; }
public abstract class usrCustomField : PX.Data.BQL.BqlInt.Field<usrCustomField> { }

Using Visual Studio:

  1. Open your customization project in Visual Studio.
  2. Navigate to the DAC that contains the field you want to modify.
  3. Add or modify the attribute for the field, setting the MinValue parameter of the PXInt attribute to 0.
  4. Save the file and publish the customization from the Customization Project Editor in Acumatica.

After applying the customization, the field should no longer accept negative values. When a user tries to input a negative value, they should receive a validation error.

Thank you so much @davidnavasardyan09 , for your solution. What I did first is, I just entered the first line as a condition, published the pkg. So now Acumatica doesn’t allow me to even type the negative ‘-’ sign in the field.


And upon creating a new field and adding the lines as you suggested, the system displays the following message when trying to publish as shown below. Please let me know what I am missing here. I haven’t created any field with name as Custom2 before.


Thanks in advance.

Hi @Harshita , just use these attributes to add your fields, you don’t need to define a property or abstract class for these fields. Apparently the reason of this error is that Acumatica has created this property and abstract class for your fields automatically and if you type it manually it seems like duplication. So keep all as shown on your first screenshot and after that if you want to add these fields to screen just go to screens page in your customization editor,find the form Document and place your fields where you want, for searching the fields quickly you can look for only Custom fields.


Reply


Cookie policy

We use cookies to enhance and personalize your experience. If you accept you agree to our full cookie policy. Learn more about our cookies.

 
Cookie settings