Solved

Multi-branch Project ID's


Hello,

Hoping that someone can help me with what I thought would be an easy task.  We have a couple of branches and each needs separate projects and thus separate Project ID’s. 
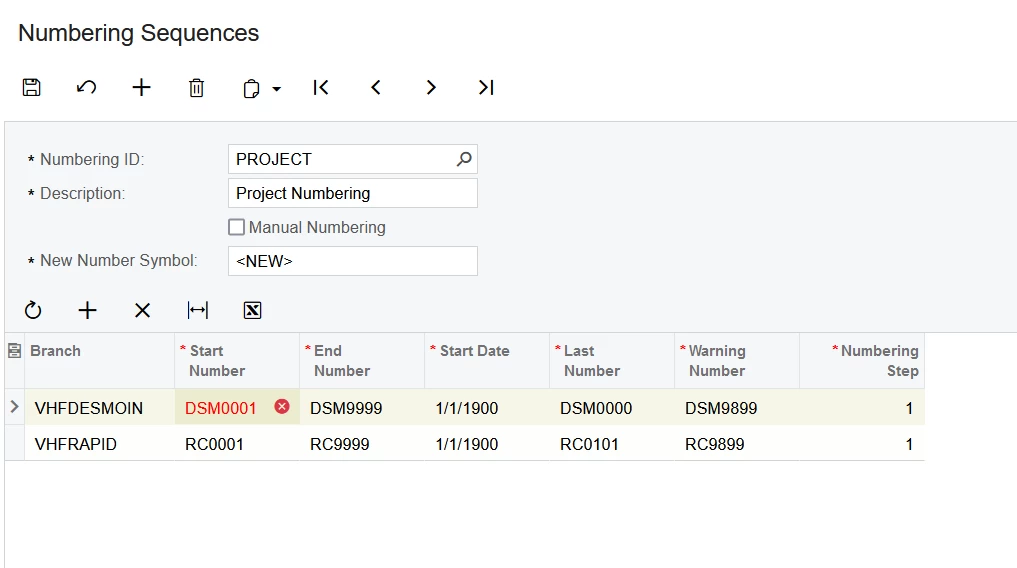
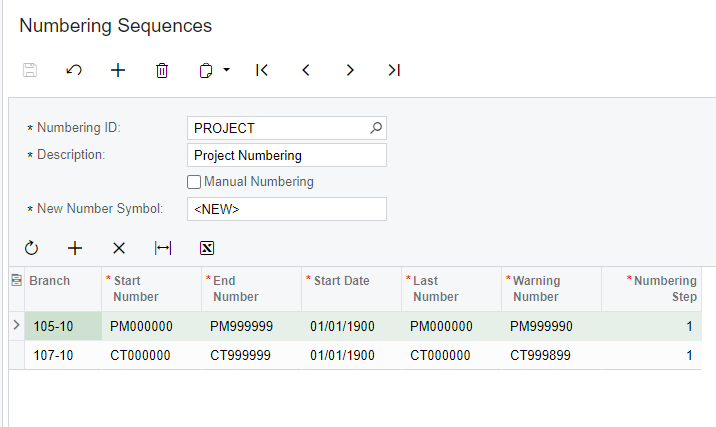
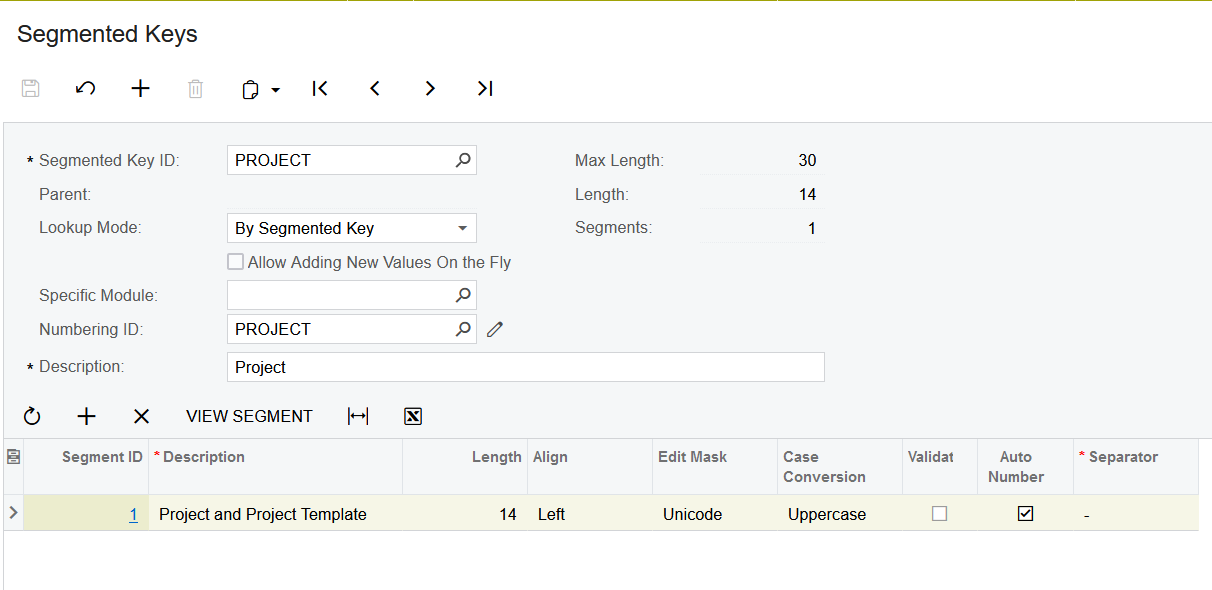
I have looked at a lot of different setup sections and cannot find anywhere that would allow me to change a setting that is associated with adding a different sequence for each branch.  It does not matter what I put in the Start # it gives me the same generic error.
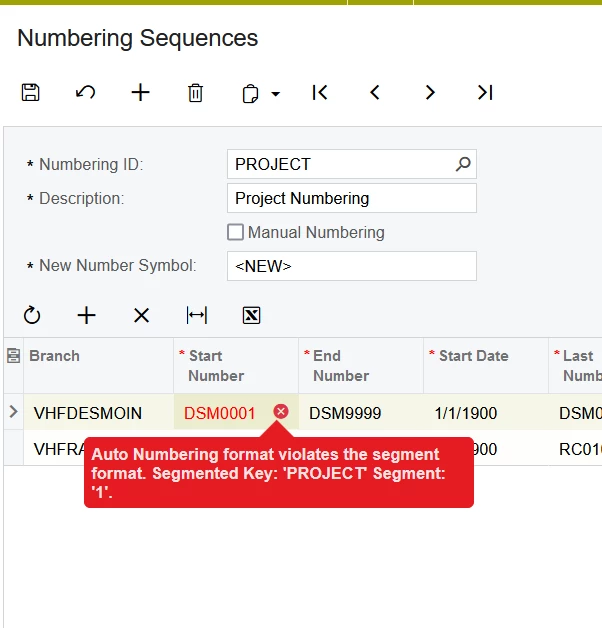
 

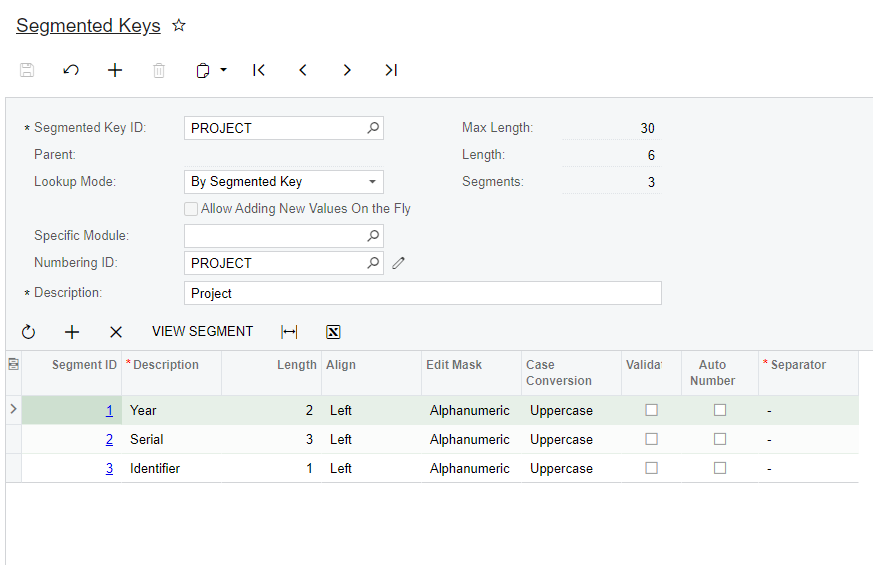
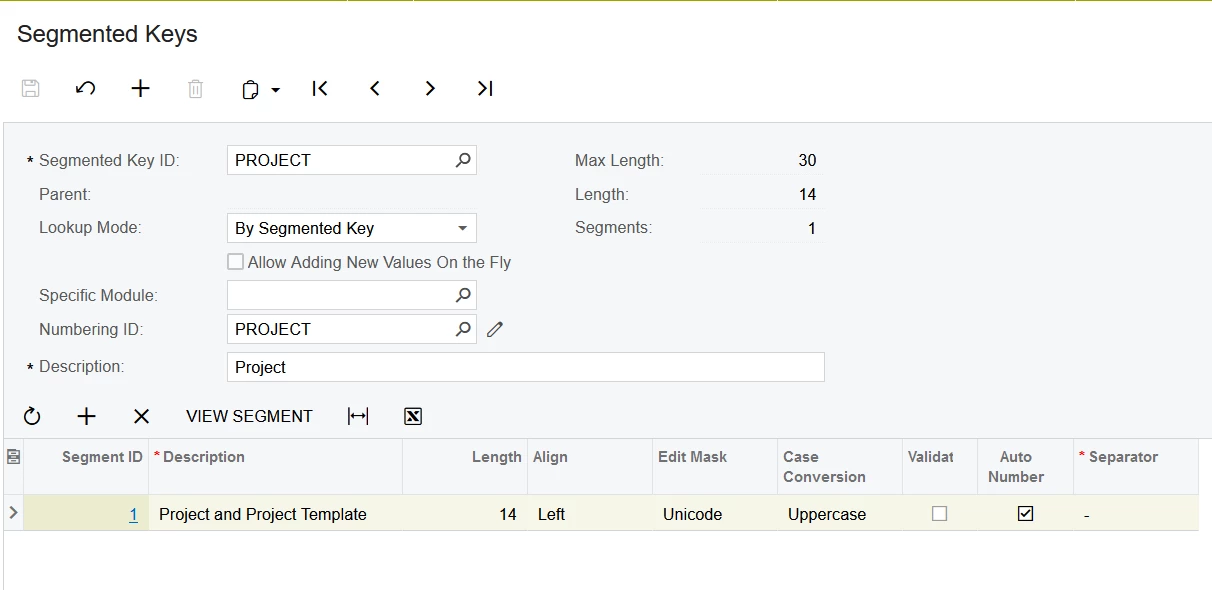
I have reviewed the segmented keys section and what I am attempting to add does not violate the setup criteria.
 

Any help would be greatly appreciated.


Thank you in advance.

Best answer by aaghaei

The procedure to make this work:

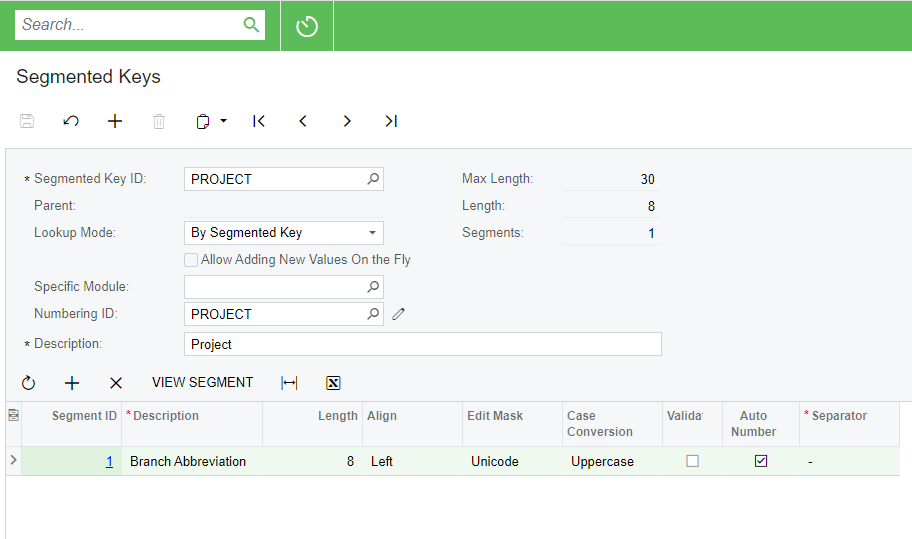
  1. from ScreenId=CS202000&DimensionID=PROJECT turn the Auto Number OFF and save.
  2. click on the Segment ID hyperlink and delete the possible values and save and navigate back to the Segmented Keys screen above
  3. Determine the length of the Segment (Project ID). The numbering sequence later should match this length to system work. Note the length you determine CAN NOT be less than the length of the existing ProjectIDs in the Project Screen PM301000.
  4. Go to PM301000 and make sure the existing projects ID complies with the length and structure you have in your mind. For example, if you want to have 8 characters long Project ID then all existing IDs should be 8 characters long. Also, the Project ID of each branch should comply with the coding convention you have in your mind for each branch. For example, if for branch one you would like to have coding like AA###### (8 Char long) all existing projects of this branch MUST comply with this coding. If there is any project that doesn’t comply with this coding then, you can use the Change Project ID action in this screen to assign a new ID in accordance with your naming convention. Review all existing projects and ensure are properly coded.
  5. Go to ScreenId=CS201010&NumberingID=PROJECT and delete the existing rows in the grid and save.
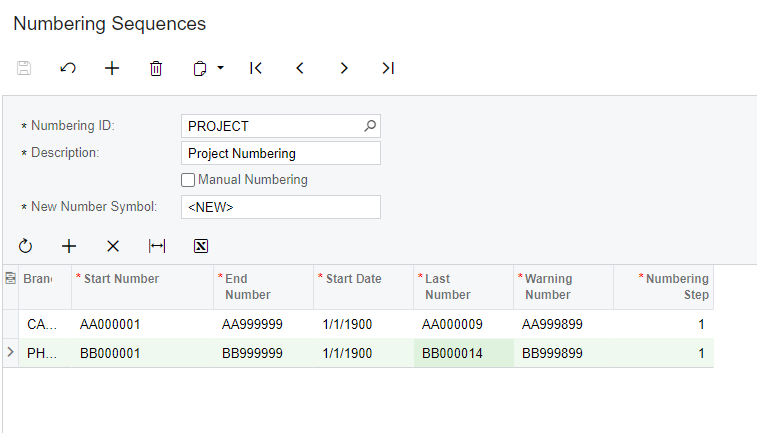
  6. Fill in the Branch and the Start Number according to your naming conventions. For example, in the above example, it is going to be AA000001 (8 char long) for branch one.
  7. When you hit the tab after entering the Start Number, the rest of the fields will automatically be filled.
  8. Update the Last Number with the Greatest Project ID that you have for this branch. For example, if the greatest ID that you have assigned to your projects in branch one is AA000008 then enter this as the last number.
  9. Repeat steps 4 - 8 for all branches. That will be ideal if people do not set up projects while you are doing this to avoid possible inference and invalid ID re-creation. Note that the Numbering Sequence length MUST be consistent amongst all branches.
  10. Go pack to ScreenId=CS202000&DimensionID=PROJECT and set the Auto Number ON and save.
  11. Try to create new projects in each branch and it should work just fine. I know it works in fact.

phew, this was the longest non-code writing I had done in the past two years on cases.

End Result in my example


View original
Did this topic help you find an answer to your question?

6 replies

aaghaei
Captain II
Forum|alt.badge.img+9
  • Captain II
  • 1178 replies
  • March 16, 2023

I tested on 2022R2 and works just fine. See below. The issue based on your screenshot is going back to your Project Segments. 


  • Author
  • Freshman I
  • 4 replies
  • March 16, 2023

Thank you very much.  Doesn’t look intuitive so I just want to be clear…

Should I add an additional Segment Key to accommodate the additional branches?  We will be adding additional branches in the future too so I am trying to understand how the system knows to utilize a different key?  It is not a Segment as I would think from your example above - each of those are part of one Numbering Sequence?


TY


Ted


aaghaei
Captain II
Forum|alt.badge.img+9
  • Captain II
  • 1178 replies
  • March 16, 2023

Can you share your “Project” segment keys and if they have values the values list of each segment.


  • Author
  • Freshman I
  • 4 replies
  • March 16, 2023

Sure,


This is the entire Segmented Keys for Project that we have.


In the screenshots above in my original post you can see the current 2 branches.  We have been using RC0001 for Rapid City for about 8 months now without any issues.  Since we are opening the Des Moines branch we need to setup DM0001 and on to differentiate the projects for that branch.


Is this what you are looking for?  


aaghaei
Captain II
Forum|alt.badge.img+9
  • Captain II
  • 1178 replies
  • Answer
  • March 17, 2023

The procedure to make this work:

  1. from ScreenId=CS202000&DimensionID=PROJECT turn the Auto Number OFF and save.
  2. click on the Segment ID hyperlink and delete the possible values and save and navigate back to the Segmented Keys screen above
  3. Determine the length of the Segment (Project ID). The numbering sequence later should match this length to system work. Note the length you determine CAN NOT be less than the length of the existing ProjectIDs in the Project Screen PM301000.
  4. Go to PM301000 and make sure the existing projects ID complies with the length and structure you have in your mind. For example, if you want to have 8 characters long Project ID then all existing IDs should be 8 characters long. Also, the Project ID of each branch should comply with the coding convention you have in your mind for each branch. For example, if for branch one you would like to have coding like AA###### (8 Char long) all existing projects of this branch MUST comply with this coding. If there is any project that doesn’t comply with this coding then, you can use the Change Project ID action in this screen to assign a new ID in accordance with your naming convention. Review all existing projects and ensure are properly coded.
  5. Go to ScreenId=CS201010&NumberingID=PROJECT and delete the existing rows in the grid and save.
  6. Fill in the Branch and the Start Number according to your naming conventions. For example, in the above example, it is going to be AA000001 (8 char long) for branch one.
  7. When you hit the tab after entering the Start Number, the rest of the fields will automatically be filled.
  8. Update the Last Number with the Greatest Project ID that you have for this branch. For example, if the greatest ID that you have assigned to your projects in branch one is AA000008 then enter this as the last number.
  9. Repeat steps 4 - 8 for all branches. That will be ideal if people do not set up projects while you are doing this to avoid possible inference and invalid ID re-creation. Note that the Numbering Sequence length MUST be consistent amongst all branches.
  10. Go pack to ScreenId=CS202000&DimensionID=PROJECT and set the Auto Number ON and save.
  11. Try to create new projects in each branch and it should work just fine. I know it works in fact.

phew, this was the longest non-code writing I had done in the past two years on cases.

End Result in my example


  • Author
  • Freshman I
  • 4 replies
  • March 22, 2023

Thank you so much for the info!  We will work with this example and I will let you know.😉


Reply


Cookie policy

We use cookies to enhance and personalize your experience. If you accept you agree to our full cookie policy. Learn more about our cookies.

 
Cookie settings