

1. Introduction
Documenting an Acumatica customization project is beneficial to all. As anyone who has published, upgraded, or maintained a customization (i.e. a Customizer) can tell you, determining the purpose of a customization project is often difficult after it exists. Unless you are the author and can remember all its features during its lifetime of use, on the surface it can be a mystery. For example, if you look at the image in Figure 1, which was copied from the current Acumatica Customization Guide online help, do you know what the purpose of any of these customization projects are? You might have a clue, or you might not. Even if you do, are you aware of any of their features or impact, or the Acumatica release for which it was written? Answer: No.
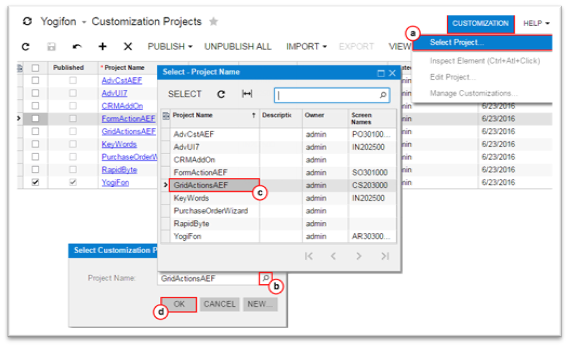
Figure 1: Customization Project List
Imagine looking at these for the first time. In this example, there are no Descriptions. You should always include a short description of the project’s purpose when authoring a customization project. For a very simple one-off customization, this may tell a Customizer all they need to know. Also, the Project Names shown are short and cryptic to most users. It is a good idea to use a naming convention to aid Customizer and client. At Aktion Associates, we use the following project naming convention:
<Creator>.<Client>.<Purpose>.<Acumatica Major Version>
Example:
Aktion.Common.InventoryAllocation.23R1
Note: In this real example, this customization project is shared by multiple clients, thus our use of “Common”.
Such simple steps help greatly to maintain and identify a project or group of them more easily, and I recommend adding to your customization development best practices.
The next recommended step, which is the main subject of this article, is to document the primary features of a customization project, its impact, or anything else with relative importance to the Customizer and client. It is also key to be able to store such documentation within the customization project itself, so that it will follow the project wherever it travels. My suggestion for such capability is the use of a README file.
2. What is a README file?
Likely not a new concept to most, a README file is simply a single text file associated with a software application, library, component, etc. which describes its purpose and use. The file is meant to be noticed by someone reviewing the program files within the file system – thus the commanding name of “READ ME”. Often, the file is named READ.ME, README.txt, or README.md (markdown format).
Markdown is a popular format for Wikis, and some popular source code repositories such as Azure DevOps, GitHub, and Bitbucket support the use of a README.md file containing markdown format to display within their respective Git cloud platforms. Markdown allows you to specify some basic formatting within your text-based documentation, which is then shown as formatted within such tools supporting it.
The content of a README file can include such helpful information as:
- Name and Short Description
- Author(s) and Acknowledgement
- Version and Licensing
- Installation and Integration Instructions
- Features and Requirements
- Support and Contact Information
- Links to additional information
3. Using a README in Acumatica
Using a README for an Acumatica customization project is effective in documenting and tracking its purpose and features; and including it within the customization project allows it to be easily referenced and reviewed. The ultimate goal then is to package a README file in a customization project’s packaged .zip file.
The simplest way to include a README file within an Acumatica customization project is to create a README text file with its content, save it to the Acumatica application’s website App_Data folder, and then add it to the customization project as a file within the Customization Project Editor screen. See Figure 2 for an example of adding a READ.ME file to a customization project from the Add Files popup after the file was created and saved to the App_Data folder.
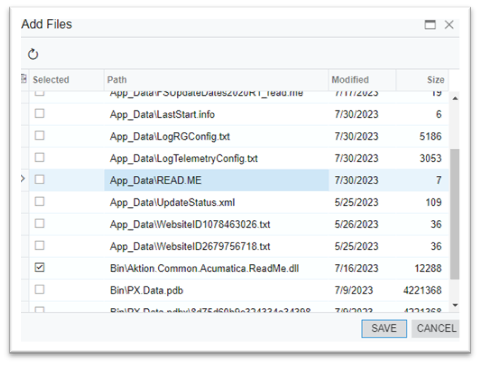
Figure 2: Add README file to project
After adding it, you can also edit the file within Acumatica. See Figure 3 of an example of editing a README file in the Edit File popup by clicking on the file within the Customization Project Editor screen.
If your customization project is published on an on-premises Acumatica instance and you have access to your application’s website folders, you can stop there. You now have a README file associated with your project. However, if your customization project lives on a cloud Acumatica instance, as many do, adding the README to a project takes a bit more effort because you don’t have such access. One method is to add the file to a local Acumatica website where the customization package is loaded, then import that into the cloud site. A more integrated and efficient solution is described in the next section.
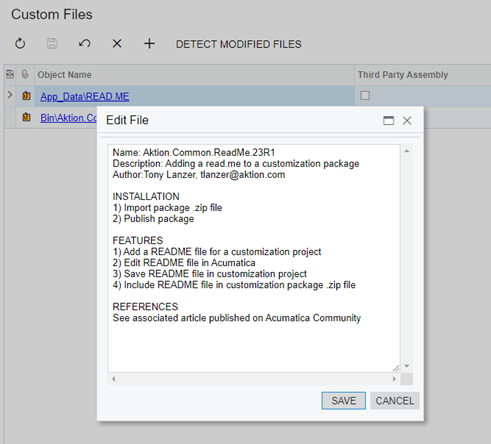
Figure 3: Edit README file
4. A Custom README Project
To support the creation of README files within a customization project where you (1) don’t have access to the application website folders, or (2) want to create the file within Acumatica; you can create a customization project like I did that accomplishes this. My customization project adds a button to the Customization Projects list screen (yes, I customized the Customization Projects screen) that opens a popup dialog in which the README content can be edited. When saving, it writes the content to a file in the application’s App_Data folder. To also save a step of adding the file to the customization project manually, it then inserts/updates the necessary corresponding data rows in the Acumatica database so that the project sees the file, and it will be packaged with the rest of the files.
4.1 Customizing the Screen
Customizing the Customization Projects screen is fairly standard. The graph class for the screen can be extended, and an action button added on the screen toolbar, as shown in the following code snippet (and illustrated in Figure 4):
public PXAction<CustProject> openReadMe;

[PXButton(DisplayOnMainToolbar = true)]
[PXUIField(DisplayName = "read.me")]
public IEnumerable OpenReadMe(PXAdapter adapter)
{
    CustProject project = Base.Projects.Current;
    if (project == null) return adapter.Get();

    CustProjectExt projectExt = project.GetExtension<CustProjectExt>();

    if (string.IsNullOrEmpty(projectExt.UsrReadMe))
    {
        // If read.me file exists, open and set field content
        if (ReadMeFileExists(project))
        {
            projectExt.UsrReadMe = GetReadMeContentText(project);
        }
        // If file doesn't exist, default with a read.me template
        else
        {
            projectExt.UsrReadMe = string.Format(README_TEMPLATE, project.Name,
                project.Description);
        }
    }

    return adapter.Get();
}
GIST: https://gist.github.com/tlanzer-aktion/99ff743dff939b4c815aefdbbe48847f
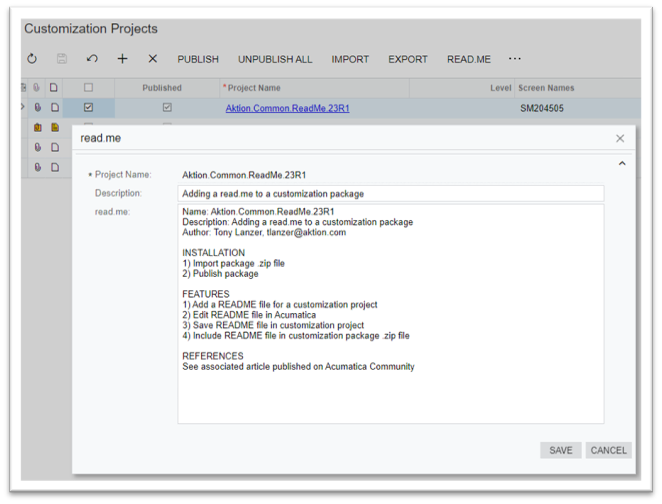
Figure 4: README dialog
A new custom dialog was added from the Customization Project Screen Editor that allows edit of the README content within a new non-DB custom text field. Shown in Figure 4 is a standard multi-line textbox that was used. A classic text README was used in this example, but the rich text PXRichTextEdit textbox could also be used if you want to edit and save as rich text. Although outside the scope of this article, you could likely also use a 3rd party JavaScript markdown editor/viewer for markdown format if you’re more adventurous.
For the form in the dialog, a new data view was added to the graph extension that points to the current customization project, as shown in the following code snippet:
public SelectFrom<CustProject>
    .Where<CustProject.projID.IsNotNull
    .And<CustProject.projID.IsEqual<CustProject.projID.FromCurrent>>>.View
    ReadMeProject;
GIST: https://gist.github.com/tlanzer-aktion/99ff743dff939b4c815aefdbbe48847f
4.2 Saving the README file
For the README content, a custom database field is used for editing and saving to the customization project record, and it is also saved to an actual README text file in the App_Data folder on Save button click from the new dialog. When saving the file, its file name includes the project name so that it is unique in the folder when there are multiple projects. The following code snippet saves to a README file from the new custom field:
internal void SaveReadMeToFile()
{
    CustProject project = Base.Projects.Current;
    if (project == null) return;

    CustProjectExt projectExt = project.GetExtension<CustProjectExt>();

    // Write the read.me content to the web server file system. The read.me file
    // path includes the project name.
    File.WriteAllText(GetProjectReadMePath(project), projectExt.UsrReadMe);
}
GIST: https://gist.github.com/tlanzer-aktion/99ff743dff939b4c815aefdbbe48847f
4.3 Adding the README to the package
Once the README file is saved, in order to include it in the customization project package automatically, a reference to it needs to be added to the appropriate Acumatica database tables. The UploadFile and UploadFileRevision tables contain header and detail rows for a file reference/attachment and its revisions, respectively. UploadFile contains the file name, while UploadFileRevision contains versions of the file with actual content. This article does not explore file versioning, so only a single revision is maintained for a README. The CustObject table contains the details of objects included within a customization project as shown from the Customization Project Editor screen. See Figure 5 for a minimal database diagram excerpt of the tables involved. The CustObject table has a field named Content which is a formatted string that contains within it the UploadFile FileID field value which can be parsed out.
The following code snippet saves the README file reference to the Acumatica database (some pseudocode shown for brevity – see GIST link for full snippet):
internal void SaveReadMeToDB()
{
    CustProject project = Base.Projects.Current;
    if (project == null) return;

    // Look for the project read.me file in the project package file references
    string objFileName = GetObjectReadMePath(project);
    CustObject fileObject =
        ProjectObjects.Select().RowCast<CustObject>()
        .FirstOrDefault(o => o.Name == objFileName);

    // Search for the file reference according to its special Acumatica-
    // formatted and delimited name
    string uploadFileName = GetUploadFileReadMePath(project);
    UploadFile uploadFile = ProjectFiles.SelectSingle(uploadFileName);
    UploadFileRevision uploadFileRev =
        ProjectFileRevisions.SelectSingle(uploadFile?.FileID);

    // Read file into memory
    byte[] readMeFile = GetReadMeContentBytes(project);

    // Save to the db
    using (var tran = new PXTransactionScope())
    {
        // If the file object is not referenced by the customization, add the
        // object
        if (fileObject == null)
        {
            <Insert into CustObject>
        }

        // If the file reference doesn't exist, add the file
        if (uploadFile == null)
        {
            <Insert into UploadFile>
        }

        // If the file revision doesn't exist, add it
        if (uploadFileRev == null)
        {
            <Insert into UploadFileRevision>
        }

        // If the file reference exists, update the file
        else if (uploadFileRev != null)
        {
            <Update UploadFileRevision>
        }

        tran.Complete();
    }
}
GIST: https://gist.github.com/tlanzer-aktion/99ff743dff939b4c815aefdbbe48847f
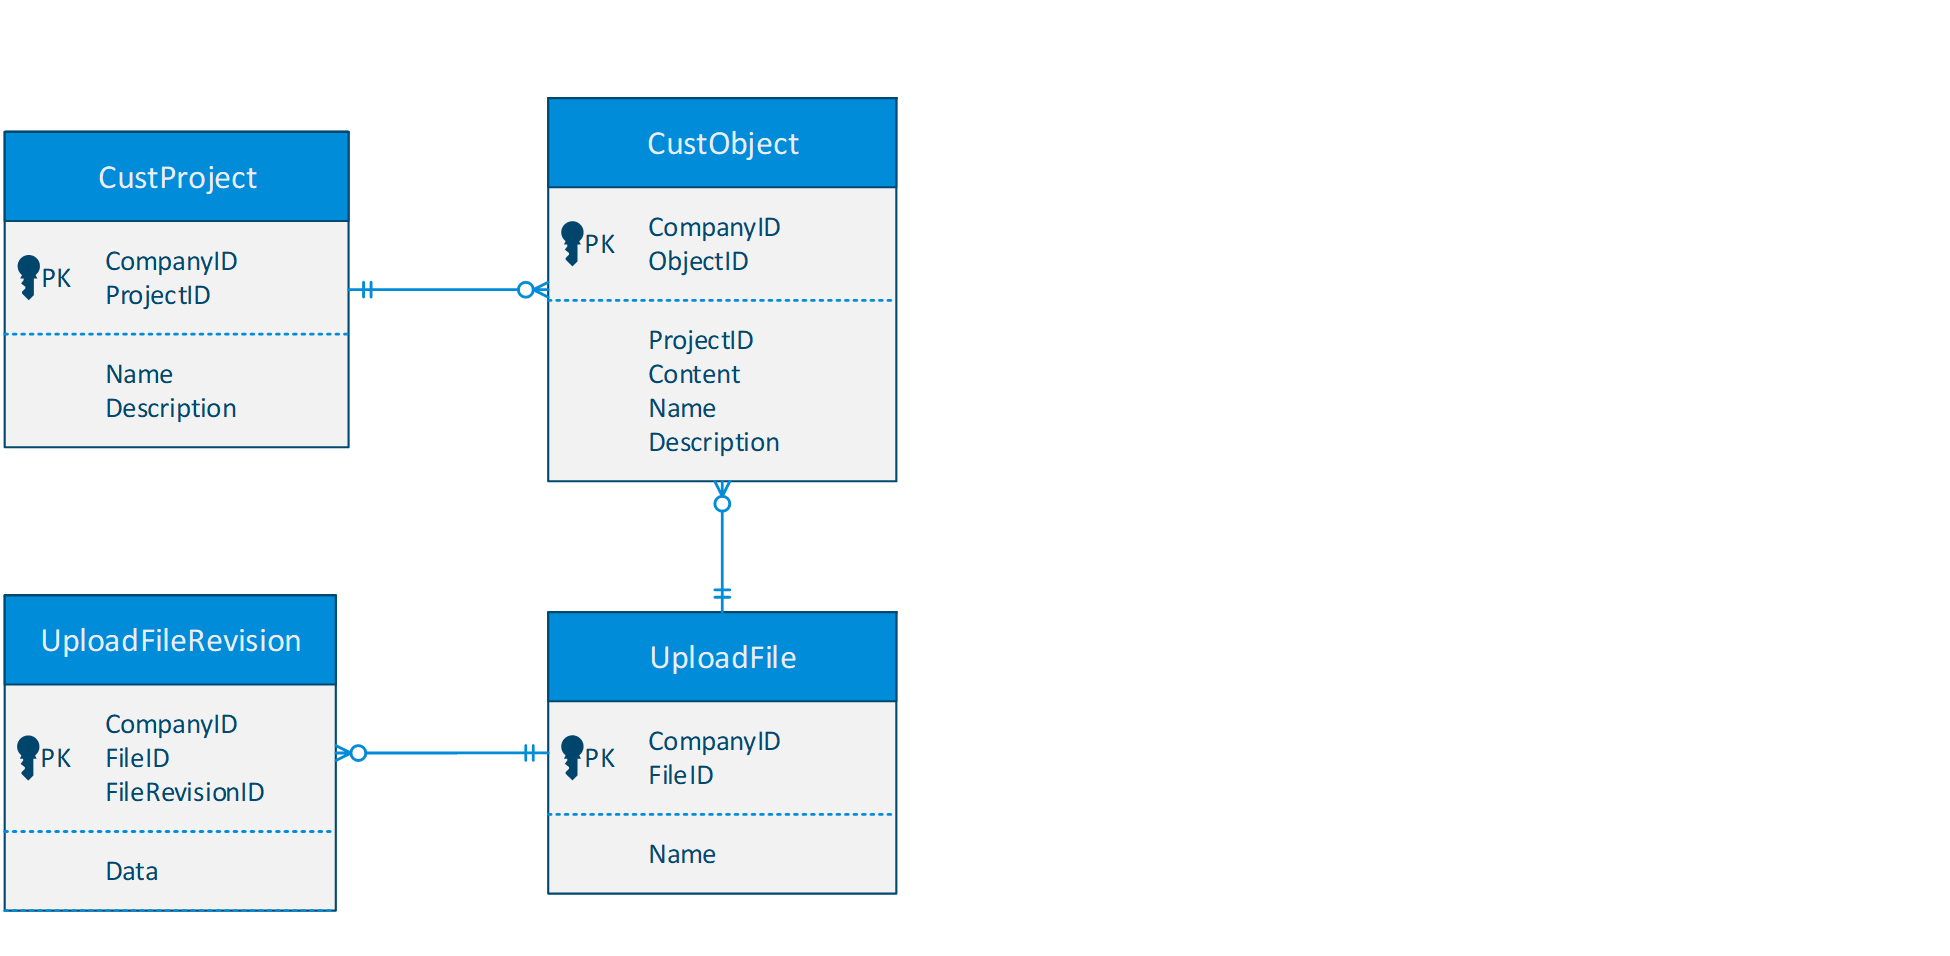
Figure 5: Acumatica db tables
In the supplied code snippets you may notice some helper functions used for building and parsing file path, and reading file content. These methods are included in the associated GIST links. Some of the file references stored in the Acumatica db tables require some parsing and conversion for such and I enlisted helper methods for these reusable patterns and processes.
5. Summary
I hope you find these suggestions for including a README file in your customization projects useful, and I’d love to hear from you and how you’ve put it into use or adapted it for your own needs. I recommend adding the suggestions described in this article to your own best practices for customization packaging. The efficiency gained by easily referencing the features and essential information for your customizations is substantial and valuable. When customizing the Customization Projects screen or customization data, please be aware that if any errors occur, there could be consequences in accessing any customization projects. However, even if you don’t customize for this purpose, please add a README file manually. Customizers and clients will thank you.


