Solved

How to have two Forms embedded in a single screen as a TabItem and show full toolbar for each TabItem

  • 21 July 2023
  • 7 replies
  • 122 views

Userlevel 6
Badge +3

On my custom screen, I have a “dummy” form that includes a tab with two tab items.  Each tab item has it’s own form.  Each form is essentially a screen with it’s own DACs.

I COULD create two separate screens, one for each tab item, but I want to include them on one screen.

For a single form I would add the primary DAC to the graph declaration to add the full toolbar to the form (cancel, save, new, Next Last etc.)

However, each tab is a unique form.  

I want to show this in each tab item.

To reiterate, this graph does not have a true “primary” DAC.  The main form just has a dummy primary DAC (PXFilter<MasterTable> MasterView;).  I’ve hidden the standard buttons for the main form.

This is the aspx for this screen.

<%@ Page Language="C#" MasterPageFile="~/MasterPages/FormTab.master" AutoEventWireup="true" ValidateRequest="false" CodeFile="IC102000.aspx.cs" Inherits="Page_IC102000" Title="Untitled Page" %>
<%@ MasterType VirtualPath="~/MasterPages/FormTab.master" %>

<asp:Content ID="cont1" ContentPlaceHolderID="phDS" Runat="Server">
<px:PXDataSource ID="ds" runat="server" Visible="True" Width="100%"
TypeName="AdvancedRefrigeration2023R1.ICSPricingCalculator"
PrimaryView="MasterView"
>
<CallbackCommands>

</CallbackCommands>
</px:PXDataSource>
</asp:Content>
<asp:Content ID="cont2" ContentPlaceHolderID="phF" Runat="Server">
<px:PXFormView ID="form" runat="server" DataSourceID="ds" DataMember="MasterView" Width="100%" Height="100px" AllowAutoHide="false">
<Template>
<px:PXLayoutRule ID="PXLayoutRule1" runat="server" StartRow="True"/>
</Template>
</px:PXFormView>
</asp:Content>
<asp:Content ID="cont3" ContentPlaceHolderID="phG" Runat="Server">
<px:PXTab ID="tab" runat="server" Width="100%" Height="150px" DataSourceID="ds" AllowAutoHide="false">
<Items>
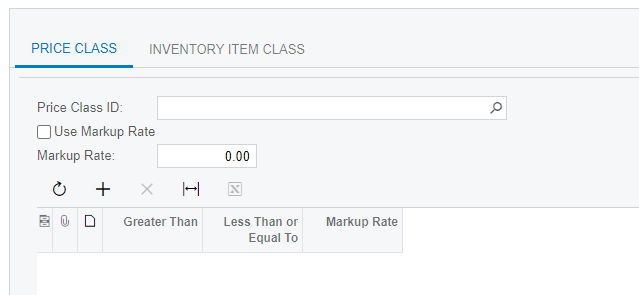
<px:PXTabItem Text="Price Class">
<Template>
<px:PXFormView DataMember="PricingClass" runat="server" ID="CstFormViewPriceClass" >
<Template>
<px:PXSelector Width="350" runat="server" ID="CstPXSelector6" DataField="PriceClassID" ></px:PXSelector>
<px:PXCheckBox runat="server" ID="CstPXCheckBox7" DataField="UseMarkupRate" ></px:PXCheckBox>
<px:PXNumberEdit runat="server" ID="CstPXNumberEdit13" DataField="MarkupRate" />
<px:PXLayoutRule runat="server" ID="CstPXLayoutRule5" StartRow="True" ></px:PXLayoutRule>
<px:PXGrid SkinID="Details" Height="250" runat="server" ID="CstPXGridPriceClass">
<Levels>
<px:PXGridLevel DataMember="PriceClassMatrix" >
<Columns>
<px:PXGridColumn DataField="FromPrice" Width="100" ></px:PXGridColumn>
<px:PXGridColumn DataField="ToPrice" Width="100" ></px:PXGridColumn>
<px:PXGridColumn DataField="MarkupRate" Width="100" ></px:PXGridColumn></Columns></px:PXGridLevel></Levels></px:PXGrid></Template></px:PXFormView></Template>
</px:PXTabItem>
<px:PXTabItem Text="Inventory Item Class">
<Template>
<px:PXFormView DataMember="PricingINItemClass" runat="server" ID="CstFormViewINItemClass" >
<Template>
<px:PXSelector Width="350" runat="server" ID="CstPXSelector10" DataField="PriceClassID" ></px:PXSelector>
<px:PXSelector Width="350" runat="server" ID="CstPXSelector12" DataField="ItemClassID" ></px:PXSelector>
<px:PXCheckBox runat="server" ID="CstPXCheckBox15" DataField="UseMarkupRate" />
<px:PXNumberEdit runat="server" ID="CstPXNumberEdit11" DataField="MarkupRate" ></px:PXNumberEdit>
<px:PXLayoutRule runat="server" ID="CstPXLayoutRule8" StartRow="True" ></px:PXLayoutRule>
<px:PXGrid Height="250" SkinID="Details" runat="server" ID="CstPXGridINItemClass">
<Levels>
<px:PXGridLevel DataMember="INItemPriceClassMatrix" >
<Columns>
<px:PXGridColumn DataField="FromPrice" Width="100" ></px:PXGridColumn>
<px:PXGridColumn DataField="ToPrice" Width="100" ></px:PXGridColumn>
<px:PXGridColumn DataField="MarkupRate" Width="100" ></px:PXGridColumn></Columns></px:PXGridLevel></Levels></px:PXGrid></Template></px:PXFormView></Template>
</px:PXTabItem>
</Items>
<AutoSize Container="Window" Enabled="True" MinHeight="150" />
</px:PXTab>
</asp:Content>

Is there a way to add the toolbar to each tab item as they are essentially two distinct forms?

I’ve tried manually editing the aspx and remove the tab items and have multiple “<asp:Content ID="cont3" ContentPlaceHolderID="phG" Runat="Server">” but I have errors with duplicate ContentPlacehoderID’s and if I change that ID to a different one, it is not a recognized ID.

Or, do I just have to do two screens and live with it?  It would be easy to do them separately, but it is more user friendly to have these two options in one place.

icon

Best answer by aaghaei 21 July 2023, 19:59

View original

7 replies

Userlevel 6
Badge +4

Hi @Joe Schmucker 

I suggest you submit a ticket to Acumatica Development team.

From my point of view Tabs in a form contain data related to the main record of the header form. When you interact with the fields on each tab, all info is stored in the cache (respective entities) and when you save, the whole action is wrapped up in a transaction affecting all those entities. Therefore, you just only need your navigation and action buttons on the main toolbar.


Userlevel 6
Badge +3

@Leonardo Justiniano Thanks for the input.  I think I’m just going to make two separate screens.  Putting all the code for all the events for “two screens” in one graph will be messy anyway.  I think what I am trying to do is not feasible in the framework.  Even if I did get something working, it would probably just be a boat load of workarounds.

One of the main reasons I wanted to put them on one screen is that if a user uses a markup rate at the Price Class level, it will supersede any entries in the Price Class / Item Class level.  By having them on one screen, I could put information in one place and have everything in one container. 

I’m going to mark your reply as the answer as I don’t think there is a way to do it without a complicated mess.  If I don’t mark an answer for this, Chris H. will get mad at me.  :-)  

Have a great weekend and thanks for taking the time to give your insights.

Userlevel 7
Badge +8

@Joe Schmucker 

depending on how the fields are different from each other in your two tabs, you might have been able to create one Table/DAC for both of them and add a field to distinguish records from each other in the public view you are going to use for each tab. In fact you would have one DAC but two views and then you could have the same DAC is your primary requiring one set of Actions. 

Hi @Joe Schmucker , you can create two separate screens and link them using the side panel

Userlevel 6
Badge +3

@aaghaei  I actually started on that path, but I found road blocks.  I had an issue in that you can have both a Price Class pricing Matrix and a Price Class - Inventory Class ID matrix. When the calculation is triggered, I look for existence of records in a particular order and evaluate settings on the records.  I’d have to show a flow chart as it is pretty complicated.

I had issues with my key fields on the primary DAC where the Inventory Class ID field would have to allow NULLS.  One Price Class ID can have it’s own “fallback” pricing matrix if there is no Price Class - Item Class matrix. When you click “Save” on the primary DAC, it MAY or MAY NOT need to save multiple price matrices.  That is why I broke it out into separate tables.  For example, if in the “header”, you select a Price Class ID, you could have a price matrix for the price class that is used when there is no Price Class - Item Class combination.  I tried to use a header on the top of the form, and two tabs, one for the general price class matrix (grid), and another tab for price class - item class combo (grid).  For the Item Class ID grid, I needed it to be embedded into a Form as you have another field (Item Class) to select that would have nothing to do with the primary DAC. I would need to use filters for the header form and the tabs.  It got complicated and I couldn’t get it to work.  

I’m off to a funeral, but I will let my brain chomp on it for a while.  

Thanks for the input.  I will re-think this and let you know if I can find a way to make that work.

Userlevel 6
Badge +3

@ivankolesnyk58 To be honest, I’ve never done anything with Side Panels.  Let me look into that!

Userlevel 6
Badge +4

@ivankolesnyk58 To be honest, I’ve never done anything with Side Panels.  Let me look into that!

This is a good option Joe.

This can help:

Adding Side Panel to Data Entry Screens - Acumatica – Tips, Tricks and Components (greytrix.com)

Adding Side Panels to Data Entry Screens • Everything Else • Acumatica User Group Forums (augforums.com)


Reply


About Acumatica ERP system
Acumatica Cloud ERP provides the best business management solution for transforming your company to thrive in the new digital economy. Built on a future-proof platform with open architecture for rapid integrations, scalability, and ease of use, Acumatica delivers unparalleled value to small and midmarket organizations. Connected Business. Delivered.
© 2008 — 2024  Acumatica, Inc. All rights reserved