
I wanted to share some code with you all, as I have not seen too much about adding custom actions into the SO Quick Process workflow.
We have a custom requirement to set a shipment as delivered before it can be invoiced. I have added the workflow status of Delivered to Shipments, and updated the prepare invoice action to require the status of Delivered, and not Confirmed. We may have shipments picked (confirmed) and sitting before either truck delivery to the customer, or hold for pickup.
My workflow customization works great, but we want to add the ability to set it as delivered on the SO quick process screen if it is a “counter sale.” Customers would walk into one of our stores and purchase items and walk out with their products. We use shipments for our DOT paperwork and other customizations, so it is not a order of type cash sale, but a normal sales order. I was able to add a “Set Delivered” action to the quick process, and the workflow has been working flawlessly.
This is done by customizing the SOQuickProcess DAC through a Cache Extension.
First, a new property, UsrHWSetDelivered is a boolean field added to the SOQuickProcessParameters table.
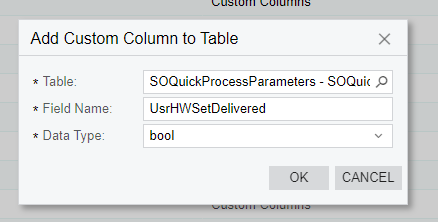
Next, we will add the DAC extension to the SOQuickProcessParameters table so we can define our step. You will add a standard boolean field delcaration to start. You do not need to add the PXUIField attribute to this.
#region UsrHWSetDelivered
[PXDBBool]
public virtual bool? UsrHWSetDelivered { get; set; }
public abstract class usrHWSetDelivered : PX.Data.BQL.BqlBool.Field<usrHWSetDelivered> { }
#endregion
Next, in the DAC class that defines the BqlField (usrHWSetDelivered), we must setup what the step does.
public abstract class usrHWSetDelivered : PX.Data.BQL.BqlBool.Field<usrHWSetDelivered>
{
    public class Step : PXQuickProcess.Step.Definition<SOShipmentEntry>
    {
    }
}
We declare a class inside of the field of type QuickProcess.Step.Definition<TGraph> where TGraph is the graph that the step’s action will be executed against. In this case, the Shipment record will have the delivered action pressed, so SOShipmentEntry graph will be passed as the type.
You can override Success and Falure (Processing) messages with your own text. The failure message appears when there is an error. New documents created will show on the processing screen if there are no errors, with a link. You can surround the text, such as <Shipment>, and it will add the link over the shipment. If you use <*>, it will show whichever document is created. For this step, such as the confirm shipment step, it will not show any success messages during the process, only error messages if it fails.
public class Step : PXQuickProcess.Step.Definition<SOShipmentEntry>
{
    public override String OnSuccessMessage => OnDeliverShipmentSuccess;
    public override String OnFailureMessage => OnDeliverShipmentFailure;
    public const string OnDeliverShipmentSuccess = "Shipment is delivered";

    public const string OnDeliverShipmentFailure = "Delivering shipment";
}
Finally, you would declare the constructor for the step, passing the action to execute when the step is processed.
public Step()
        : base((Expression<Func<SOShipmentEntry, PXAction>>)((SOShipmentEntry g) => g.GetExtension<Delivery.SOShipmentEntry_Extension>().setDelivered))
This passes SOShipmentEntry to the step, and tells it to first get my custom extension and then execute the setDelivered action. This parameter is the PXAction, and not the function that executes the code. If you were going to execute an action that is defined on the primary graph, such as Printing the Pick List, you would add the following:
public Step() : base((Expression<Func<SOShipmentEntry, PXAction>>)((SOShipmentEntry g) => g.printPickListAction))
Once we define what the step is doing, we can move onto the attributes which define how the step is processed.
The first attibute is IsBoundTo, which ties the action that we declared in the class to this step. We also tell it that this step is bound to a database field, and give it a display name.
[PXQuickProcess.Step.IsBoundTo(typeof(usrHWSetDelivered.Step), false, DisplayName = "Deliver Shipment")]Next, we can tell it what steps it requires. This ensures that it is enabled and executes only when the required step is checked. We want this to execute after the shipment is confirmed.
[PXQuickProcess.Step.RequiresSteps(typeof(SOQuickProcessParameters.confirmShipment), new Type[] { })]Next, we can declare when this step is applicable. Not all order types will require this step. I have this set to order type behaviors of SO, which has the shipment process. This will not be available on other order type behaviors.
[PXQuickProcess.Step.IsApplicable(typeof(Where<Where<BqlOperand<Current<SOOrderType.behavior>, IBqlString>.IsEqual<SOBehavior.sO>>>))]Finally, we need to make sure it is placed in the proper order. Per our workflow, this action must be pressed before the shipment is invoiced.
[PXQuickProcess.Step.IsInsertedJustBefore(typeof(SOQuickProcessParameters.prepareInvoiceFromShipment))]Our step is now added, but our work is not done. By default, the prepare invoice action requires only that the shipment confirmation step is checked. We need to move it along in our workflow to happen after set delivered is checked. We do this by appending an attribute to the other step.
[PXMergeAttributes(Method = MergeMethod.Append)]
[PXQuickProcess.Step.RequiresSteps(typeof(usrHWSetDelivered), new Type[] { })]
public virtual bool? PrepareInvoiceFromShipment { get; set; }
Here is the final code of our DAC extension
public class SOQuickProcessParametersExt : PXCacheExtension<SOQuickProcessParameters>
{

    #region UsrHWSetDelivered

    [PXQuickProcess.Step.IsBoundTo(typeof(usrHWSetDelivered.Step), false, DisplayName = "Deliver Shipment")]
    [PXQuickProcess.Step.RequiresSteps(typeof(SOQuickProcessParameters.confirmShipment), new Type[] { })]
    [PXQuickProcess.Step.IsApplicable(typeof(Where<Where<BqlOperand<Current<SOOrderType.behavior>, IBqlString>.IsEqual<SOBehavior.sO>>>))]
    [PXQuickProcess.Step.IsInsertedJustBefore(typeof(SOQuickProcessParameters.prepareInvoiceFromShipment))]
    public virtual bool? UsrHWSetDelivered { get; set; }
    public abstract class usrHWSetDelivered : PX.Data.BQL.BqlBool.Field<usrHWSetDelivered>
    {
        [PXLocalizable]
        public class Step : PXQuickProcess.Step.Definition<SOShipmentEntry>
        {
            public override String OnSuccessMessage => OnDeliverShipmentSuccess;
            public override String OnFailureMessage => OnDeliverShipmentFailure;
            public const string OnDeliverShipmentSuccess = "Shipment is delivered";
            public const string OnDeliverShipmentFailure = "Delivering shipment";

            public Step()
                : base((Expression<Func<SOShipmentEntry, PXAction>>)((SOShipmentEntry g) => g.GetExtension<Delivery.SOShipmentEntry_Extension>().setDelivered))
            {
            }
        }
    }
    #endregion

    [PXMergeAttributes(Method = MergeMethod.Append)]
    [PXQuickProcess.Step.RequiresSteps(typeof(usrHWSetDelivered), new Type[] { })]
    public virtual bool? PrepareInvoiceFromShipment { get; set; }


}
Now, we must make sure we add the new step into the UI.
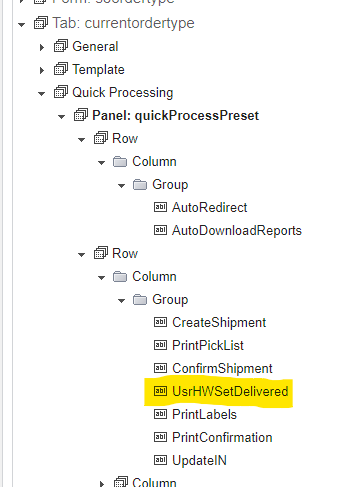
First, add the step to the Order Types(SO201000) screen and place it in the proper order. Ensure to set CommitChanges to True.
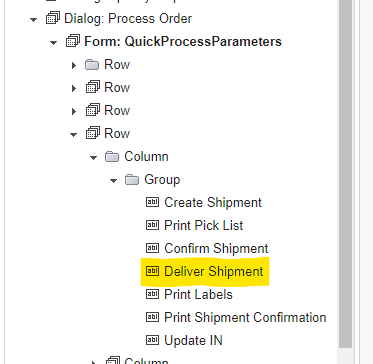
Next, add it to the Sales Order Entry (SO301000) screen. This will be under the dialogs, then the Process Order dialog. Ensure to set CommitChanges to True.
Once this is published, we can go back to the order types screen to enable the step. We may have to uncheck other steps to get deliver shipment to be checked, but this only will be need to be done once. Our final form on the SO type will look like this:
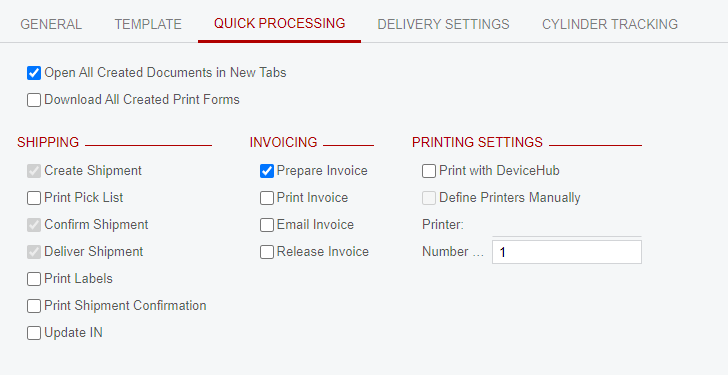
With this, we can create a sales order, and see what our quick process looks like:
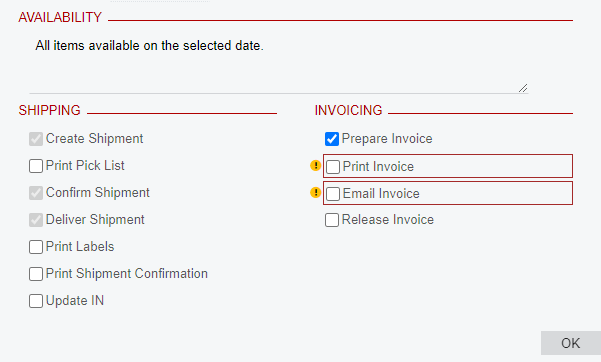
The order goes through to invoice, following the workflow changes that I have made to require delivery before invoicing. Let me know if you have any questions on this, or if you are having issues getting your quick process steps added. I hope this helps!

